Tuesday, October 12, 2010

My nekked kitchen windows

Sooo…do you remember that little bitty kitchen project I started ohhhhh…five months ago? With the help of some free Amex points, I was able to take the simple changes I had planned for the space and amp them up just a tad. :)

Well, the summer-o-lazy hit, and then the closer we got to fall, the more obsessed I got with decluttering, so the kitchen has had very little DIY action lately. I’m finally getting the urge to get it finished up – especially since there’s not really that much left to do anyway.

I do have one thing I’m stuck on though – our window treatment-less windows. My plan has always been to redo the no sew roman shades I had up before – I absolutely LOVED them, but the fabric was a bit heavy for the updates I made to the kitchen.

But the further I got into the changes to this space, the less I wanted to cover the windows again!

I started the window redos by reinstalling molding around the windows. I had done this once before a couple of years ago, but they never looked quite right because I never painted everything out white:

bay window before

I ended up stealing that molding for a family room wainscoting project a year or so ago, so they were trimless again for some time. Nothing is safe with me – I’ll pull it right off the wall if it will save me some cash.  :)

This time, I installed the trim again, using this technique – the molding is just the right width and matches up with our window sills perfectly:

I painted out everything in a glossy white paint, to give the illusion of window casings:

It’s the thrifty man’s version of beautiful molding around the windows. :) Not nearly as thick as I’d like, but I do love the result!

My main mission with this kitchen redo was to brighten up the space. It was never really dark and dreary, but I was craving a change after six years. My original plan was to paint our bay window area an apple green to go with the accent color in the room.

But we all know how the apple green went. :) NOT GOOD. Bad. Very, very bad.

So I decided to just paint the whole area out in the wall color that goes throughout our great room – Sisal from Ralph Lauren. BEST. color. ever. (Home Depot doesn’t carry the RL line anymore, but I think they can still find the formula for it! I get it matched to Behr paint.)

It brightened up the space so much, and I swear it made the area feel more spacious too!

The before, with the olive green bay window:

kitchen before

The after, with the Sisal walls, trimmed out windows and a few other new additions:

bay window after

But here comes the dilemma – I started making new window treatments a couple of months ago and they were a colossal FAIL. In the end, I think it was the fabric I chose. It was gorgeous, but too bland for the space. There wasn’t enough contrast -- everything was blending together.

And now that we’ve lived without treatments in this space, I have to say…I’m quite loving it!

FOR SHAME, I know! I’m usually a decorating, window treating, cover those windows, fanatic!!

But with the changes, this:

Now looks like this:

IMG_0793

I mean, look at all that beautiful natural light! (I know, the before pic was taken at night, but just nod your head and agree with me.)  :)

Oh yeah, and the unplanted basil, honkin’ cat water bowl (with a fountain, GAH) and Halloween stickies on the window are the perfect touch. I know you’re jealous.

When I redid our backsplash, I took the beadboard up high around the window over the sink, and I absolutely love how it looks with the trim around the window:

beadboard backsplash

On a side note -- since all our other herbs died, I added a little Halloween to the sill by filling my Ball jars with candy corn:

candy corn jars

And sticking a little orange LED candle in each one:

IMG_0782

Adorable. And I don’t like candy corn…so absolutely ZERO temptation. That is what I’m talkin’ about.

Anyhoo…I can’t believe it, but I don’t want to cover those windows! Is that crazy? Good LORD, is that even allowed?? Will the decorating police come and find me?

When we moved in, I put treatments up thinking I would close them often, but we’ve found little need to do that. Because of the way our house is situated, we don’t really need them for privacy.

I do think a bamboo roman shade would look pretty fab above that kitchen sink – especially up against all that white trim. But the bay windows are super skinny, so finding matching shades for those would be hard. (And expensive.)

So what do you think? Cover my nekked windows? Leave them alone? Just do a little somethin’ somethin’?

Are you a window treatment fool like me? Or do you prefer your windows completely uncovered? I think I may have crossed over. :)


Thanks to this week’s sponsor!

forloveorfunnybutton125

Sunday, October 10, 2010

Our (tiny!) fall porch

We have what is probably the teeniest porch EVER. We didn’t even think about it when we picked out this house though – we loved the exterior so much. It’s another one of those things you realize later…it would be nice to have a porch to sit and rock on. And maybe to decorate.  :)

But I have found ways to make it work for each season, and fall and Christmas are of course, my favorites. It’s these times of year that I quite love our little porch, because little changes make a BIG impact.

I showed you my Dollar Tree wreath a few weeks ago:

Not many of you believed our door really isn’t blue – it just photographs that way close up. ;)

My tried and true addition to the porch are my corn husks:

corn husks

I mean really – you couldn’t get more fall than these!! I get bunches of them at a local nursery and I’ve seen them sold for $5.50 to $7 a bunch. (At least around here, where the corn isn’t hard to come by!)

On a recent True Value trip, I about squealed when I saw the HUGE mums they had:

They were only $5 EACH! I could not believe it! Plants this big are at least $15, usually more.

They are just about to burst open – any day now!

One of the items I took from my father-in-law’s house was his American flag:

He immigrated to this country 60 years ago and became a U.S. citizen. I’ve always been so proud of him for that, and he was so proud to be an American.

The beautiful new flag was the perfect finishing touch for our fall porch:

Oh, and the pumpkins from our weekend trip to the patch don’t hurt! I absolutely fell. in. love. with the green pumpkins. :)

I usually plant mums in the window boxes, but this year I was taken with the kale:

We’ve gotten SO little rain over the past few months, so these beauties should hold up well. I stuck some (fake!) pumpkins in with them, and I absolutely love how full and pretty they are!

And a cutie patootie peeking out sure helps too:

OH, be still my heart. :)

Our itty bitty porch is so easy to make over for the holidays – just a few additions make a HUGE difference:

Just in time to string the purple and orange Halloween lights everywhere!

And speaking of Halloween -- no worries, I move everything off the steps and porch that night, so there’s plenty of room for the kiddies. :)

So, do you decorate your porch for fall? Do you have an itty bitty porch like ours, or a big one? If you tell me you have a porch swing, I’m officially, totally jealous. :)


*I was one of the bloggers selected by True Value to work on the DIY Squad. I have been compensated for my time commitment to the program as well as my writing about my experience. I have also been compensated for the materials needed for my DIY project. However, my opinions are entirely my own and I have not been paid to publish positive comments.*

Thank you to this week’s sponsor!:

Giveaway winner and updates

Well hello there!! Hope you had a fantastic fall weekend!

The winner of the Deeply Fabulous giveaway is (randomly drawn) comment #4 – Terrae01 of Minnesota!:

[head+shot.bmp]

Congrats! Give me a holla {simplehomeinteriordesign (at) gmail (dot) com} and I’ll get you in touch for your two cutie bags!!

I wanted to mention a couple updates as well – you may have noticed my little consult tab up above is missing, and that’s because as of a couple of months ago, I decided to stop taking on anymore consultations.

I had to let go of something, and that was it. I do have good news though – I’m working with a site that will offer (even better!) online consults for a really fantastic price. I’ll be announcing that very shortly!

If you purchased a consult from me and never sent in your photos, please shoot me an email!

Also – I am trying SO HARD to respond to all of your lovely emails, but I’m not always so successful. :) I am not complaining – I read every single one and love them all! But when there’s a specific question that’s asked numerous times, I’ll be adding it to my FAQ tab. You can find it at the top of my site, on the right, or by clicking here.

I’m hoping this will help get the info back to you, even if I’m not able to answer you personally! (Which I still try to do.)

I’ll be back shortly to share my porch decked out for fall! :)


Thank you to this week’s sponsor!:

deeply fab 125 px sq ad[4][1]

Thursday, October 7, 2010

My great fall clean up

Well, Stink Eye Sister went and messed up all my grand plans. I was all set to hire her as my assistant, and she went and got another “real” job.

WHAT-ev.

Seriously, would you rather be at my beck and call, helping my clean my house, work on house projects and running my errands, or would you rather have a cushy, well-paying desk job??

WHAT-ev. I KNOW. I would totally pick the cushy job too. But I am SO much more fun!!

Grumble.

;)

Anyhoo – she starts her new job soon, so I have taken her prisoner offered her money if she would spend her last days of freedom helping me get our house in order…for once and all.

Like everyone, when January comes around every year, I’m on a mission to to declutter and clean our whole house. I started off with a bang – earlier this year, I took three (SUV!) car loads to a local shelter.

I’ve kept going here and there throughout the year decluttering, but then something happened that quite literally changed my life.

We lost my father-in-law a couple of months ago, and the process of going through his home completely changed me. We were so overwhelmed in our mourning, but at the same time, we have had to address a house full of memories, a lifetime of things. For the past few weeks, I’ve focused on decluttering with a new outlook.

All I’ve been able to think of while in the process is how I don’t want my stepdaughter and our son to have to do go through all of the STUFF in our house when we’re gone one day. I picture them in our home, and I think about their grief, and I know the very last thing they’ll want to be burdened with is our STUFF.

Like I said, it’s changed my life. I haven’t shopped at a Goodwill for more than two months. I shop completely differently now. And it has been so much easier to let go of the things we don’t need.

You all know how much I love STUFF. I just don’t want the stuff we don’t need, use or treasure to weigh down our lives.

(And yes, God willing, it will be a LONG time before our children would have to go through our home, but that thought is still stuck in my head and it’s never leaving.)

So…with an extra set of hands for two weeks, I came up with a plan. I wanted to tackle the problem areas of our home that are kind of bigger than life – and use the help while I had it.

First up was our pit of despair ummmm…garage.

I showed you how it looked last year after I decluttered:

Pretty darn good huh?

Uhhhhh. Let’s just say it was back to this:

gross

OK, not quite that bad, but pretty bad. Like, four carloads to Goodwill and three large garbage bins FULL -- bad.

UNREAL.

HOW in the WORLD do we accumulate so much CRAP??? It is blowing my mind.

We’re thisclose to being done with this project, and I can’t wait to show you. It will never cease to amaze me how a decluttered space seems to make our whole life go smoother. I love it.

My plan for next week is to address our deck. It was so smokin’ hot this summer, it was insane. We spent so little time out there, which really bummed me out because we so enjoyed it so last summer when we made it into this beautiful space:

deck

Gorgeous, eh?

Well, now it looks like this:

Sanford and Sons

Wha wa wa wa…wha wa wa wa wa wa waaaa…

Sing it with me!

HA! Lemme just tell you -- our neighbors LOVE US.

And oh yes, I will show you the before pictures. I’m not suffering through this alone. :)

And finally…if there’s time…I will submit my sister to the messiest space of all -- our master closet.

It’s so bad I couldn’t even bring myself to take a picture to show you.

THAT BAD.

It’s so bad that when I searched “messy closets” online, I couldn’t even find a picture of a closet that was messy enough to even compare it to.

Ohhh…you think I’m kidding. Bless your hearts.

You will see. After I’m done of course. :)

So that’s my plan for the Great Fall Clean Up at the TDC house.

I only have one more week of my sis’s help. I’m under the gun. But I am determined to get our WHOLE house under control before the holidays hit. And this time, they will stay that way – I have absolutely no doubt in my mind.

And just so you don’t think I’ve completely lost my organizing mojo, our linen closets still look like this:

linen closets

And the space under my bathroom sink still looks like this:

clean

So BOO to the YAH. I still go it. :)

Is there a space that is putting you over the edge? Have you been avoiding it all year? Can you walk into your closet to get dressed every morning without risking your life?


**Putting Sister to Work Disclaimer**

At no time has Stink Eye been subjected to poor work conditions or held against her will. She has been fed well with McDonald’s fries and other drive through goodness. She is also being paid handsomely for her time by TDC and Mr. TDC.

No sister’s have been harmed in the decrapifying of my house.


Thank you to this week’s sponsor!:

Deeply Fabulous

Tuesday, October 5, 2010

Falling up the stairs

Last year, I was itchin’ to tackle a certain project for MONTHS. In fact, I researched it for quite some time – and in January I finally got up the courage and went after it…and I’m SO glad I did. :)

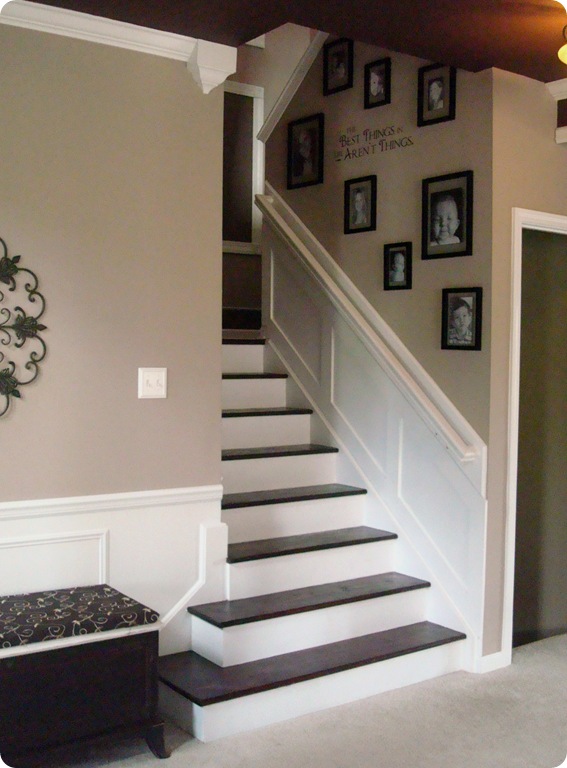
That project was ripping the carpet off of our stairs and staining/painting the wood underneath. Hands down my favorite transformation in our house. Because we were lucky and had beautiful treads under that carpet, the whole project only cost $30 – the investment (like usual) was in my blood and sweat:

Like I said, I had been dreaming about the wood stairs for quite a while. So long that I bought the Martha Stewart mice silhouettes on clearance last fall, knowing I would use them on the steps someday. I was SO excited to pull them out of the fall stash this year! Yippeeee!

I knew I wanted to add a little somethin’ extra along with the little mice, so I used some random magazine photos as inspiration and decided to do an arrangement of itty bitty pumpkins along the side of the steps:

Because I’ve spent so little on fall decor this year, I splurged on real pumpkins. For a little extra PADOW, I added a little votive holder to each step as well:

Don’t worry – there’s no flame. :) I only use the LED votives anymore, and these are two for a buck at Dollar Tree. LOVE THEM. They even have the little flicker and look so real.

Do you see how the pie pumpkins are positively glowing? I used Stephanie Lynn’s technique for preserving pumpkins (petroleum jelly) and they are GORG!!

The Bub and I arranged our mice here and there along the risers and let. me. tell. you. – they are stinking CUTE!!:

IMG_0577

This is the only time of year I can stand spiders and mice. :)

A couple of months ago, I showed you how I finished off the stair redo by adding the detail along the side of the staircase using mdf:

After that post, my friend Layla, being the brilliant mind that she is, (a brilliant mind with Photoshop), sent me a picture with a potential change to the staircase – one I was considering for awhile, so it was AWESOME to see how it would look:

It was subtle – just changing the color of the railing. She also changed the brass fixtures to a brushed nickel, which looked so sharp!

It totally pays to have friends with Photoshop. :)

I’ve been meaning to make this little change since, but it was only when I starting falling up the stairs that I decided to just do it already, and I’m SO glad I did!!:

I sprayed the hardware in oil rubbed bronze, to work with the rest of the house. (I just took them off, sprayed with primer, then the ORB.)

The handrail got a quick sanding, then two coats of brown paint, leftover from our dining room walls. I put a coat of poly on top and plan to add one more.

I don’t know what took me so long to make the change – the dark color looks fantastic!:

A reminder of how it looked before, with the white rail:

Notice the difference in the picture quality too? ;) I LOVE my new camera!!

Pretty crazy how the color matches exactly what Layla suggested too!:

The pumpkins fit perfectly into that space under the handrail – we haven’t had any issues with them in the way at all. Now let’s just hope they hang in there a couple more months, when the Christmas decor will come out. (OH the possibilities!!)

I love how our staircase has turned into another space I get to decorate! :) Martha Stewart mice

Tired of seeing my stairs yet? (Don’t answer that.)

Adorable. I big fat love ya Martha.

Especially at half off.  :)

**Be sure to check out all of the inspiration at the Before and After Party!

**I got my mice from Michaels, but here’s a link on how to do them on your own!

(Adding this to Susan’s Met Monday!)

Thank you to this week’s sponsor!:

deeply fab 125 px sq ad

Monday, October 4, 2010

Before and After Party: Buh bye ceiling fan

Hello there! Welcome to the October Before and After Par-tay!

So…I got nothin’ against ceiling fans. Really. We have three of them in our house. Well – now two. :)

We’ve always had one in our bedroom -- we hand picked it when we built the house:

before

And pretty much since the first week we lived here, I’ve wanted to take it down. :)

We used to use it fairly often, but over the past few years, it’s made hubby and I both feel like we have a cold the next day if we have it on all night – so we haven’t used it in a long time.

So…for a few months now I’ve been planning to replace it with a gorgeous new chandelier. But I have no gorgeous chandelier. DANG!!

And the Dave Ramsey plan (that’s WORKING, by the way!!) makes it so we need to pick and choose our splurges, so it wasn’t really on the horizon anytime soon.

And then…while I was working on the basement a couple of weeks ago, I moved a light fixture I’ve had forever around about 20 times before it hit me. DUH.

Why don’t I use this?:

I got it from our local Habitat for Humanity Restore at least a year ago – maybe even longer. I didn’t know for sure where I’d use it, but it was BIG and only $22, so I just couldn’t pass it up.

I wasn’t crazy about the finish, but I figured a coat of paint would help that:

I knew I could totally make it work! Whooeee! And since I bought it forever ago, that made it FREE! According to my way of thinking anyway. :)

So I set it up in my fancy spray paint station in the garage, (a.k.a hanging it on a hook with a sheet behind it), and covered it with one coat of basic black spray paint from my local True Value:

If you’re like me, you get spray paint finger pretty easily. To prevent my hands from turning into claws, I’ve used a few different spray paint handles over the years. But they never work great -- I cannot tell you how many times I’ve been spraying something and the can falls right out of the handle. Drives me batty!!

I saw this one at the True Value and decided to give it a try:

spray paint gun

I LOVE it! I don’t know how it’s different, but I didn’t have one issue with it. The can stayed put the whole time (and every other time I’ve used it). LOVE.

My sweet Dad came over and helped me hang this one. I had never taken a ceiling fan down before and wasn’t sure which wires would go with what. Because the light fixture didn’t come with any of the usual accessories needed, we got a crossbar to hang it:

crossbar

And a new canopy as well (that I still need to paint black!):

True Value also had some frosted bulbs that I wanted to try:

And after a quick coat of spray paint and some help from my awesome Dad, we had the new light up in record time:

Don’t you love the frosted glass on those bulbs? I think I may change out the lights in our dining room fixture to these too – I just love them. It makes the light just a bit softer.

Dad must be my good luck charm, cause this one was up in no time flat! Seriously, I think start to finish, it took us about 15 minutes.

And I LOVE it!:

IMG_0389

It’s not the blingy, crystally (word?) chandelier I’ve been dreaming of, but for now, it works beautifully. I may raise it just a tiny bit more, so it doesn’t complete with the canopy rails (which are staying because my hubby loves them).

Because it’s on a dimmer (I had the fan light on one), it’s super bright turned all the way up:

Like, surface of the sun, bright. :)

But most of the time it’s turned down:

Sigh. Dimmers rock. Try them – you won’t be sorry. (They are so easy to install – check out my post here to find out how to do it.)

So here’s this month’s before and after! The ceiling fan before:

With the previous bedding, lamps and drapes.

And the after, with the new bedding and some fab drapes for a steal at JCPenney's:

Restore light

One of my lovely readers, Missy, gave me a heads up about these drapes. The are only $12.99 each -- even for the longer lengths! I wasn’t sure the color would work, but I ordered them because of that price. Turns out the color is perfect!

They are reversible too – and the buffalo check side is gorgeous, it just was a bit too country for this room. I’m going to add a liner behind them so they are more solid during the day, and maybe a little detail to bring in some cream – not sure about that yet.

You can find the drapes here – but I think this is the only color left.

Ohhh, I almost forgot! Did you catch the Nate Berkus show today? It was “our” episode! Proof I was there:

Nate show

(I’m in the back in the purple sweater. See Rhoda next to me?)

That’s me nodding, saying “YES Nate, you are adorable. And YES I would be happy to come on your show! And YES Nate, I know I am dreaming!”

:)

I totally zoomed in on this shot…but still. COOL!

Alrighty, let’s see your before and afters! Please remember to link to your post, not your blog. I’ll keep the linky open till next Monday evening, so feel free to join in!

*I was one of the bloggers selected by True Value to work on the DIY Squad. I have been compensated for my time commitment to the program as well as my writing about my experience. I have also been compensated for the materials needed for my DIY project. However, my opinions are entirely my own and I have not been paid to publish positive comments.*