Saturday, May 31, 2014

Minimalist Living Room Interior Design 2014 Popular


 Minimalist Living Room Interior Design 2014 Popular
If someone asks where the main heart of a house? The most appropriate answer must be the living room. Why? because this is the one room of our house will be a haven of others. If there are guests who visited our dream house, then we will allow them to sit in the living room and menjamunya.
Minimalist Living Room Interior Design
A person can also assess the contents of a home simply by seeing her living room alone, if his living room attractive and friendly in the eyes, then it is likely that the contents of the house are also interesting. And now, as by emerging gait minimalist house, the higher the public's curiosity about the living room interior design is minimalist.
Minimalist Interior Living Room
Minimalist Living Room Interior Design

The living room can be both beautiful and comfortable design if its interior design is very supportive. So, if you want to beautify the living room of your minimalist, it is not wrong if you have to look at some examples of minimalist interior design living room in this article as a reference material that may be able to generate great ideas in the brain so that you will have plenty of inspiration to decorate living room at home.
Minimalist Living Room Interior Design

By having a living room minimalist unsightly, the guests who visit your home will also give a positive perception of your dwelling. They will assess that your home is a comfortable home to live in and can bewitch people who see it because it has a high aesthetic value.
Minimalist Living Room Interior Design

And now it is time for you to interpret the soul as well as your personality through interior design minimalist living room suitable for a house that you live in does not lose identity and visiting guests will feel comfortable and happy with the interior living room in your house attractive.

Friday, May 30, 2014

My favorite projects

Hello and happy Friday! It’s the unofficial start of summer for us – I’ve never been so ready!

I can’t believe it’s the end of May already – time is passing by so fast. Fall will be here before we know it. (If you saw my FB or Instagram this week you know Hobby Lobby already thinks it’s here.) ;)

It’s been a few months since I rounded up some of my favorite recent posts so I’m combining March, April and May into this one!

I got a ton done in the master bedroom earlier this year – it’s coming along so well! The first big project was beefing up the baseboards without taking off the old ones:

thicker baseboard without taking off the old

I LOVE THEM. It makes a huge difference in the room!

I continued the chunk with new DIY craftsman door trim as well:

craftsman door trim

Sigh.

Because there wasn’t enough new wood on the walls, I covered the wall behind the bed with a wall treatment in a dark gray:

gray wall behind bed

I’m SO pleased at the progress! I kind of pooped out on it a month or so back so I need to get going on the rest of the plan now.

It’s been a couple years since we finished our basement – I’m so thrilled we were finally able to do it. I went through the process and how we had it done on a budget in this post:

built in cubbies

I have a big plan for that TV wall – I may work on that this weekend. :)

I shared a few of my favorite online resources for free art in this post: online resources for free art

And made some fun new art for the kiddo’s bathroom with scrap wood and wavy FrogTape Shape Tape:

DIY nautical art

So preppy, I love it!

I made a very simple pet food tray with more wood from the garage pile and showed you how here:

DIY pet food tray

It’s such a little thing but it works SO well. No more water or food messes on the floor!

Our mud room got some pattern and texture with the DIY (no sew!) cushion I made for the bench:

DIY bench cushion

This is another space I stalled out on, but I hope to get more done in there soon. It’s so functional though – that bench is awesome!!

I got a HUGE project done in our master closet -- you have to see the before pics to see how far it came:

closet storage from kitchen cabinets

I took down all the shelving, filled hundreds of holes, installed the cabinets and then painted them and the walls. It was a ton of work but I did it for way cheaper than what a custom closet system would cost! And I love the dusty purple color, so pretty.

Our living room got a couple updates too – this space is one that has always bugged me and I’m determined to change it up this year. I did a DIY project I’ve wanted to try forever – replacing the window sill so I could install the thick trim: craftsman wood trim around windows

Can you find the smushed cat? :)

And moving this small bookcase to this corner opened up the room a ton!:

etagere with cut outs on side

I’m starting to really love this space. Slow but sure. :)

I shared my spray paint “taste test” – and there was a clear winner:

spray paint reviews

The results even surprised me!

I shared my experience with HomeGoods furniture in this post:

bench at kitchen table

I don’t have many large pieces from there but I counted quite a few HG chairs in our house. ;)

I’ve been back outside for the past few weeks and it’s been glorious! I created a “front porch” where there wasn’t one:

adirondack chairs in front of house

We sit there at least once a day – again, a little thing that I’m so glad I did!

And last weekend I moved some things around on the deck and patio and it feels like a brand new space!:

outdoor sectional

Finally, I showed you the results of my biggest personal project over the past few months!:

weight loss tips I’ve got more work to do but I’m thrilled with how far I’ve come!

Those are just a few of my biggest projects from the past few months! May has been busy for us so I’m looking forward to things calming down now that school’s out. So happy to see summer!!

Did you miss any of these projects? I think the gray wall in the master is my favorite. :) Hope you have a great weekend and I’ll see you back here on Monday for the June before and after link up!

Minimalist house design architecture 2014


Minimalist house design architecture 2014
Architectural design minimalist home following 2014 could be the inspiration of your home. Example of minimalist house design architecture 2014 below 424.69 KB sized 1600x1200px. Fotodesainrumah.net is a website about home design, houses a collection of pictures covering the design, decor, architecture, furniture, types, models, examples, from the minimalist, modern, simple, classic, unique, etc. to help you find the idea of ​​selecting your dream house want. architectural design minimalist house minimalist house design Architecture 2014 2014
Minimalist house design architecture 2014

Examples of Architectural Drawing 2014 minimalist house design in the form of JPG image. Photo Architecture minimalist house design 2014 posted on December 5, 2013 at 2:46 am. Architectural drawings collection of minimalist house design in 2014 was seen by 59 136 visitors. If you want to display the image details, please click the "Show Full" to get a good image resolution. See also other inspiration, or leave a comment to request wallpapers, photos, or pictures of minimalist house design architecture for the model 2014 or other versions.
Minimalist house design architecture 2014 Idea House
Minimalist house design architecture 2014
Inspiration: Images of Houses
Tags:
Posted: December 5, 2013 at 2:46 am
Viewed: 59,137 views
Image Type: image / jpeg
Size: 184 kB
Resolution: 1417x858 Pixel
Total: 21 Visits

2014 Architectural home design minimalist home design inspiration you. Look forward ideas minimalist house design architecture in 2014 and visit the site for more latest updates. Do not forget to like and share love ya :)

Thursday, May 29, 2014

Decorating Living Room Minimalist Modern White Dominant


Decorating Living Room Minimalist Modern White Dominant: following could be an inspiration for your home. Examples of Minimalist Living Room Decorating Dominant White Modern measuring 320 x 240px 21:11 KB. Fotodesainrumah.net is a website about home design, houses a collection of pictures covering the design, decor, architecture, furniture, types, models, examples, from the minimalist, modern, simple, classic, unique, etc. to help you find the idea of ​​selecting your dream house want. Decorating Living Room Minimalist Modern White Dominant This could be your choice.Decorating Living Room Minimalist Modern White Dominant
Decorating Living Room Minimalist Modern White Dominant

Sample Image Minimalist Living Room Decorating Dominant White Modern is in the form of JPG image. Living Room Decorating Pictures Dominant White Modern Minimalist published on January 10, 2014 at 8:05 pm. Collection of images of Living Room Decorating Minimalist Dominant White Modern has been viewed by 55401 visitors. If you want to display the image details, please click the "Show Full" to get a good image resolution. See also other inspiration, or leave a comment to request wallpapers, photos, or images Minimalist Living Room Decorating Dominant White Modern versions of the model or the other.
Minimalist Living Room Decorating Dominant White Modern Home Idea
Decorating Living Room Minimalist Modern White Dominant
Inspiration: Living Room
Tags:, Living Room Decorating
Posted: January 10, 2014 at 8:05 pm
Views: 55402 views
Image Type: image / jpeg
Size: 21 kB
Resolution: 320x240 Pixels
Total: 16 Visits

Living Room Decorating Dominant White Modern Minimalist design inspiration of your home. Look forward ideas Living Room Decorating Dominant White Modern Minimalist other and visit the site for the latest updates. Do not forget to like and share love ya :)

Tuesday, May 27, 2014

Outdoor living

Hey hey! Hope you had a WONDERFUL holiday weekend! You can tell summer is approaching in this household – it’s getting harder and harder for us to get up in the mornings and my posts are getting later and later. ;)

This weekend was just gorgeous and I’m just so thrilled to have nice weather again! I worked on the deck and patio quite a bit this weekend -- moving things around, planting and working on little projects here and there. Loved it.

I got a bug to move some of the outdoor furniture around the other night and I love how it came together. I’ve mentioned before that I rarely move furniture around inside because our house layout just doesn’t allow for much of it. But it was so fun to tackle the outside – we’ve had it the same way for nine years now.

First of all, let’s have a moment of silence for our beautiful gazebo that used to be on the deck:

gazebo on deck

Sniff. It was so darn pretty.

Then this happened:

We got that dissembled last year and then things got boring. :)

We left the furniture over there with the fire pit and it’s been like that since early last year. We didn’t want to replace the gazebo just yet because I’m afraid the same will happen again. I’d like to do something more permanent like a pergola, but we’ll leave it as is until we figure out what we’re doing with possibly expanding the house.

So. This is how it looked Saturday morning:

deck with different levels

Not bad! I was just craving a change. I’ve always wanted to move that table over where the gazebo used to be but never did since we liked having the seating area under there.

We built the deck in three sections that are on different levels – not sure I would do that again. But it does add some interest and makes the areas feel like different “rooms.” Since we don’t have any structures to work around now, I went for it and moved the table and chairs over to that bigger area and I LOVE it:

deck with outdoor eating area

The old rug used to be red and white and now it is just…beige. ;) It didn’t hold up well so I grabbed a new one at Lowe’s. It’s a bit boring but I looked at Garden Ridge, Lowe’s and Home Depot and didn’t see a great selection of outdoor rugs this year. I figure it’s a good backdrop for more color anyway:

deck white railings

I LOVE having all that space around the table! Oh my goodness. The kids always play around the table and it always worried me in that middle spot before – with the chairs pulled out there wasn’t much room to walk around it.

Now I’m considering moving my DIY potting bench over next to the table since we use that to serve food and drinks at parties. I think it may work better up there and there’s plenty of room.

I was just going to move the furniture that was over where the table is now over to the middle section, but remembered the whole thing could make a big sectional. We never had it as one sofa under the gazebo – I realized it would be a perfect fit on the patio if I put it back together:

outdoor sectional

There’s still so much I want to do out here! Beyond some new plants and small projects I want to sand down that tabletop and restain it – the sun has not been kind. (You can see how I made that table here.)

But I really dig that sectional there – it’s a perfect fit!

I moved the sofa that was down on the patio up to the middle section on the deck with the fire pit:

square firepit

It works so much better. I don’t worry about the kids now – especially over by the wide stairs going down to the patio.

Here’s a better look at the different levels on the deck:

deck with different levels

I feel like this layout is so much more conducive to socializing and it flows much better out to the patio:

deck and patio

Every time we are out on the deck or patio one of us says how much we love it out there. We are so lucky to have this little peaceful oasis for our family.

It’s ready for summer and so am I!:

large deck with living areasI think moving furniture around (inside or out!) is the cheapest way to make a space feel brand new. Do you have outdoor spaces that you’re prepping for the summer? Is it finally warming up where you are?

I shared my favorite “staycation” spot over at my friend Kate’s blog last week – can you guess where it is? ;)

Thursday, May 22, 2014

I work out

Some of you are all, well that’s a random title. And the rest of you are singing “Girl look at that body…”

:)

It will be in your head all day now. You’re welcome.

Today I’m going off course as I do sometimes to talk about life stuff. I’ve had a bit of an epiphany over the past four months or so and I wanted to share a bit of the journey with you today.

I know too many people right now who are dealing with the scary, nasty, despicable disease that is cancer. It’s hit especially close and it woke me up to the fact that I have one body and I want to take better care of it. Simple as that. (And in no way am I suggesting those with cancer do not. I just want to do better by mine.) I’ve never treated my body horribly, but I haven’t treated like the temple that it is. Laugh at that if you want, but it truly is! 

So earlier this year I was on a mission. I don’t do resolutions but this mission started suspiciously close to the beginning of the year. ;) But that’s what I do every year just because it feels like new start to me. Thing is, usually by March I’m kind of done and I go back to old habits.

Last summer I got in decent shape and had lost quite a bit of weight – and I don’t know what in the heck happened but by Christmas I was inching up to dangerous territory for me again. It happened SO fast. I was still working out, just not as much. And I was obviously eating anything and everything.

I was tired of it. Tired of doing well and going backward and tired of not treating myself better overall. And I had that epiphany -- I have a healthy, working body and I’m going to take care of it and take advantage of it. How lucky am I?

This time I’m sticking with it. It’s my life now – this is a totally different outlook than I’ve had before. I’m SO thrilled with my progress so I wanted to share little things that have helped me along the way.

First up is tracking what I eat. I’ve had the My Fitness Pal app on my phone for years and never really used it till a few months ago:

My Fitness Pal

So here’s the thing. I still eat. I don’t eat great all the time either. We go out to eat a lot. I like margaritas. And tortilla chips. :) I’m still not eating as well as I should but I have made changes that have helped.

I say that to be honest but I also say that because so often I think we feel like we can’t lose weight unless we eat like birds and eat nothing but lettuce. I eat bread, (real) sugar, meat, ice cream and even fried chicken occasionally – but I don’t eat a lot of it. I know myself and if I restricted everything I love completely I’d be back to my old habits in no time. It’s not always about willpower for me – it’s about enjoying life. I enjoy food and refuse to give up all the stuff I love 100 percent.

I was hard core with My Fitness Pal for months but I’m starting to log in less and less. Partly because I know what many of the foods are as far as calories so I can keep it going in my head all day, but partly because I’m determined to just move more so the calories don’t matter quite as much.

Here’s another thing – don’t eat too little calories! I think anything below 1,400 a day is too low. I’ve lost weight just fine at 1600 to 1800 a day – but that’s based on my weight and some calculations. You need to figure out the calories it takes to sustain your current weight and then from there figure out how many to cut to lose weight. (That’s a post for another day.)

Speaking of moving – you need to find a workout that you enjoy. I’ve tried to become a runner so many times in my adult life and I’m just not one. Although I’m realizing how it works my body in different ways so I’m trying to incorporate it more.

But group fitness I’ve always enjoyed -- in college I did kickboxing and loved it. When I was at my lowest weight about 14 years ago (low weight because all I did was work out because it was how I dealt with a sad time in my life) I started it up again.

But for years after that I rarely worked out at all. A couple years ago a friend had mentioned taking Zumba and it sounded fun…but it had been a long time since I had been in a fitness class. I was intimidated. So instead I got the Zumba fitness “game” for Xbox and starting doing it at home:

zumba rush xbox

Being overweight, walking into a group class you are clueless about, not knowing a soul – it’s not something many people can just do. And if you don’t know what you’re doing and feel uncomfortable, you’re not going to go back.

So this was my way of easing into it – and I LOVED it. After about six months of doing it at home (and seeing some results) I started going to the class. And once you find a class that you love, there’s no going back. It becomes almost an addiction – you WANT to be there. I hate missing class – what?? 

My instructor is now a friend and her classes are intense – almost like a Zumba boot camp. But I love that I feel like I’m dancing the whole time, not working out. The music is big for me – she incorporates some hip hop and top 40 that we know so it makes it so much more fun. Like I’m in da club. But not. :)

I started out with a little Fit Bit to track my steps every day:

fit-bit

It’s great – I wear it all day long now and it syncs to my phone. You’d be surprised how many calories you burn cleaning your house or walking up and down the stairs doing laundry. :)

The Fit Bit doesn’t track things like riding a bike or floor exercises (we do the latter in class a lot) so I ended up getting the Polar Fit as well:

polar fit

This one is more expensive but tracks the exact calories burned (you have to wear the strap around your chest). Most times you’re burning more than the Fit Bit tells you so I like having both.

I think the biggest part of this journey is having support. You know the whole it takes a village to raise a child mantra? Well, I think it takes a village to lose weight. I really do. My husband is SO supportive of me running off to class each week. And I’ve made some wonderful friends throughout the process. About 25 of us did the Dirty Girl Mud Run this past weekend:

dirty girl mud run

It was TOUGH (with five days of rain before) but we had so much fun. And now I seriously can’t wait for the next 5K. We even signed up to do the Indy mini next year – not sure where my head was on that one. It’s peer pressure – but the best kind. :)

Here’s another biggie for me – I have no idea how much weight I’ve lost. I don’t weigh myself anymore. It gets me down. Last time I checked I had lost about five pounds but what was months ago. But overall I’ve lost more than 18 inches in four months – that’s pretty amazing. That is encouraging to me – the scale is not.

Last night I remembered that I had taken some before shots of myself back in January. I never do that but I knew this time was different so I wanted to track the difference. Four months later (this morning) I took progress pics and when I put them side by side I almost cried. I couldn’t believe the difference! It doesn’t feel like much when you’re going through it but the pics made me realize I’ve really started to change my body:

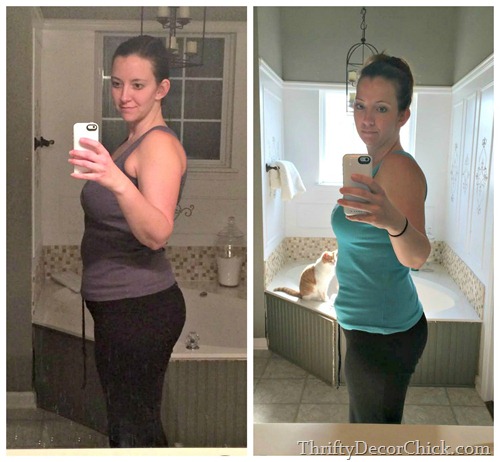
I wore the same pants in the photos – I noticed the other day that they are starting to fall off when I wear them. WHOOT! I don’t really have a goal in mind – I’m just going to keep going and see where I land. Now I’m focusing hard on my arms and that middle pooch. I loathe that middle pooch.

My goal is not to be skinny. I want to fit and athletic and strong:

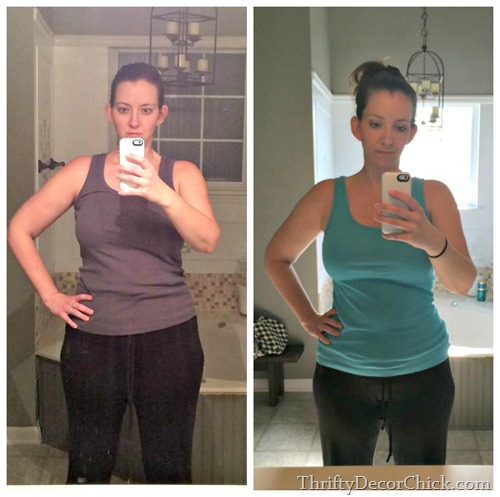
I do weight training with a friend once a week as well but want to try to start adding a day – weight training does wonders for your metabolism! It won’t make you bulky – it tightens you up and completely changes the way you look.

Even though I have more weight to lose I am in the best shape of my life at 38 years old. Seeing muscles develop is almost as exciting as fitting in my old jeans again. :)

One of the biggest areas I’ve noticed is the “back fat” – I am starting to get a little bit of definition in my back and I love it. And the side rolls are getting smaller and smaller:

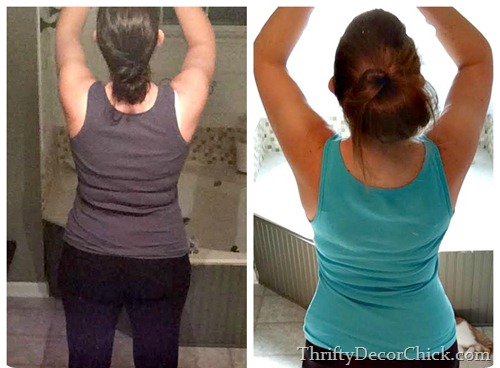
I hate taking photos of myself but it’s actually really encouraging to see the progress!

But first, let me take a selfie:

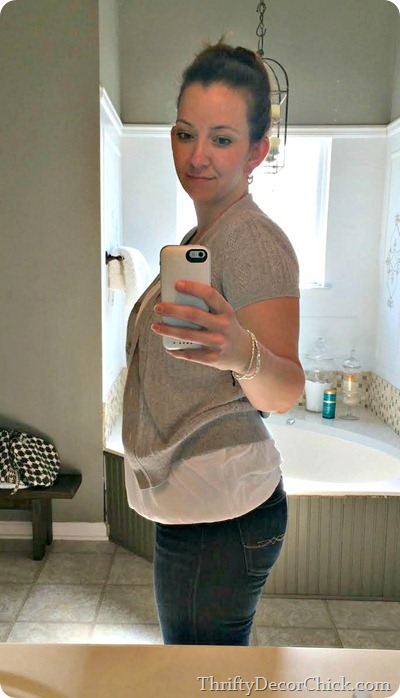
Now THAT song will be in your head all day. Sorry. ;)

Just with DIY and decor I don’t think there’s rules to getting fit – you just have to figure out the way that works best for you. If you still want to eat your favorite foods I believe you can – you’ll just have to cut down and your progress may be slower. I think that’s just fine. I’m sharing my thoughts to encourage but take what works for others with a grain of salt – you need to figure out what will keep you going.

Do you struggle with weight and working out? Do you have a routine that you love to do? Do you run? If so teach me your secrets. :)

Tuesday, May 20, 2014

Weeding the easy way

So today I have no pretty pictures – just weeds. And overgrown plants. And siding that still has holes in it from the hail damage a year ago. I bet you’re really excited! :)

I’ve been working outside over the past couple of weeks to get the beds ready for mulch. I saved this side of the house for last because…well, I hate this side. It’s ugly. I planted these bushes shortly after we moved in and I don’t like them. Not even sure what any of them are but they don’t fill in well and they don’t grow very big and I can’t wait to pull them out. 

That’s how I feel about that. ;)

There’s also a big open spot where there used to be another bush that died years back – the weeds have taken over that area:

getting rid of prickly weeds

Do you have these weeds? I can’t remember what they're called. I have a special name for them. I call them prickly *#@*$*%:

getting rid of prickly weeds

UGH. They will take over if you don’t stay on top of them. I hear they are really nasty too – you are supposed to get the entire root in order to get rid of them. Something about just pulling them will make them spread? I’m not sure, but over the years I’ve learned the best way to remove them.

I found this weeding tool years ago at Lowe’s I think – you can find it online here or at Amazon:

best weeding tool It’s called the rocket weeder and I LOVE IT. It’s my favorite gardening tool, hands down.

The bottom has a claw and a foot lever, and the top has a puncher:

rocket weeder weeding tool

So you push the claw into the base of the weeds and then either rock it back towards you so the lever pushes down, or you can use your foot to push it:

getting rid of prickly weeds

This makes the claw clamp down on the root and then you pull it up and push the button at the top to get it to pop out. It’s fabulous!

No getting down in the dirt to dig them out with your hands! I used to have a process of spraying weed killer at the base of the plant, then pulling them with my hands (with really thick gloves on). This tool gets deep enough to pull the entire root up (if not most of it) and I don’t have a problem with them growing back. Other areas, sure. But not the same exact spot. :)

The weeder even gets the really tall ones that are, ahem, a couple feet tall:

pulling prickly weeds

Have you ever tried pulling one of these out of the ground? The buggers hurt!! Hence the cussing. (When you toss them makes sure to grab them at the root to avoid getting stuck.)

So here’s my gorgeous after! Prepare yourselves for the beauty!:

getting rid of weeds the easy way

Ugly bushes and holes in the siding are still there, yes. But the weeds are gone! :)

I’m waiting to address this area till we hear back on quotes for the possible dream project in the back – this area will get a lot of wear from trucks if we go ahead with it.

But at least the prickly weeds are gone, and I barely had to do any work:

getting rid of prickly weeds I seriously love this thing! I use it in the yard for dandelions too. I mean, if you have a ton it’s not your best option, but it makes quick and easy work of a few here and there. It’s quite satisfying to use too. :)

Do you have a garden tool you can’t live without? Any advice on the weeds?

Monday, May 19, 2014

Butcher block in the kitchen

Hello all, hope your weekend was great!! Oh my goodness – we had a blast at the mud run. It was SO intense though – it had rained five days up to it so the course was 95 percent mud up to your mid-calf. It was insane. Many of the ladies lost shoes and socks and it took us almost two hours to get through the three mile course…but we did it. :)

So Sunday I was pretty much toast. I laid on the couch most of the day but did get a small DIY project done. We’ve had our butcher block counter on the island for nearly four years now and it’s held up GREAT. I don’t know if I’ve shared this process before, but it never hurts to show it again since I know there are a lot of questions about butcher in the kitchen.

First up, I have to say I LOVE having the wood on the island. It did worry me a bit at first – the first few weeks I was extra careful with it. Now? I put anything on it. I’m finding I love it more with the little cuts and dings. It’s incredibly easy to keep up. I rarely have any stains or issues – I think there’s only two times that I’ve had a mark on it and both times were from paint cans: sanding down butcher block

I left a small can on there for a few days and it left that mark. But I’ve had juice, wine…anything else you can think of on there and it wipes right off. I’ll share why in a minute, but first my process for dealing with any marks.

This only takes me a few minutes because it’s just the island and the wood is not stained. I used a 220 grit sandpaper:

sanding butcher block

And my favorite sander:

best handheld sander

I love this sander for two reasons – it keeps most of the dust in the little container (last time I did this with another sander the kitchen was covered in a layer of dust). And it doesn’t leave the little swirl sanding marks that others I’ve tried did. If I don’t sand properly it still does it occasionally, but nothing like I’ve had in the past! If I take my time and do it right I never get them. :)

Again, this just took me a few minutes -- I wiped it down after with a wet towel after sanding and then let it dry well.

I use Formby’s Tung Oil to seal up the wood (on recommendation from my Dad): tung oil for butcher block

It has worked incredibly well! I usually reoil about once a year – if that. And I don’t always sand it down first (I only did this time because of that paint can mark). Usually I just clean the top and then apply one or two more coats.

It takes a couple minutes to apply – just use a clean white rag (with gloves on) and wipe it in:

 sealing wood countertopssealing butcher block 

It needs to dry 12 hours and they say to buff with fine steel wool and then do another coat. I kind of cheat – I don’t sand it down again, I just put another coat on. :)

I did the first yesterday evening before we left for a movie, I’ll do another coat tonight before bed:

sealing wood countertopsI wasn’t sure I’d like the more natural finish all those years ago, but now I LOVE it. It helps to lighten things up with our dark cabinets.

Butcher block for a kitchen island can get really pricey! I got mine from IKEA for less than $200 but I’ve heard they don’t sell this size anymore? That would be a major bummer because I’m always thrilled with their butcher and this is a fantastic option.

I had a local woodworking place router the pretty edge on there for an added detail:

butcher block on island

I have zero complaints when it comes to this countertop – there is a little bit of maintenance but it’s maybe once a year that you need to oil it up again. It’s probably been longer than that since I last did it.

If you have them stained then the care will be different. I’ve seen Waterlox used a lot on stained counters but Tung oil may be fine over stain as well. I used a poly over my stained butcher block in the dining room and mud room but those get very little wear and tear. If you like the natural look this oil is great option to seal up counters from stains and liquids and it’s incredibly easy to apply.

Do you love the look of butcher block counters? Could you have them throughout your whole kitchen? I’m considering it!