Showing posts with label before and after. Show all posts

Monday, June 2, 2014

June before and after!

Hello everybody! It’s time to kick off June (can you believe it?) with another before and after link up. I so enjoy looking through all your projects and homes – blogs are pretty awesome. :)

I’m sharing a few that caught my eye and then we’ll see what you’re up to this month. I was SHOCKED when I saw the before photo of this sofa:

upholstering old sofa

It was a Craigslist find and Cheryl had incredible vision (and a great upholsterer) – it just goes to show that a good quality sofa can be transformed. I absolutely love the new look.

There were two kitchen redos that caught my eye – first up was Laura’s before and after:

kitchen redo white cabinets

Can you believe the difference? Amazing! She shared a whole before and after house tour, be sure to check it out.

Michelle shared the progress her kitchen has made over the years as well:

white kitchen white backsplash

Her kitchen table is gorgeous too!

I love a good knock off and I love a lighting knock off even more – Tasha’s take on a West Elm light fixture was brilliant:

west elm bentwood knock off

And Carrie’s fixture was so simple it’s just ridiculous:

orb light fixture knock off

I have one of those orbs and the thought never even crossed my mind!

Haeley shared one of the easiest, cheapest tricks for large artwork:

DIY art with canvas and fabric

Her whole master bedroom turned out beautifully, check it out here.

So inspiring, all of you!

As always, if you’d like to pin these projects, please do so from their respective sites. :)

Now let’s see what you’ve been up to over the past month! If you’d like to be considered for next month’s review, please include a link to TDC or this button in your post:

<div align="center"><a href="http://www.simplehomeinteriordesign.blogspot.com/" title="TDC Before and After" target="_blank"><img src="http://www.homestoriesatoz.com/wp-content/uploads/2012/03/beforeAndAfterButton_thumb1.gif" alt="TDC Before and After" style="border:none;" /></a></div>


Here you go!:


Thursday, May 22, 2014

I work out

Some of you are all, well that’s a random title. And the rest of you are singing “Girl look at that body…”

:)

It will be in your head all day now. You’re welcome.

Today I’m going off course as I do sometimes to talk about life stuff. I’ve had a bit of an epiphany over the past four months or so and I wanted to share a bit of the journey with you today.

I know too many people right now who are dealing with the scary, nasty, despicable disease that is cancer. It’s hit especially close and it woke me up to the fact that I have one body and I want to take better care of it. Simple as that. (And in no way am I suggesting those with cancer do not. I just want to do better by mine.) I’ve never treated my body horribly, but I haven’t treated like the temple that it is. Laugh at that if you want, but it truly is! 

So earlier this year I was on a mission. I don’t do resolutions but this mission started suspiciously close to the beginning of the year. ;) But that’s what I do every year just because it feels like new start to me. Thing is, usually by March I’m kind of done and I go back to old habits.

Last summer I got in decent shape and had lost quite a bit of weight – and I don’t know what in the heck happened but by Christmas I was inching up to dangerous territory for me again. It happened SO fast. I was still working out, just not as much. And I was obviously eating anything and everything.

I was tired of it. Tired of doing well and going backward and tired of not treating myself better overall. And I had that epiphany -- I have a healthy, working body and I’m going to take care of it and take advantage of it. How lucky am I?

This time I’m sticking with it. It’s my life now – this is a totally different outlook than I’ve had before. I’m SO thrilled with my progress so I wanted to share little things that have helped me along the way.

First up is tracking what I eat. I’ve had the My Fitness Pal app on my phone for years and never really used it till a few months ago:

My Fitness Pal

So here’s the thing. I still eat. I don’t eat great all the time either. We go out to eat a lot. I like margaritas. And tortilla chips. :) I’m still not eating as well as I should but I have made changes that have helped.

I say that to be honest but I also say that because so often I think we feel like we can’t lose weight unless we eat like birds and eat nothing but lettuce. I eat bread, (real) sugar, meat, ice cream and even fried chicken occasionally – but I don’t eat a lot of it. I know myself and if I restricted everything I love completely I’d be back to my old habits in no time. It’s not always about willpower for me – it’s about enjoying life. I enjoy food and refuse to give up all the stuff I love 100 percent.

I was hard core with My Fitness Pal for months but I’m starting to log in less and less. Partly because I know what many of the foods are as far as calories so I can keep it going in my head all day, but partly because I’m determined to just move more so the calories don’t matter quite as much.

Here’s another thing – don’t eat too little calories! I think anything below 1,400 a day is too low. I’ve lost weight just fine at 1600 to 1800 a day – but that’s based on my weight and some calculations. You need to figure out the calories it takes to sustain your current weight and then from there figure out how many to cut to lose weight. (That’s a post for another day.)

Speaking of moving – you need to find a workout that you enjoy. I’ve tried to become a runner so many times in my adult life and I’m just not one. Although I’m realizing how it works my body in different ways so I’m trying to incorporate it more.

But group fitness I’ve always enjoyed -- in college I did kickboxing and loved it. When I was at my lowest weight about 14 years ago (low weight because all I did was work out because it was how I dealt with a sad time in my life) I started it up again.

But for years after that I rarely worked out at all. A couple years ago a friend had mentioned taking Zumba and it sounded fun…but it had been a long time since I had been in a fitness class. I was intimidated. So instead I got the Zumba fitness “game” for Xbox and starting doing it at home:

zumba rush xbox

Being overweight, walking into a group class you are clueless about, not knowing a soul – it’s not something many people can just do. And if you don’t know what you’re doing and feel uncomfortable, you’re not going to go back.

So this was my way of easing into it – and I LOVED it. After about six months of doing it at home (and seeing some results) I started going to the class. And once you find a class that you love, there’s no going back. It becomes almost an addiction – you WANT to be there. I hate missing class – what?? 

My instructor is now a friend and her classes are intense – almost like a Zumba boot camp. But I love that I feel like I’m dancing the whole time, not working out. The music is big for me – she incorporates some hip hop and top 40 that we know so it makes it so much more fun. Like I’m in da club. But not. :)

I started out with a little Fit Bit to track my steps every day:

fit-bit

It’s great – I wear it all day long now and it syncs to my phone. You’d be surprised how many calories you burn cleaning your house or walking up and down the stairs doing laundry. :)

The Fit Bit doesn’t track things like riding a bike or floor exercises (we do the latter in class a lot) so I ended up getting the Polar Fit as well:

polar fit

This one is more expensive but tracks the exact calories burned (you have to wear the strap around your chest). Most times you’re burning more than the Fit Bit tells you so I like having both.

I think the biggest part of this journey is having support. You know the whole it takes a village to raise a child mantra? Well, I think it takes a village to lose weight. I really do. My husband is SO supportive of me running off to class each week. And I’ve made some wonderful friends throughout the process. About 25 of us did the Dirty Girl Mud Run this past weekend:

dirty girl mud run

It was TOUGH (with five days of rain before) but we had so much fun. And now I seriously can’t wait for the next 5K. We even signed up to do the Indy mini next year – not sure where my head was on that one. It’s peer pressure – but the best kind. :)

Here’s another biggie for me – I have no idea how much weight I’ve lost. I don’t weigh myself anymore. It gets me down. Last time I checked I had lost about five pounds but what was months ago. But overall I’ve lost more than 18 inches in four months – that’s pretty amazing. That is encouraging to me – the scale is not.

Last night I remembered that I had taken some before shots of myself back in January. I never do that but I knew this time was different so I wanted to track the difference. Four months later (this morning) I took progress pics and when I put them side by side I almost cried. I couldn’t believe the difference! It doesn’t feel like much when you’re going through it but the pics made me realize I’ve really started to change my body:
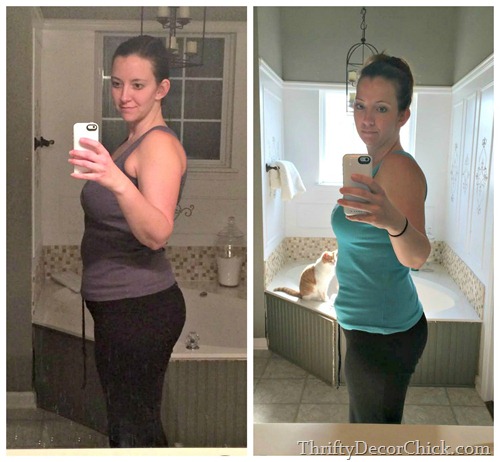
I wore the same pants in the photos – I noticed the other day that they are starting to fall off when I wear them. WHOOT! I don’t really have a goal in mind – I’m just going to keep going and see where I land. Now I’m focusing hard on my arms and that middle pooch. I loathe that middle pooch.

My goal is not to be skinny. I want to fit and athletic and strong:
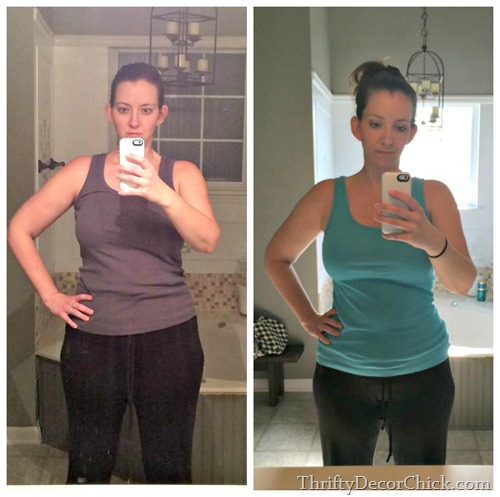
I do weight training with a friend once a week as well but want to try to start adding a day – weight training does wonders for your metabolism! It won’t make you bulky – it tightens you up and completely changes the way you look.

Even though I have more weight to lose I am in the best shape of my life at 38 years old. Seeing muscles develop is almost as exciting as fitting in my old jeans again. :)

One of the biggest areas I’ve noticed is the “back fat” – I am starting to get a little bit of definition in my back and I love it. And the side rolls are getting smaller and smaller:
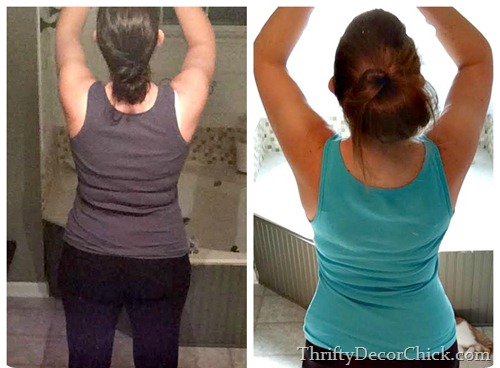
I hate taking photos of myself but it’s actually really encouraging to see the progress!

But first, let me take a selfie:
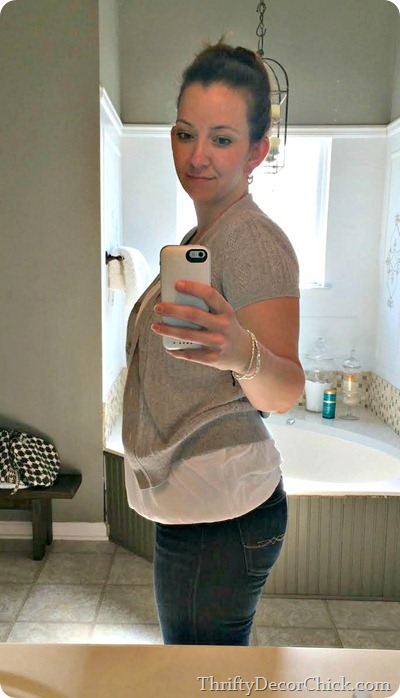
Now THAT song will be in your head all day. Sorry. ;)

Just with DIY and decor I don’t think there’s rules to getting fit – you just have to figure out the way that works best for you. If you still want to eat your favorite foods I believe you can – you’ll just have to cut down and your progress may be slower. I think that’s just fine. I’m sharing my thoughts to encourage but take what works for others with a grain of salt – you need to figure out what will keep you going.

Do you struggle with weight and working out? Do you have a routine that you love to do? Do you run? If so teach me your secrets. :)

Thursday, May 8, 2014

Looking back: A powder room redo

Hey there! Hope you are having a wonderful Thursday!

It’s time to go back in time again and check out the progress of the smallest room in our house over the years. First of all – I think the amount of time and effort I’ve put into this bathroom is odd because I haven’t done much at all in bathrooms that would bring more value – like the master bath. But, we use the powder room ALL the time. And guests see it. So in the end, I guess it’s worth making it a priority.

And secondly, I’ve painted this small room more times than I’ve painted most of the rooms in our house all together. I was talking with a friend a few months ago and she mentioned how much I paint in our house – I told her she’d be surprised that most of the rooms in our home have only been painted once. They’ve stayed that way for a long time too. The kitchen, family room, master bath, guest bath and master have been painted once in ten years. And the living room, staircase, loft and upstairs hall as well.

BUT…when I paint one tiny room like 56 times, yeah, I could see how it seems like I’m always painting walls. ;)

This was a room I was never quite happy with, until last year when I finally finished it up. I lived with each look for a couple years, but it never felt quite right. Shortly after we moved in I tried my hand at molding – and I used Liquid Nails to apply the molding. You know, just in case I NEVER EVER WANTED TO TAKE THEM OFF:

Here’s the proof that we all start somewhere. I was using an electric handheld saw to cut that wood and didn’t begin to know how to cut at an angle – so I used some trim pieces in the corners. I think they’re supposed to be installed with baseboards.

The quality was…interesting. :) So years later I made over the room again. This time with mitered corners (yeah!) and lots of brown (noooo):

dark brown bathroom

I actually quite like this for a while. But after a while the chocolate brown got depressing and dark and…brown.

I went all the way too:

dark brown ceilings

But pretty soon I was craving a lighter look. I painted over the stencils, took the molding down, then started painting over the brown in a hurry before a party. It was months later before I finally finished it up: 


At this point we’re a good two years into the redo here. I’ve mentioned a few times that when I stall on things it’s either because they’re incredibly hard or because I’m still not convinced on my direction. This one was the latter. :)

But the plan finally came together in my head and I forged on! I started installing the wood planks:

And pooped out again. I knew it would look good eventually – I was just tired of the space and needed to focus elsewhere. A few months went by and I was ready again. (Told you – longest makeover EVER.)

When I was ready again I spent a few days straight working like a beast. The planked walls came together: 

how to install planked wallsYou can see how I installed those here. The process is really easy, it just takes some time. And painting them in a pain in the butt, for real. 

And then I tried my original plan on the walls – painting them red:

DIY craftsman trim

If I was more of a red girl I would have gone for it – but I’m not. I loved the red against the white for sure, it just wasn’t the look I was going for.

After two more attempts on the color I finally got it right. Accessible beige by Sherwin Williams:

white planked walls

Let’s count the number of times I’ve painted this room now, shall we? I think I’m at seven. :) Seventh time is a charm I guess.

The whole room was designed around my son’s artwork – it was when I saw it that I knew exactly what I wanted to do in the room:

planked walls in bathroom

We obviously changed more than just the walls – the hardwoods are so lovely and the IKEA vanity offers a ton more storage. I truly, truly love this space now. It’s bright and happy and fun – and it reminds me of my boy. :)

You can see the full reveal of the room here and all the details of the space are here. Even though it’s the smallest room in our house I think it’s one of the biggest transformations I’ve ever done. Maybe I need to take five years to redo all my spaces! Oh that’s right. I do.

Thanks for looking back with me again! Before and afters are my favorite! :)

Monday, May 5, 2014

May before and after!

Hey all! It’s the first Monday of the month and that means it’s party time! Excellent.

It’s the day you all share one of my favorite things in the decor/DIY world – before and afters. I can’t get enough of them. I will kick it off with a few of the awesome projects linked up last month.

Cassie did one of my all time favorite decorating tricks – painting the backs of her bookcases:

painting backs of bookcases

I always love the look (I think it makes everything pop) and her black color is super sexy. I think it just makes all the accessories more dramatic. (You can see my gray blue background on our bookcases here.)

You MUST go check out Tiffany’s new pantry. Must. It is fantastic:

built in pantry with drawers

Drawers people. Brilliant. I want drawers everywhere. (And there’s a little surprise on the sides.)

Bethany’s kitchen has been undergoing a redo and it looks SO good:

blue island I especially love the detail they added to the island and I dig the blue color. (My island is light blue and I still love it.) Her before and after is pretty amazing, check it out here.

Man, I love a bright white kitchen, but I love contrast too. Julie’s black cabinets look so good, and she shares a GREAT, detailed tutorial on tiling your backsplash:

how to tile a backsplash

That choice of tile is perfect with the black cabs and stainless appliances. Love it.

Sometimes the simplest project make the biggest impact. Kammy took a regular rug and turned it up a notch with paint:

painting stripes on rug

What a difference! Stripes make many things better. :)

Jaime’s mudroom underwent a little redo with paint and a few little details:

mudroom makeover

Again, it wasn’t a big reno, but little projects like paint and hooks that make the difference here. Love her door with the window too. You can check it all out here.

Andrea finished off her dining room with new chairs (that are lovely): 

stenciled wall dining room

But it’s that stenciled wall and wood starburst mirror that really stood out to me. Such a beautiful, well done space!

It’s always hard for me to pick just a few projects to highlight! If you’d like to be considered for next month’s round up, be sure to include a link to TDC in your post or add this button:

<div align="center"><a href="http://www.simplehomeinteriordesign.blogspot.com/" title="TDC Before and After" target="_blank"><img src="http://www.homestoriesatoz.com/wp-content/uploads/2012/03/beforeAndAfterButton_thumb1.gif" alt="TDC Before and After" style="border:none;" /></a></div>


I have the pin it button installed but I ask that you pin from each respective site instead of mine if you want to save these projects.


Now it’s time to see what you’ve been up to lately! I hope to see some outdoor projects creeping in. :) I’m finally starting some of my own! It’s about dang time.


Monday, April 28, 2014

Living room refresh

Good Monday to you! Hope you had a great weekend!

I’ve mentioned before that I LOVE when I get to move furniture around…because I never move it around. Our house has a very open floor plan and very little useable wall space (that isn’t covered by windows). So once I find a spot for something it stays…forever. Moving furniture is a rare treat. :)

I found this étagère at HomeGoods a couple years back and it was love at first sight. I loved the detail on the sides of it and the size – nice and skinny. It started out between the two windows in the living room, but that became too busy to me, so I moved it next to the sofa last year:

tall etagere

It was there for a long time, but the height right there bugged me. It was right where the dining and living rooms meet and it felt awkward. I don’t have a full shot to show what I mean. It wasn’t awful or anything, I just wasn’t feeling it.

I decided a few weeks ago to try it in the corner where this desk/console used to sit:

desk by window

I wanted to use that desk in my office so the spot was freed up. I moved the bookcase over and loved it in that spot! And that of course started off a series of other small projects as well. It’s how I do. :)

When I installed the new window trim a couple weeks ago I started replacing the chair rail as well. I wanted something simpler that would sit flush against the window trim. And when I put the rail in years back I kind of cheated along that half wall behind the desk. Long story short the trim on the half wall didn’t meet up with the chair rail on the wall. So I removed all of it, including the top of the half wall, and installed all new:

replacing trim on half wall

Now the chair rail on that wall is one continuous piece of wood instead of two mismatched pieces. This would all make more sense if I had taken a before pic, but I forgot. :)

I got this new-to-me primer at Lowe’s when I was painting the window trim and so far I love it:

wood primer

It gives the wood a great base and goes on really smooth. I finished off the new chair rail and the top of the half wall with caulk and two coats of semi gloss paint. I still have quite a bit of chair rail to replace but I’ll do that as the budget allows.

But the best part is that I think this piece has finally found it’s forever home!:

skinny bookcase

It’s much bigger than the desk was, but takes up less visual space for sure. I couldn't believe the difference. I love how open it feels now and that we can appreciate the pretty detail on the side!

I loved what I had on the wall above the desk so I moved that between the windows:

DIY craftsman window trim

I’m not sure that will stay but I do like that the round mirrors break up all the rectangles in this spot – windows, wainscoting, bench and bookshelf.

OH! And I pulled the chair away from between the windows and I LOVE it. I hesitated to put the chairs on the rug (they don’t match but I’m working on that) -- I’ve liked having the floor more open. But WOW, what a difference it made to pull everything together – it really opens up this room. Love it. More pics soon!

I edited the contents of the shelves down a bit:

white etagere

I’m not 100 percent on the bottom shelf, but I’m using what I have so I’ll deal. ;)

I’ve decided for now I’m not putting the drapes back up. I’m sure I’ll crave more color there eventually, but for now I’m loving how clean and simple it is. Speaking of color, I was looking back at photos and found this before that shows the étagère in it’s original spot and the old pinky walls:

bookcase between windows

Can you believe how pink they were in that light? Goodness. Anyway, here’s how it looks now, with new paint and trim: craftsman trim on windows My little BFF is smooshing himself into this shot. :)

This room was on my list of spaces I wanted to rework this year and so far I’m really, really happy with how it’s coming together! It’s a two story space so it’s harder for me to figure out.

Do you move furniture around a lot? If so I’m jealous. It’s a free fix when you get the itch to tweak things around the house. :) Or do you keep things the way they are forever like me? I love using what you already have in a different space – it feels brand new when you move it around!

Tuesday, April 22, 2014

Building a house

Hey all! It’s a beautiful day in the neighborhood – hope your weather is finally coming around too!

Lately I’ve been talking a bit about a big anniversary that’s coming up next week – ten years this house! I’m pretty nostalgic about it. It means so much to me that we’ve been here for so long. I swear I’m getting the house a cupcake next Monday for the “birthday.”

Kidding. I’ll get myself a cupcake.

Now that we’ve lived here ten years I have new appreciation for the building process, so I wanted to pass my thoughts along. I’ve been wanting to write a post like this for years and I figured the ten year mark would be pretty appropriate. It’s a bit like labor – you forget all the bad stuff and only remember the good. Mostly.

Obviously you have to decide if building a house is for you. The idea of new and shiny everything is certainly a bonus – that is if you like new and shiny. :) If you prefer more character in a more established area then building a new home is probably not for you. (Unless you are going more custom.)

We loved the idea of starting from scratch and getting exactly what wanted. Honestly, we didn’t even look at any existing houses – we knew right away we wanted to build. There are good and bad aspects to the process of course.

The good:

You pick out all your finishes – every. little. thing.
You can schedule the build for when it works for you (we delayed ours for three months so we could get out of our apartment lease on time).
You pick your neighborhood and lot.
Everything is brand new (if you like that sort of thing).

The bad:

You pick out your finishes – every. little. thing. ;)
Your house won’t be ready for three to six months (more for custom). Ours took about five and a half months start to finish. (Eight and a half with the delay.) 
Building can be more expensive than buying if you don’t reign in all the extras.

Deciding on a builder is a biggie. For us it was more about the location and the house we fell in love with than the builder, honestly. We signed our contracts with Trinity Homes and then it was bought out by Beazer almost immediately:

Screen Shot 2014-04-22 at 10.14.21 AM

We lucked out. We had nothing but excellent experiences with them the entire time. In the ten years since about half of the builders in our area have folded – Beazer seems to still be going strong.

If you’re like us you find your location before your builder – I think that happens a lot. But either way, as they say, location is everything. My advice to you is to not put too many boundaries on where you build. Of course you’ll have a certain area you’d like to put down roots and if you have kids you’ll be thinking about schools. But I had a very specific area in mind when we were looking and didn’t want to go outside of it. I actually drove out to our neighborhood once to go through the model – and turned around because it felt like it was SO FAR AWAY. (Drama.)

It was about one mile past the “boundary” I had in mind. Later we found our model in another city and realized it was built in this neighborhood. We drove it again and all the sudden it wasn’t so bad. :) Now we honestly couldn’t be more pleased with the location. It’s minutes from great shopping and restaurants but we drive by farmland to get to all of it. I love that.

The easiest part for us was finding our lot:

tips for building a house

You’ll pay extra for more land, for a corner lot or for a tree lined backyard. We drove up one street and knew immediately this lot was the one we wanted. The backyard wasn’t big and it was sloped, but not as much as the others. All that mattered to us were the trees and the land behind the house. That land is why we won’t be moving any time soon – it’s just too hard to find anymore. That privacy is HUGE to us. A big backyard may be what is most important to you, it all depends on what you want for your family.

Right off the bat you’ll have to make BIG decisions. The structural stuff needs to be figured out immediately. That includes the elevation of the house (not the height like I always thought, but the design of the front of the home), how you want the kitchen set up (for us we had to decide on things like double wall ovens or a slide in), if you want fireplaces, a basement, all that big stuff: tips for building a houseAlthough sometimes the structural stuff isn’t big and you would never even think of it. So my advice is, before you sign one document -- pour over magazines, pinterest, walk through model homes and do your research! We had no clue what we wanted when it came to most of it. I wish we would have done the double ovens in the kitchen. :)

The stress of this process came when we had to pick out all of the finishes for the house. Again – I don’t think you can plan too much for this part. And again, we did very little of that. You have a very short amount of time to pick out all the finishes for the inside of the house and if you aren’t ready it is extremely stressful. Stressful in a first world problems kind of a way but still stressful.

We had a couple scheduled times to walk through the showroom and decide on our options. This is for EVERYTHING – the great thing was that we had endless options for lighting, flooring, faucets, brick, all of it. That was the bad part too. It is incredibly overwhelming if you don’t have an idea of what you want going into it.

And even then you will sit down to make your final decisions and find out about all kinds of stuff you never thought of. At least we did. A sound system (we added), an irrigation system (we didn’t), a security system (we did). Lots of systems. I hadn’t even considered all of that until we had to make the 100 percent final decisions. Hence the reason I think building can be more expensive than buying outright. If you’re not careful you tend to think you must do ALL THE THINGS to your house right then, instead of spreading them out.

I’ll do a separate post about what we would have done differently, but overall I have a few more thoughts about the process to pass along. The biggest is to be there as often as you can. It goes fast! We had an Amish crew frame our house and where there was a hole, a house was built within days. I would drive out almost every single day after work. First of all -- it was incredibly exciting to watch. Secondly, I just wanted to stay on top of the process: 

tips for building a house

Our superintendent was AWESOME and we were in constant communication. If something came up he would call and I’d be out there. A few times I noticed things as well – like that we were supposed to have a gas oven and dryer and only electric was installed. (I noticed it before drywall so it wasn’t a big deal to fix it.)

Don’t be afraid to ask for small changes along the way! At least with our builder we were able to tweak throughout the process. Little things like not having a half wall installed in our front room weren’t a big deal for them to adjust, and our super would often ask along the way what we thought. I was so thankful they were open to it. I don’t know if all builders would but it never hurts to ask.

When you’re visiting all the time, be sure to take photos! I took them every time something big happened – framing, electrical, drywall:

tips for building a house

That fireplace is now this one: how to decorate a mantel

:)

I’ve referenced our build photos many times in ten years. I looked back at pics to see if I remembered right about the wood on our stairs before I decided to rip off the carpet:

tips for building a house

There are some changes I’d like to make to the kitchen and when I looked at the framing photos I realized there’s a huge plumbing pipe running right through a wall I’d like to change up. Drats. But it’s MUCH easier to study photos than it is to cut out drywall.

And finally, when you’re picking out all the goodies for your home – keep in mind what’s easy to change out yourself. When you buy a fancy sink through the builder it costs more than just buying it yourself (the bonus is that you’re paying for the sink over 30 years). ;)

So my advice is to go builder basic on things like light fixtures (at least ones you can reach to change out), faucets and hardware. (Or see if they will install items you bought instead!) Even a novice DIYer can change out a door knob and I promise switching out lights is not hard. Of course this depends on the time you have to dedicate to this stuff – if changing all that out seems like torture it will be worth it to just pay for what you want!

That’s the whole point, right? You’re building a home to your exact specifications. That’s the best part! That and the new house smell – I swear ours smelled new for years.

So those are my thoughts on building a house. There are definitely some things I’d do differently in our home and I’ll talk about those sometime soon. For us the process was pretty fantastic and other than some stress it was a fun experience. I would do it again for sure.

Have you gone through the building process? Did you enjoy it? Any other advice you would add?
