Wednesday, March 31, 2010

A spring table

 birdyWell, it’s in the 70’s here today, and the weather has been glorious for weeks now – SO unlike the Midwest. I’m crossing fingers and toes that there is no more snow! Puhhhleaze? Considering it’s supposed to be 84 degrees here tomorrow, you’d think we’re safe.

When I showed you the cute little Dollar Tree bird in this post, I told you I had some ideas in mind for others as well. I was so sure my idea would be adorable, I drove back to the dollar store at 8:55 that night, grabbing the last few I could find. (So sorry if you were looking for them…)  ;)

My idea was to use them on the dining room table. The bowls I bought last year for the place settings (from Pier 1) have been such fun to decorate with each holiday/season!

My first thought was to nestle them into some Spanish moss, but then I had a bit of a freak out that the moss would stain the white bowls. Probably wouldn’t – but my freak out made the end result even better!

To protect the bowl, I first used crinkled up tissue paper and made a “nest” – but then it hit me. What’s natural, springy, pretty and moss-stain protecting? Burlap baby! And I already had it!:

041 083

I have six little birds total, but I am using a couple elsewhere, so I still needed to fill two place settings.

When Maryann posted her twine/jute covered eggs back in February, I was HOOKED. I am a sucker for jute. I don’t know what it is – but I love it on just about anything.

So I made some of my own jute covered eggs a few weeks ago – just using plastic Easter eggs we had and hot glue. Fareee!

Last week I found some white yarn in my craft stuff and covered a couple with that as well:

043 044 

Warning:  This cuteness takes foreva and a day to attain. I think about 15 minutes per egg. But it’s good mind-numbing activity while I watch my shows. ;)

I wanted to keep the centerpiece simple but wanted to add a little somethin’. I found some mossy “blanket” stuff at Joann’s today that was perfect to line the bottom:

068

I just cut it to fit and I love it! It was pricey -- $9 – but it is reusable.

A couple weeks ago I decided to start using a few of the candle holders as vases, so I’ve been filling a few of them:

057

If you look carefully you can see the toys on the floor…shhhhh. Nothing but the best for you all!

I had forgotten what a great deal flowers are at Trader Joe’s until my friend Kate mentioned it. (You must see her dining room. Swoon.)

Some of these have lasted for two weeks now! The tulips were $10 for 20. Hard to beat!:

070 072

 074 078 

I absolutely love how fresh and bright the table is!

064

    060 And I wuv you, you cute little birdies! Kisses!

087I  have BIG plans for our hutch – I can’t wait to get working on it. I don’t know if it’s going to work, but I’ll let you know, of course.  (And no, I’m not painting it!)

To see how I made the centerpiece, go here.

For a recap of the dining room redo, go here.

Monday, March 29, 2010

A cozy window nook!

049

First of all, thanks so much for your idea on the furniture layout! It’s hard to get a feel for the room just with the pics I posted – there are walkways behind both sofas, so for now, they have to stay put. But I am going to add a console table behind the long sofa for sure – I found a perfect table that isn’t too deep and it’s gorg! But for now I’m trying not to spend any cash. ;)

One of the first changes I made to the Bub’s room was his window –  it looked like this for quite some time:

beforeI’ve gone back and forth for years now about adding a built in window seat in this spot. Some day I think we will, but for now, I needed a spot to put the rocking chair. The addition of a big boy bed made for little room for it. It fit perfectly into this little area -- so I decided to make a little “reading nook.”

Then it was time to address the window. I’ve slowly but surely been replacing all of our two inch blinds with bamboo roman shades (LURVE) and that was the first step:

bamboo

I loved the shutters (found at an antique store) but with the move to a big boy room, they just felt too “nursery” to me. Or maybe I was just tired of them. I’ll go with the former. ;)

I played with a few ideas in my head. One was to make shutters like I did for the windows on our deck and hang them to each side of the window. I loved that idea, but I also had plans to add more light to this spot. It was going to look odd having the light sconces I had in mind installed on top of the shutters.

I wanted it to be light and airy feeling – and then I remembered the white muslin fabric I had bought for another project. I had a ton of it (I need to get more now for the other project, then I’ll share that one!), and it was only $1.99 a yard, and 40 percent off of that.

Score!

It was perfect!:white drapesI found the swing arm sconces at Home Depot ($30-something each?) and they were EXACTLY what I was looking for! Squeal! They are so gorg. And they even had drum shades, with a yummy basket weave-like fabric. (Just like the wallpaper I used in this space!)

I still wanted to add a little something to the white drapes, so I decided to use extra fabric from his headboard project (coming soon). I started by hemming up the ends of the muslin with my iron and hemming tape:

hemming

Then I made panels of the accent fabric, hemming the edges with the no-sew tape:

And then I just ironed the panel to the muslin:

I rarely ever sew drapes – I always use hemming tape! I cannot stress how easy it is to use! I always buy the super weight and it holds up great – for years and years and years. You can even wash items you use it on. I buy mine everywhere – Joann’s, Hobby Lobby, I think even Walmart has it?

This project would probably have been faster with a sewing machine – but by the time I get my little machine out and then try to sew a straight line, I’d rather just use hemming tape. ;)

Now the little touch of navy blue really grounds the drapes, both literally and figuratively:

sconces

The extra fabric at the bottom helps to make them a bit more substantial and they hang much better now.

I planned to make the panels a little thicker than they are, but I didn’t have enough fabric. They ended up being eight inches tall:accent fabric

I love love LOVE how they look next to the built ins:

Wooeee, I am in love with this navy and white combo! Classic.

Each sconce takes a 75 watt bulb, so it adds a TON of light:

after

The sconces are on the wall behind the fabric – and to make it so the arms came through the fabric, I separated the panels of muslin – one slightly thinner panel on the left, one wider on the right. So the arm of the sconce comes right through the fabric:


I can still close the wider section when I want, so they are operational.

I’m thinking about adding a cornice at the top, but I’m a little wary that it will get too busy, so I’m holding off for now.

I am so thrilled with the transformation! Before:

After!:

nightI especially love this area at night! It’s so sweet to sit in this chair with the Bub – during the day, looking out on the land behind us. At night, reading, talking, just being.  :)

All in all this spot was in the cost of the sconces and the bamboo shades (from Lowe’s). The fabric I already had for other projects. It is one of the first things you see when you walk in, so I felt like it was worth it!

The room is coming along just as I saw it in my head. Lurve. Lots still to do in here – art, accessorizing, molding, painting, painting and more painting. :) I can’t wait to show you the rest!

P.S. You can see peeks to other parts of the room in these pics – I know I said before I was trying to avoid primary colors when I started thinking of the redo a year ago. The whole irony in all of this is that primary colors are all that are going in here! AND I love it! :)

Friday, March 26, 2010

How does your garden grow?

Really. I’m asking. How does your garden grow? Cause I want to grow a vegetable garden. :)

This year, I have been hit with the must-grow-our-own-food-I-may-not-ever-use-because-I-hardly-cook bug. I MUST have my own carrots. And lettuce. Pumpkins. (Ack! Can you imagine how fun it would be to grow your own pumpkins??)

I do OK with plants – we can’t have many inside because we have three cats. One of those cats eats ANYTHING green. When my sweet hubby sends me roses, we have to put them on the highest point in house, where I can barely see them or smell them – just so our vegetarian cat won’t eat them.

And if you have cats you know that just about every plant or flower is poisonous for cats. I stand in the middle of the Lowe’s indoor plant section quite often with my phone, looking up the list of poisonous plants – and it’s pretty much every plant known to man. (OK, I know. Not that many. But all of the plants I want.)

So anyhoo…I do OK outside. I’m super proud of my gorgeous azaleas and massive lilies:

DSC09892 I used to have a fifth azalea plant in the middle of that bed, but a nasty vermin, rodent, blasted booger of a thing ate the roots of it last year. So I need to find a matching species this year to replant.

I’m great with trees, bushes, etc. But for some reason I can’t keep a rose bush alive to save my life. I’m determined to master that this year – I think I’ve been planting them in the wrong spots.

So back to the food. Last summer I got this:

topsy050509

And it actually worked great! I cannot tell you my glee when I saw my first green tomatoes coming in. When they got red, and just needed a few more days to ripen…I went to pick them days later and every time, some blasted, nasty vermin, rodent something or other had picked them right off and ate them.
ALL of them! (The planter wasn’t hanging high enough, obviously.)

So that brings me to my questions. We are so fortunate that our backyard backs up to woods and a massive field – so we get a lot of wildlife. Wildlife that likes tomatoes. (??)

I know I need to create a bed – but do you just put up chicken wire or something similar to keep the animals out? Will animals try to eat all veggies, or just certain ones?

Also, are bugs usually a problem? And if you’ve ever grown a vegetable garden, what did you use as compost? I would love to use our grass clippings, but hubby uses chemicals on the yard occasionally, so I know that’s out. I found a compost pail you keep in your kitchen that looks like a great option to make our own:

bambcompst-actual

Has anyone tried it or something similar?

Basically, if you’ve ever grown a vegetable…and actually gotten to EAT said vegetable, I’d love any advice you can offer! I’m a total newbie! Any tips? Any veggies that are easier to grow than others?

I WILL have my own tomatoes. I will!! By the way, you all rock – in advance. :) 

Have a great weekend!

Wednesday, March 24, 2010

Lighten up!

First of all, the winner of the $50 HomeGoods gift card is Cindy from The Flipping Couple! Congrats Cindy! Email me and I’ll get your card sent out to you!

Sooo…this post could also be titled:

“Hello my name is Sarah and I suffer from DOCD (Decorating OCD)”

or

“I am obsessed with the color green.”

or

“Spray paint is ahhhhmazing.”

I couldn’t decide.

I don’t know what’s come over me lately – but I want to paint everything in our house cream. I mean, that’s typically not me. I’m more a warm, cozy, Black Suede paint from Behr kinda girl.

I don’t know if it’s spring or just that my tastes are changing just a bit, but it’s happening and I’m not sure why. I’ve been making minor changes lately to see if I like the lighter colors around here and so far I quite like it!

I’ve shown you the steps of my mini family room redo I’ve been working on over the past couple of months. Last week I was going to do a final post with the changes because I thought I was pretty much done.

Buwahahahaha! Pushaw…that is just something I should never say to myself. Very much like I should never utter the words “This should only take a few minutes.” Because that is the project kiss of death.

I made a few changes to this wall in our family room:

Some of you remember when I moved this Ballard Designs art to this spot last month. I like this so much better because it adds some color to this spot – it was all brown before.

What? What is that you say? It’s STILL ALL BROWN? Ummm…yeah. That was bugging me too. I’ve mentioned lately that I’m obsessed with contrast. I was craving more of it in this space, especially because the brown table, chair and storage ottoman were all melting right into the floor.

My first project was the ottoman – it was a half off purchase at Joann’s a few years ago. I bought it to house diapers and wipes when the Bub was born and it’s turned out to be great extra storage. It now holds toys. (Lots and lots and lots of toys. Help me.):

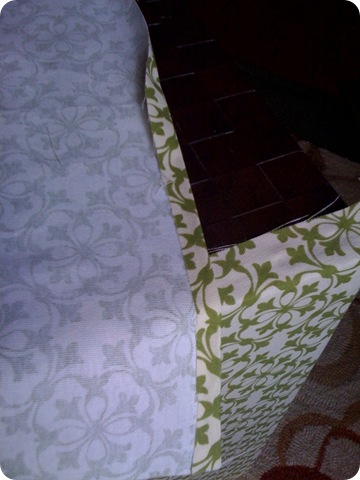
I got a yard of a patterned fabric at Joann’s for the base and two-thirds yard of a solid fabric for the lid. I took the lid off, then started wrapping the ottoman…

And realized I was inches short – because I am so freaking cheap!! Argh. So what should have been really easy (simple wrapping the fabric all the way around the ottoman and stapling inside) turned into just a project that was (just a little) less easy. I had to cut a piece of fabric for each side:

I just hot glued it down on the sides. Then, to cover up the rough edges, I made a hem using hot glue as well, and just applied each section, covering the rough edges as I went:

Then I stapled the fabric down on the inside and on the bottom and did the same with the lid. You can see how I made the “seam” here:

I cannot even tell you how much I love it now!:

015

The print is a cotton fabric and was $10 a yard and I used a 40 percent off coupon. The top is a cotton duck and was $8 a yard, then 40 percent off. Not bad for hot glue and a staple gun, eh?

I was so excited at this transformation, I just kept going! Whoohoo! I took a dollar frame from Goodwill and then covered a leftover mat with the same green fabric:


The frame has no easel, and the Plexiglas that was inside was a mess, so I propped it up on my own easel and will get a new piece of plexi to go inside soon. The picture is about two years old, but it’s got a cute baby Bub, so I’m OK with it.  ;)

The pull of HomeGoods forced me dragged me lulled me in the other day, and of course I couldn’t walk by the lamps. I fell. in. love. with this glass beauty:


It was $30 with the shade – a beautiful luscious creamy drum shade. I walked past it five times and tried so hard to get it out of my head…but I couldn’t. It came home with me. And it is is SO much brighter than my cute button lamp I had there before.

My next project was the Bub’s cutie patootie little rocking chair. I spray painted it brown last year and loved it…but my cream obsession was whispering in my ear…

“Spray paint it Sarah. Do it! And use that Heirloom White color every decorating blogger in America has used but you. Do it. C’mon. You know you want to!”

So I did:

Heirloom White had me hello. I also added a simple initial on the chair, which is one of those little things I have been meaning to do for the past year anyway.

It positively pops now! I adore it!

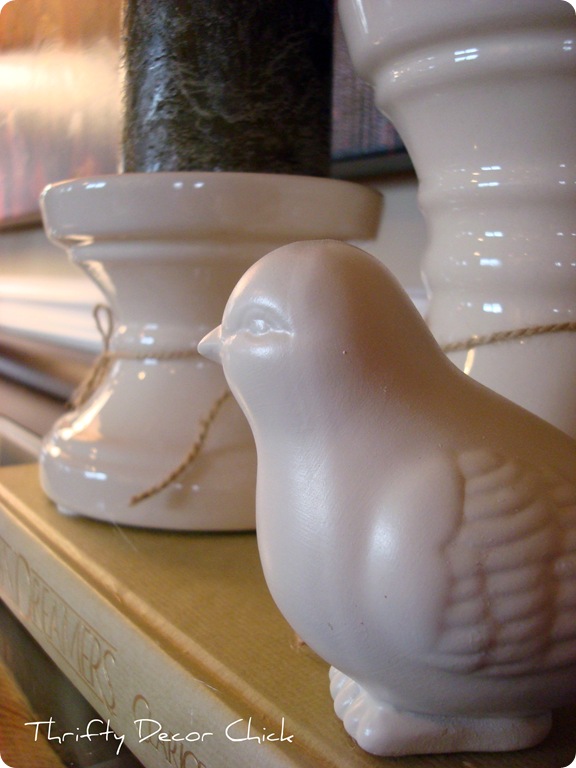
I rearranged some of the accessories, and found these beautiful chunky candlesticks at Target for less than $10 for both:

The price tag was hung by the jute and I just left that on – I love it! The little birdie was from the Dollar Store and I spray painted it with HW (now that I’m a user, I can make up nicknames for Heirloom White.) I have another project in mind for these cuties – I’ll show you soon. Aren’t they precious?

I added a huge basket from another spot in the house to the bottom of the table and piled it with blankets:

And now this dark spot:

068

Is now light, bright, creamy, loveliness!:

I know the picture sucks! I was losing natural light, so I had to use a flash. Argh. And YES I KNOW, there is a cord. I’m fixing it! (It was either cover the cord or get a picture before the sun went down. Priorities.) But otherwise, I LURVE. (If the sun is shining tomorrow I’ll take a better pic!)

Many of you will not be surprised to know I have one more idea in mind for this wall – I’m just not digging the candle sconces anymore so I’ve got a project in  my head. Let’s just hope it turns out like it does in my noggin.

You just never know.  ;)

Sunday, March 21, 2010

HomeGoods Spring Challenge!

Well helloooo and welcome to SPRING!! Isn’t it fantastic? It’s about darn time, that’s all I gotta say. (Although I see many of you got SNOW this weekend. For once, we had gorgeous weather!)

First of all –- the winner of Donna G.’s photography print is Stacey from The Blessed Nest! (Stacey has a beautiful site, check it out!) Congrats Stacey! Email me and I’ll get you in touch with Donna.

OK, onto more fun! I’ve been chomping at the bit to tell you about this one, cause it’s going to be FUN! If you’ve read this blog for a while, you know how much I love HomeGoods. I was just there today, in fact! (I’ll show you my latest find soon.) I can’t resist it’s pull, try as I might. ;)

Well, HomeGoods has a fantastic spring challenge starting tomorrow that I know you’ll love:

header_2

I am SO excited to be a judge for the HomeGoods Happy Spring Challenge! Each week over the next six weeks, HomeGoods will announce a new “Spring Trend that Makes Us Happy” on their Openhouse Blog, Facebook, and Twitter pages.

For a chance to win, you are invited to share your take on each weekly trend and how you use it to create a happy expression of your personal style. Your submission can be a picture from your home, a product, a mood board, fabric you think represents the trend...really anything you wish…be creative!

The prizes are FAB!! Every Monday, they’ll announce the winner who will receive one of the HomeGoods items reflecting that trend AND a $100 HomeGoods gift card! Also, that week’s winner is automatically in the running for the $5,000 HomeGoods shopping spree.

Um, did you hear that? FIVE GRAND BABY! Do you KNOW how much you could get at HomeGoods for $5,000??

Here are the details:

  • For six weeks, HomeGoods will announce one trend per week on 9 a.m. EST Monday.
  • Contestants can submit photos from Monday morning through 5 p.m. EST on Friday.
  • They’ll announce the weekly winner and the next trend on Monday morning and the process begins again.
  • You can enter at the HomeGoods Openhouse Blog, Facebook, and Twitter pages starting tomorrow!

But guess what the best part is? (At least for me, and a few of you!) I have a few $50 gift cards to giveaway to you, my Squeezies!! To kick off the week, I’m giving away one of them. Woohoo!

What better way to start off spring than with $50 to spend as you wish at HomeGoods?

All you gotta do is leave a comment here. That’s it! I’ll leave this one open until Tuesday at noon.

And for more chances to win, two of my bloggy friends are also giving away $50 gift cards -- Susan at Between Naps on the Porch and Melissa at The Inspired Room. Make the rounds and check them out!! ;) Have fun!

Monday, March 15, 2010

A blue room (I did not cry!)

It took me a whole year to figure out the paint colors for the Bub’s big boy room (are you tired of hearing about it yet??). I wanted something that was a bit more mature but still fun…and I was determined to NOT do primary colors.

Why? I have no idea. I guess because it was predictable? I’ve mentioned before how hard it is to create a unique space for a boy no matter what the age. His apple green and cream nursery was my answer to breaking away from the blue for a baby boy.

But a couple weeks ago, when the new room came together in my head – it had blue walls. Not just blue walls, but deep, navy blue walls. Navy blue walls that screamed, “A cute little boy lives here!!” All of the sudden all I could think about was BLUE.

Can I tell you – I’ve never liked blue. Not one bit. It’s just never been me. But lately, it’s really growing on me. There are three rooms in our house that may have tones of blue on the walls in the near future.

Well, make that two more -- one already does. This is why you never, ever, ever, NEVER say never. :)

Ever:

That light switch is crooked! Gah. That’s gonna drive me batty.

I have realized something about myself lately – I adore contrast. Like, big fat wanna marry it if I wasn’t married already LURVE contrast. This blue with the white woodwork is turning out exactly how I saw it in my head:

And look at this blue with the apple green!:

Ignore my scraggly paint lines on the green wall, and just pay attention to that beautiful color combo! I love it. I’ve already gone with other colors for the room, but seeing that green with the blue makes me want to keep the splash of apple in here.

For those of you who are freaking out that’s it’s going to be too dark – I promise you it is not and will not. The area under the chair rail will be bright and I have a few other tricks up my sleeve – you’ll just have to wait to see. ;)

I used the Behr Ultra paint for this project – from what Paint Guy told me, it’s the only version of Behr that is low VOC. Although at times I still felt like it was a bit stinky – I’ve used low VOC once before and it didn’t smell “painty” at all – this one did at times.

The Ultra also has the primer in it as well – which turned out super handy, cause I was going to have to prime over the little bunnies, lambs and words on the walls. Because I was covering a light cream with a darker, saturated color, I did have to do two coats, which I normally don’t do.

No hint of the bunnies peeking through, so it works!:

I can “cut in” with the best of ‘em when I’m going up and down on a wall…but horizontally I fail miserably. So I had to tape off all of the chair rail and crown molding, and the result is giving me the itchies:

002 004    

I may just recaulk everything, instead of trying to get the lines matched up. Dark paint is not forgiving!

I used a scrubbable flat paint, which I’ve used before and am quite happy with. It looks GREAT on the walls. As I’ve mentioned, I usually use an eggshell finish on our walls because it’s a great compromise between a glossy sheen (which shows all of the wall’s imperfections) and a true flat (which is just asking for hives, especially in high traffic areas).

You can’t see the roller marks with this paint either, which I LURVE. Overall, I’m really happy with it! And it was only $30 a gallon – I thought it would be much more than that. I’m a pleased peep with Behr paint:

017Home Depot was able to pull up the actual paint (called Admirality) from Lowe’s so they could mix the true color – I didn’t even have to color match it! That was super cool.

And guess what? I didn’t cry when I painted over those cute bunnies. Not even a sniffle. :) I am so excited with how the room is coming along, I am having a blast starting the transformation. I’ll show you more later this week!

P.S. My friend AnNicole wrote here about the Behr Premium Plus Ultra paint as well!