Monday, August 30, 2010

My heart is full

I truly cannot thank you enough for your incredible comments and emails over the weekend and today. I’m humbled and so grateful for of your prayers and thoughts. Each and every comment made my weekend.

The past few days have been filled with so much sadness, but SO MUCH joy and love as well. Our friends and family have gathered around us with real and virtual hugs – YOU included. It always amazes me how I can feel so much love at such a sad time – but that’s what it’s all about isn’t it? Celebrating how someone lived and realizing what we have to live for.

I don’t how else to express my gratitude but to just say THANK YOU from the bottom of our hearts. I mean that – each and every one of you are a blessing to us.

Tonight, I leave you with one of the bouquets that the staff at hubby’s school sent:

photo

Beautiful right? But do you see the extra special additions? Garlic, avocado, chilies and peppers – some of my father-in-laws favorite ingredients! Absolutely unique and stunning. He brought so much joy to those he cooked for. PERFECT. :)

Thanks again so much. This weekend has inspired me many ways – I’ll show you one way tomorrow. :)

Monday, August 23, 2010

Farmhouse table turned desk


Hello there!
I hope you all had a wonderful weekend! I got a project completed with a little bit of help. Actually…a TON of help. But it was worth it. :)
You may remember my travesty of a desk I showed you a couple of weeks ago. It was a hot mess of mixed colors, woods, textures…just a smokin’ hot mess:

I didn’t even finish it, I just knew it was on the road to nowhere. ;)
Then I found a farmhouse table through a friend of a friend and it was everything I was looking for and more…in a table. Vintage looking, the perfect size, beautiful curves, and it had me at $15:

But it was mess as well. WHY can I not find something I don’t have to touch? Drats.
So I geared up at my local True Value and one day started out by chipping away the little bits of brown paint with a scraper:
I thought it would come right off, but most of it was holding on for dear life. Awesome!
I figured I would give it a once over with my sander to see how much I could get off. Thankfully, I had picked up a lead test at True Value as well, just for this project. I showed you last year how to do a lead test, and whooee, I am SO glad I tested this before I moved forward with any sanding:
lead test
Not good.
By the way, pink means lead. RED means LOTS of lead. :)
lead test result
Fantastic!! (Do you sense the dripping sarcasm yet?)
I highly recommend doing this test any time you’re going to sand anything you even suspect to be vintage or antique. The lead on this table was not in the brown paint, (that was more recent) – it was in a layer I couldn’t even see!
I was so bummed out. My easy project had turned into a total science fair. :) It took about five minutes of staring at the table before I realized I wasn’t going to tackle this one on my own. There are two things that freak me out when it comes to older pieces. One is lead, the other is mold:

And this one had both. :) Double AWESOME!! YES.
So I searched online and found a nearby refinisher who I talked to at length, and then decided to just bite the bullet and take it in. Because I was only having them take it down to bare wood, it was less than half the cost of a total refinishing job.
And the peace of mind (with a three-year-old in our house) was SO worth it. They had to take the whole thing apart to work on it, which was fine because I needed to change the direction of the legs anyway:

(Since my plan was to use it as a desk, I need the legs to go long ways with the table.)
When I first saw the table, I wanted to just poly over it and keep the lovely patina. But when the wood was really cleaned off, it wasn’t in the best shape. My only option was to paint it, so I laid everything out in my workshop on the driveway, and spray primed it all:
Spray primer is a Godsend when I comes to legs and hard to paint pieces! Then I took it all inside and put it back together before finishing it up with a brush.
Because I’m using some blue in the fabrics and paint colors, I decided on a slightly lighter tone of the blue paint I picked out for the room – it’s a True Value color called Soft Hearted and I got it in mixed in Dutch Boy paints.
It’s a lovely light blue, almost grey color:

(It’s hard to see the blue in these pics.) I had never used Dutch Boy before and I loved it! Just the container is enough to make me a fan for life.
Because the table originally had leaves that dropped down, the previous owners reinforced the table and the leaves by using a thick piece of plywood:

Because you could see the edge when it was all put back together, I trimmed it out with with some scrap trim I had in the garage:

I didn’t have enough, so I still have more to do. :)
My plan all along was to take the whole tabletop apart and put it back together, because the wood had separated a bit:

But I kind of fell in love with it as is. When I painted it, I took a toothpick to each gap just to make sure it stayed goop-free. :) I think it shows the character and age of the piece, and I adore it!
I’ve mentioned about a bajillion times how much distressing stresses me OUT! This table was calling out for it though, so I did quite a bit on the legs and along the pretty edges:
And now it’s finally done!:
farmhouse table desk
I know it’s hard to imagine it as I see it in the final room, but it’s gonna be GORG. The walls around the desk will be white (for the most part), and the art will be just beautiful. If you could see inside my head, you’d so be oohing and ahhing right now. ;)
The previous desk was HEAVY, so I have to work on getting those ruts out of the carpet. (I let ice melt on mine and it always works great!)
Now I need a cover for my parson’s chair – anyone out there know how to make one? Helloooo? Anyone? (Remember peeps, I use hemming tape…I’m not a sewer! Much of one anyway.)
You Squeezies know how much I detest cords…so I took another trip to Target for one of those fantastic, honkin’ baskets (I returned something from another room just so I could OK it in my head. ;) )
I put the shredder and the computer cords in the basket, and I can easily plug them in when needed. The basket lets everything breathe (even though they won’t be plugged in while in there anyway):

I love, love, LOVE all the space I have!! I can use the computer, craft, whatever. The table is surprisingly even on top, but I may get a piece of glass cut, or cut down some wood and paint it to make a smooth spot for writing.
I still need to get some clear, water-based poly to coat it a couple of times, but otherwise, I’m DONE. It was way worth it to pay for the help. ;)
When I asked the owner of the refinishing shop his guess at the age of the piece, he said it was made in the 1920’s, at the latest. That made me very happy. I love old pieces, and I love bringing them back to life:
And this one has me fired up to get some paint on the walls!! Maybe tomorrow. Or next week. Soon. :)

*I was one of the bloggers selected by True Value to work on the DIY Squad. I have been compensated for my time commitment to the program as well as my writing about my experience. I have also been compensated for the materials needed for my DIY project. However, my opinions are entirely my own and I have not been paid to publish positive comments.*

Wednesday, August 18, 2010

Our warm and cozy family room

069

Since the beginning of August, I’ve been cravin’ some warm colors around here. Have I mentioned fall is my favorite time of year? A few times? Well, here I go one. more. time. :)

The warm colors of fall make my heart go pitter pat. They’re just so…well, warm. Ah DUH. I’m a wordsmith you know. ;)

I’ve never been one to really change out my decor for the seasons – I mean, I decorate for fall and the holidays and all that good stuff, but I’ve never changed out drapes, pillows, bedding…all the bigger items.

But like I said, it’s August and I’m trying with all my might to hold off on putting the pumpkins out. You’d be proud of me – I’m determined to hold off till September. (September 1st, but whatev.)

So I figured I could cozy up the joint with a few changes – but I wanted to make sure they’d work into the winter, spring and summer as well by making just a few changes when the time comes.

I was on a mission -- make our family room warm and cozy and fallish without necessarily being fallish. Just a schosh of warm. A leeetle bit of cozy. Just a smooch. Like you’re kissin’ your sister. (Name that movie!)

My first goal was to find a new rug. I got a new one back in January, but it was very spring/summery:

It was also way to small for this room. I layered a larger rug underneath it, but as time went on, it still wasn’t feeling big enough. And then Pee Cat struck again (CURSES!!! She owes me big time cash!!) and we needed to replace the big rug anyway.

Free cat to a good home!! Nah…I kid.

Kind of.

So off to HomeGoods I went again…and this time I found a GORG rug that was 7.3 by 9.3 feet. Score!! It couldn’t have been a more perfect size.

I hesitated on it for a bit though, because it had a color in it I almost never decorate with:

BLUE!!  :)

I waffled back and forth between it and another and finally asked the one person who always knows best – my three-year-old. He pointed to the one with blue and said “That one!”

And that one is was:

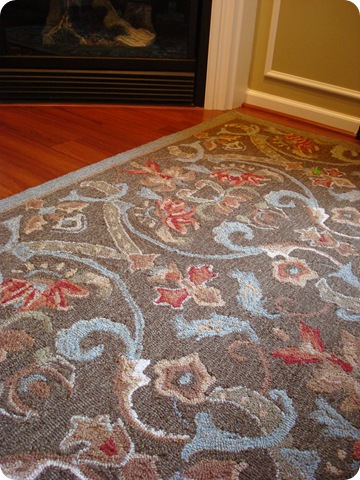
And ooooohhhh, I can’t even tell you how much I love it. Gleeeee! I love the blue touches!

I made few simple changes to the mantel as well. I had a smaller candlestick I picked up at Goodwill months ago, so I added it to the two to make a trio. (Decorate in threes – it works! Don’t know why, but it does!)

I sprayed the small candlestick in Heirloom White, the middle one stayed brown, and I found the PERFECT green called Oregano at Home Depot for the largest one:

I luuuurve that color!

I took the green grassy looking decorative balls out of my cloche, and replaced them with more rattan and twine covered ones instead:

Cause styrofoam wrapped with jute SCREAMS fall to me. Is it just me?

And it was done. I love it – the colors, the simplicity, the texture. YUMMY!:

007  

I exchanged the end table at the corner of the sofas with one of my favorite pieces eva:

It was a Goodwill find from waaaay back. And it was hideous green. My Dad stripped the whole thing down and refinished it as a gift to me. Check out all the detail:

Can you even imagine how much work that was? I LOVE this table and I wanted to have it where it was really appreciated. (Love you Dad!)

I finally get to use all my purdy blue books now! Cause I have BLUE in the room – yeehaw!:

080

I found a large tray for 40 percent off at Michael's to hold all the necessities:

You know. Like magazines, tissue, a yummy candle and a jute wrapped jar. Cause you never  know when you may need a jute wrapped jar.

:)

I know the tray is massive on top of that table, but I really don’t care. Love it. (It looks like it doesn’t fit from the angle above, but it does.)

The new accessories in the room are from around the house. They’re simple but full of texture:

There were a few splurges in the space as well…but they weren’t really splurges for me – they were all bought on credit.

Chillax peeps – not credit credit…store credit. And gift cards. Awww yeah. Is there anything better? NO, no there is NOT.  :)

When I found out the rattan storage boxes from our bedroom were recalled, I took them back to Target and got a store credit in return. So I was able to buy the FAB baskets I had been eyeing for months…for fareeeee:

Oh the dear lovin’ Lord, I adore these things. They are sturdy and pretty and HUGE.

And oh yeah -- the chalkboard labels? I’m dying.

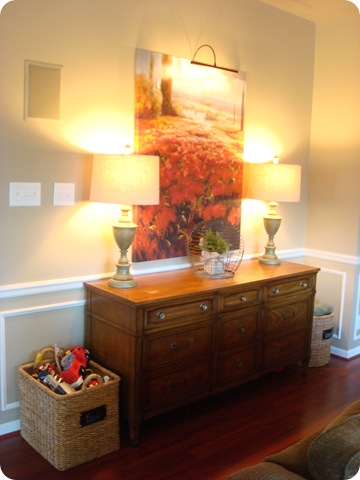
I got a round one and a square one, trying to overcome my symmetrical issues. :)

Then, it was time for the pillows. Oh, the glorious pillows. Sigh.

I had gift cards/credit for Pottery Barn, so was able to get a few of their pillow covers free o’ charge. I got some in cream, some in rust. They were $25 each, and I love their texture and the fact that they are washable.

Then, one day I saw a pillow in the most recent catalog, and there was this odd light shining down from the heavens on it and I knew…it must. be. mine. It was $40, and I only had $15 left on my credit, but I went ahead and paid the difference, and oh la la, it was SO WORTH IT:

Isn’t beautiful? It’s got all the colors from the rug – blues, reds, golds, greens. I just want to squish it, it’s so pretty.

Because I didn’t want to shell out the cash for inserts, I used other pillows and inserts from around the house to fill them:


:) They worked perfectly. For the longer pillow, a regular bed pillow filled it nicely:

Just the pillows alone warmed up this room SO much!

And now, we have a lovely, warm, cozy, almost-fall-but-not-quite family room:

family room

The bigger rug makes this room feel twice the size, I swear. It was $199, which wasn’t bad at all for how large it is. Especially considering the 8 by 11 was $400, for just a few feet more.

Because the room felt bigger, the $10 beadboard coffee table was feeling all wimpy. I moved the black Goodwill table from our living room into this space, and at first was worried it was too big. But after about five minutes, I was in LOVE:

The Bub can really spread out his games, anyone on the sofa can prop of their feet, and did you know doing laundry is waaaay easier when you have a lovely spot to fold clothes right in front of the TV?:

Well, it is! :)

All of these changes, along with the addition of the Craigslist dresser a couple months ago, have made this room feel so grown up and finished:

It is truly my favorite room in the house right now:

088

I love how my Ballard art has all of the colors of the room in it as well:See that little black smudge towards the top on that art? That’s why it was a fraction of the cost at the Ballard Designs outlet. :) It doesn’t bother me one bit for that price!

I love that most of the changes in here are easy to work with for all seasons – I can spray paint the candlesticks whenever I want, the rug will always work and a few pillows can be changed out to lighten up the space in the spring.

If you could see me right now, you’d see the dreamy smile on my face. Love:

;)

I’m in full fall nesting mode and loving it! I love these changes so much, I’m making a few to the living room too. I’ll show you that soon.

Have you started warming up your spaces? Are you pulling out the pumpkins yet? If you say you are, I’m SO doing it!!

**I keep forgetting to announce the Wuslu giveaway winner – I will do that in my next post for SURE.

Monday, August 16, 2010

Jewelry for your furniture

017Often I think it’s the little things that make a big difference when decorating – or maybe I should say little splurges. :) Things like decorative pulls and light switch covers make me smile. But they aren’t cheap, and they certainly aren’t a necessity, so I add them as I can.

One of my favorite little details are pretty knobs. You can absolutely transform the look of a piece of furniture with just new hardware. So reeehealy, when you compare buying new furniture to buying a few new knobs, that’s not really a BIG splurge, eh Dave Ramsey? Wink wink. Nudge nudge.

I showed you the fab selection of knobs and handles at my local True Value:

hardware

Excuse me while I wipe the drool…

Recently I was on a mission to find just the right knobs for my Craigslist buffet in the foyer:

I found the most beauteous glass knobs at True Value and they made a HUGE difference on this piece:

glass knobs Ohhh, aren’t they lovely? It’s all like PAAAADOW…I’m all glassy and crystally and shiny and you can’t take your eyes off me, gorgeous!

All that glitter for five bucks each. Whoooohoo!

One thing to watch for when you change out hardware is how the finish looks underneath. Sometimes if knobs are installed too tightly, they will damage the wood.

The person who painted my buffet (before I bought it) put the knobs on before the paint had cured. So they were practically glued to the drawers. (I had to take a hammer to a few of them!!)

I still need to touch up the paint around some of the new knobs because of that:

The brass hardware on my other recent Craigslist purchase is actually quite beautiful:

083

Yes, you heard me right. I just said brass was PRETTY. It’s the antique looking brass though, not the blinding shiny stuff. :)

I found some brass polish at True Value and went after these beauties with an old tooth brush:

The old finish is on the left, the cleaned finish is on the right:

Loverly! Not all of them cleaned up that well, but I’m just chalking it all up to the beauty of an old piece.

Obviously, I’ve had a bit of a Craigslist dresser obsession lately.  :) A few weeks ago I picked up a Henredon dresser for our bedroom for only 50 smackaroos (AWWWWESOME!! I’ll show you soon!), so I was moving dressers around all over the house. The old dresser in our bedroom moved to the guest room, and the one in the guest room had no home.

It’s the one from the Bub’s nursery, and it’s just lovely:

Sniff. Sigh. Boohoo…I changed my baby on this dresser for so very long. :)

I knew I wanted to use it somewhere, and then it hit me – with the new table-turned-desk for the office, I needed storage. Why not put the dresser in there?

As it was, it just looked a little off. So I was off to True Value again, checking out their selection. I found just the knobs I was looking for, and then picked up one of these jobbies as well:

I had one of these guides years ago and have no idea where it went – I was SO glad to see they had them! Turns out my hardware screw holes were two inches across, so I none of the holes on the guide matched up. I just drilled a new hole where I needed it, which made it a little harder to keep level. (Ignore the circles – those were reminders for another project.)

Normally you could just rest the ledge of the guide on  your drawer. But I’m difficult. Always. :)

I used the original hole in the drawer as my center, and made sure the two for the new pulls were level by using a small level on top of the guide. Then I marked the spots with a pen and drilled the new holes:

And installed my purdy new pulls!:

Love love LOVE! It makes it look so much more office-y. :)

(Just imagine it without the brick wall color and the cords piled up next to it, and with molding on the wall and all new art and accessories…umkay?)

I lined the drawers with a fun green contact paper:

You know I love you when I show you where I keep my Dymo label maker.

Don’t even think about it.

:)

And would you looky there…room to grow:

It’s going to work great in the office!

Speaking of the new look, I think I found all of my paint colors for the redo at True Value as well:

With white molding, of course. :) Now, I just need to paint. My lazy summer living booty is not looking forward to that…but my fall is coming, let’s get things DONE booty is saying let’s just do it already!!

We’ll see who wins. ;)


*I was one of the bloggers selected by True Value to work on the DIY Squad. I have been compensated for my time commitment to the program as well as my writing about my experience. I have also been compensated for the materials needed for my DIY project. However, my opinions are entirely my own and I have not been paid to publish positive comments.*