Showing posts with label windows. Show all posts

Monday, June 9, 2014

A glass door, sorta kinda

Hello to you! Hope you had a great weekend! Ours was lovely – lots of time outside, a date night with my hubby and family time as well. So happy that summer is here!

So a couple years ago I wrote a post that got a huge response – I never imagined talking about glass doors would be so interesting. :) I spoke of my desire to add some glass to our front door. We have a transom window above the door and five windows in the living room/foyer, but because we face north the foyer especially can feel dark.

It got even worse when I painted the inside of the door black years ago:

black front door

I LOVE my black doors though, so that was staying. :)

So many of you agreed with the desire to have that natural light coming in as well. Those of you who already have glass sidelights or doors were mixed – some loved it and some hated it. Because a lot of you are in the one percent like me:

Ninjas!

So the years passed and I still couldn’t get over how much I wanted some natural light up there. And the boy got older and I really wanted to be able to easily see where he was at outside. One day I realized I was going to just do what I said I would never do – get a storm door:

glass storm door

I’m going to be honest here – I used to be a storm door snob. I mean, in my defense, there are some that aren’t great looking. I have just always preferred the look of just the plain door.

But my mind changed. It happens. I’m growing, changing, all that stuff.

We got it from Lowe’s and it was actually a long wait to get it installed. It was about six weeks, maybe more, from start to finish. The last two weeks were the hardest – it was getting nice out and the Bub was outside all the time and I wanted that glass door so bad!

When it was installed I instantly felt very mom-like and very suburban. You know how I feel about suburban – some think it’s a bad word but it’s me. Proud of it.

I’m not totally obsessed with the way it looks from outside, but it’s not horrible at all. I went with a cranberry color (there weren’t a ton of options) because I figured it would work best with our front door. When I got home from ordering it I realized how much more rust our door is than cranberry, but I really don’t mind it:

glass storm door

For a hot second I thought about painting the door again but I think this is fine as is.

We ALL love it. It’s open all day, everyday. LOVE love love. The animals are obsessed:

I do know one thing now though – I could NOT do an all glass regular front door. No way, no how. When darkness hits that baby is closed and I need my privacy.

I was so thrilled about the door I figured it was time to update the trim like I’ve been doing all around the house. What a difference!:

black interior doors

You can see how I install my DIY craftsman trim here.

Now it works great with the new window trim up there as well:

thick window trim DIY

I still need to do some caulking on the door trim but it’s almost complete. I want to replace that foyer tile even more now! I still need to finish up replacing the chair rail throughout this front area as well.

We’re enjoying all the natural light that the new door brings in. I adore it! It makes the whole house brighter. We went with the heavier storm door with great security features, so I feel comfortable leaving it open all day:

craftsman diy door trim

Do you have a storm door? Does it make you feel incredibly suburban? :) Or do you have a glass front door and love it? Either way the natural light is amazing and I’m never going back! Whoot!

Tuesday, April 15, 2014

DIY craftsman window trim

WHOOT! I finally tackled a DIY project that I’ve been wanting to do FOREVER. But I was afraid…so afraid. I am excited to share it with you – there are a lot of pics so grab some coffee or a Coke and enjoy. :)

In addition to beefy baseboards and door trim, my dream has always been to add chunky trim around our windows. It just adds SO much character, I just love it. But all these years I haven’t been able to do it because our window sills weren’t wide enough. A long time ago I realized I could add some very skinny trim around the window that would match up with the sill:

This is a before I shot quickly before I started three days ago when it was 80 degrees and gorgeous. Today it’s 32 and snowy. But I digress.

To do the trim I wanted to do I’d have to take the whole sill (or stool, as it’s technically called) off and that intimidated me. But then I saw Cristina’s tutorial last summer and I thought it wouldn’t be as bad as I thought. I ended up following her instructions and they worked perfectly!

I actually wanted to do this SO badly at Christmas after we got our tree up. I thought it would look so lovely to have the beefy trim on the windows, but I reeled it in and realized starting this in December was not the best idea. ;)

Fast forward a few months and I finally started! First up, I removed the apron underneath the sill. Fun story – in the CRAZY cold we had this winter the window was iced up and when it melted it went into the wall. That area below the apron was a big bubble of water. Good stuff!:

So first you need to score all the areas (with a razor) that are caulked, otherwise when you pull the trim off it will pull the paint/drywall away:

removing window trim

I freaked for a split second when I pulled it off and thought there was mold:

But it was just overspray from when the room was painted years ago. :) Whew.

Here’s where I forgot to take a pic, but after the apron is gone, you take a crow bar and start pulling up the stool, or the sill. It was actually MUCH easier than I thought it would be. I mean, I’ve stood on these things – I thought they’d be impossible to remove. But they came up pretty fast and easy.

The only issue I had was the ends would start digging into the drywall as I pulled up:

When I worked on one end at a time (instead of trying to pull the whole thing up at once) it helped a bunch. I just focused on one side and got that up and clear of the drywall, then got the whole thing out. I do have to touch up a little drywall there but it’s not bad.

This is the shape of our stool when it was out:

removing window stool

And here’s what it looks like underneath:

removing window sill

I was actually AMAZED that we didn’t have any water issues – our windows get condensation every winter if we don’t adjust our humidifier in the HVAC system just so. And they were covered in ice more than once this past winter. This shows the power of glossy paint and caulk my friends!

After all that I took the skinny trim off the sides of the windows:

removing trim

I kept that all for future projects. I’ve used it on all of the wainscoting in this room.

Then I started the process of building up the new trim. I shared this image when I did my first craftsman door trim and it is so helpful:

  craftsman window trim

I can’t find their size used for the fillet, so I use a trim piece called stop instead. It works great.

Also, our window sills are deeper so I had to use 1 x 8 wood instead of the standard 1 x 5. I followed Cristina’s instructions and used the old sill as my guide for the new one. The only thing you need to keep in mind is your trim that will be on the sides of the windows – mine was 3 1/2 inches and I wanted the stool to stick out a bit from that, so I traced the original onto the new wood, but gave myself four inches:

craftsman window trim how to

Here’s how it looks installed so that makes more sense:

craftsman window trim how to

I followed my traced lines with a jigsaw to cut it out. Don’t worry if the lines aren’t perfect!:

craftsman window trim how to

They will be mostly covered with the new apron and the trim on each side of the window. The parts that aren’t covered are easily fixed with caulk. (My BFF.):

craftsman window trim how to

Putting up the trim is my favorite part! Seeing it come together is awesome. You’ll notice in that pic above that I had to pull off some other trim – more on that in a minute.

I took my sander to the edges of the new sill because this pine has really sharp edges. I do this on all of the door trim I’ve installed too:

I just knock it down a little so it’s not so pointy. If you have a router this would be even better. Then I did one coat of primer and two coats semi gloss paint on everything. I may go back over the stool with a high gloss just to make sure it’s waterproof.

So when I was putting the new trim up I realized the wainscoting I installed years ago was going to be in the way – I had to pull off each box on the wall and reinstall it all to make the new trim work. Total pain in the butt.

Some of it you can’t see, but some areas I still need to putty, sand and paint again:

craftsman window trim

I still need to touch up that area that was a bubble of water too. :)

But that will come later because for now I’m enjoying the new window trim that I love! Whoo hoo!:

beefy trim around windows

I had to pull the chair rail down to do it and I’ve wanted to replace it for a while anyway, so I started installing a new simpler rail:

trim around windows

I only have one wall done so far. I can’t BELIEVE how different the room looks with the beefier trim around the windows.

I took the drapes down before Christmas (you know, thinking I would do this back then), and I don’t know if I can put any back up:

craftsman window trim how to

We’ll see. :)

Here’s a closer look at how the new chair rail, reinstalled wainscoting and new window trim works together:

DIY wainscoting

I still need to clean up the walls a bit like I said, and caulk around the trim up higher, but for now I’m calling it good!:

thick trim around windows

I took one of these images and detailed the wood I used:

how to install new window trim

That should help if you’d like to try this yourself! Remember the 1x2 and stop up on top and the stool on the bottom will be a bit wider than the other pieces. The ones on top are 1/4 inch longer on both sides and the stool on the bottom is 1/2 longer on both ends.

Here’s a shot of the before again:

And here’s the after:

DIY craftsman window trim

Now…I just need to find someone to add the trim to the upper windows. Cause this girl is not doing it. :)

Have you beefed up your window trim? Like everything else, it will take me years to get it done throughout the whole house, but this start makes me happy! Big props to Cristina for her awesome post that gave me the courage to tackle this one! And if you have any questions let me know in the comments – I tried to cover everything but I always forget something.

Monday, January 27, 2014

Blocking the sun (new drapes)

Hello all! Hope you had a lovely weekend! I had a great time out on Saturday with some friends and also got plenty of family time in too. It was a great one.

This week the posts will probably be up later like this one – it’s so cold here and will be all week so we’re expecting school delays most of this week. That means my kiddo doesn’t get off to school till almost 11 so it pushes my day back quite a bit.

Have I mentioned it’s cold? Yeah. I’m still doing OK with it – in another two weeks I’ll be about done.

So I’m thinking more about the master bedroom redo lately. I’ve made changes over the past six months or so – I started painting (and stopped, but now I know my direction and I’m going to start again), made a new headboard and made a couple other changes along the way.

I sold our old bed so I have $500 to spend on the redo and so far I’ve spent about $350 (including items from today’s post) to start the transformation. That includes bedding, the headboard, all new window treatments and some of the paint.

The only part of the redo that won’t be covered by that $500 are the new floors…which we decided we will go ahead with next month.

Lately my focus has been on the windows. Up till about Christmas they've been nekked (I took the old drapes down months ago) with only some wonky roman shades up:

The roman shades are about seven years old, maybe older. These are the shades I spray painted years ago. (Yes, spray painted.) The new color held up great – the shades themselves didn’t. You can see in that pic that the left one wouldn’t go higher than half way.

I got tired of the room being so dark during the day so I finally got some new ones over the holidays and hung them a few weeks back. This time I went higher above the window and did the outside mount instead of inside the actual window frame:

IMG_8143

In this pic they are pulled all the way up to top of the window – LOVE it. It lets so much more light in the room and also makes the windows feel bigger. (More on that in a bit.)

That was a big change but I knew I wanted something else to soften them up. I’ve had my eye out for drapery fabric for months but wasn’t finding anything that worked that worked with the busy bedding. I wanted something really simple and it wasn’t till I was in IKEA a couple weeks ago that I realized a solid color would be perfect:

sanela panels ikea

They are the Sanela curtains – they look like velvet and I got the dark gray. Because the roman shades are hung higher I needed to clear those so I went with the 118 inch drapes. ($70 for two panels.)

Turns out I had to cut about 17 inches off the bottom and hem them to make them work so I was thisclose to being able to get the cheaper (shorter) ones, but I’m glad I went with with these in the end.

Anyway. I had picked up a long drapery rod at HomeGoods a couple months back so I got that up yesterday. Hanging drapery rods is one of my least favorite jobs, really. It’s easy, just tedious. The hardest part is making sure you place the hardware in the exact same spot on both sides of the window. Once you get your measurements figured out, mark where you need to drill, then use a stud finder to see if you need to use anchors or not:

how to hang drapery hardwarehow to hang drapery hardware

You know Mama went out when the nails are painted. :)

The stud finders are sometimes wrong, so I always use a drill bit to make my holes first. If I hit wood I know I don’t need an anchor there. The finder said there was no wood in this spot, but when I drilled the top one hit wood:
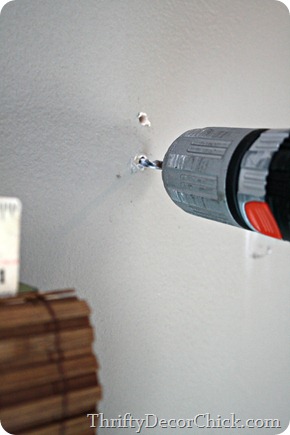
how to hang drapery hardwarehow to hang drapery hardware  

Now that I show you in photos it seems like the easiest project ever, gah. Like I said, it’s not hard…just time consuming to get all the parts level and secure in the wall.

So these drapes have grommets and I LOVE them. I’ve never used grommeted drapes before and the fact that they hang so nicely and you don’t need rings/hooks is awesome.

Our window is so close to one wall (shakes fists in air at home builders) that I don’t even put the decorative finial on that side:
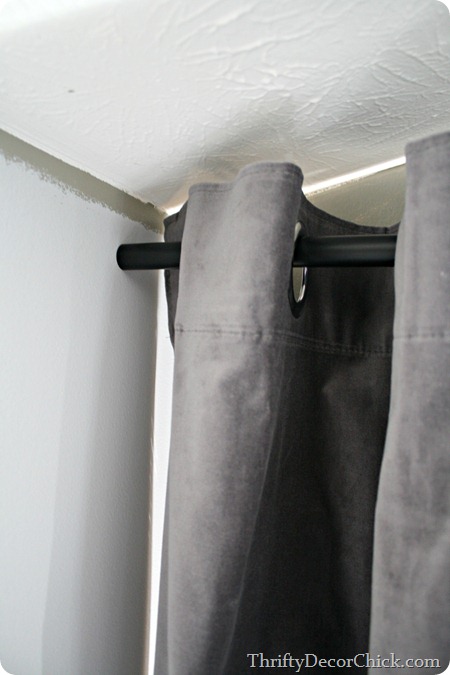
hanging drapery hardware

You can’t even tell when it’s up. Also, if you’re going to use your drapes (we are in here) then I always recommend placing one drapery ring (or in this case one grommet) on the end, on the other side of the hanging hardware. Does that make sense? This keeps that end of the drapes from moving when you pull them shut.

I love the pretty glass finials on this rod:

hanging drapery hardware

I used to go big and chunky with our window rods and finials but over the past few years I’ve moved to lighter and thinner.

I waited to take pics this morning which was DUMB. This room is impossible to photograph, especially in the morning, but this gives you an idea of how it came together:

hanging window treatments high above window

YES, the walls are still two different colors and YES I still haven’t finished painting the wall to the left, but I’m sure of what I’m doing now so I’m moving forward…finally. :)

Let’s just pretend the walls are all painted, OK?

I got them up and REALLY loved how they looked. They are sophisticated and a little sexy and I love them. When the walls are all the light gray they will stand out even more. I get a lot of questions about how well the bamboo shades filter light -- these are the shades I always get from Home Depot and they have a tighter weave then most:

bamboo roman shades

Keep in mind all that sun across the floor is from the reflection in the mirror.

In general I think they are fine without liners (I’ve found bamboo shade liners at Lowe’s), although there is one point in the morning when the sun moves across a sliver in the shade and is like a laser beam into my face, which I’m so not cool with. I wanted to make sure the drapes would be thick enough to block it out and our room was so dark this morning, it was awesome.

Here’s the same shot, same time of day with the drapes closed:

sanela ikea curtains

All that light is coming from the other side of the house. The room stayed nice and dark.

So quickly, here’s my thought on hanging window treatments high above a window. I think most of the time it really can make a huge difference – it can make a smallish window look and feel much bigger. Hanging my bamboo shades higher really does let a lot more light in too. BUT – I think sometimes doing this can look really awkward too. I recommend hanging your blinds/shades higher if you plan to hang your drapes higher too. Otherwise the illusion is ruined, if that makes any sense. You can see the true height of the window if the shades are hung using the inside mount and if you hang the drapes a foot higher it still makes the window seem small, you know what I mean? I think when both are hung higher than the window it comes together nicely.

You know, the real issues in life…where to hang your drapes. :)

I decided a while back that I wanted our bedroom to be more sophisticated then it’s been in the past, but also soothing. I’m usually not one to use similar tones throughout a room like this, but I’m loving how it’s coming together.

Once this wall is painted and the floors are redone I think it’s going to be really pretty, I’m really excited about it:
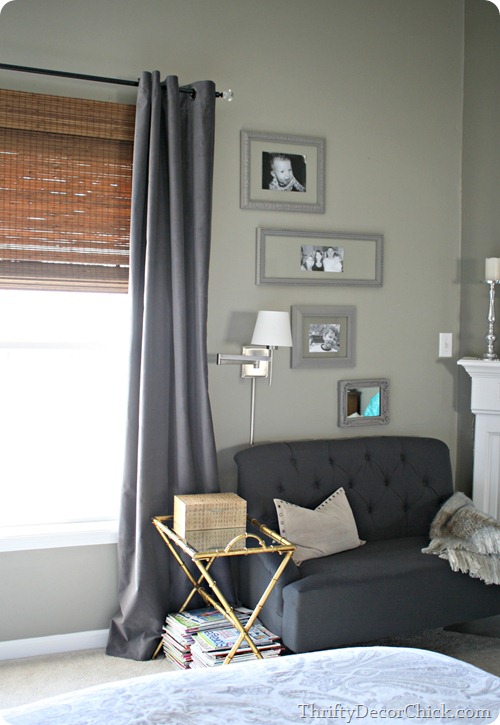
And YES I still have a magazine problem.

Other than painting I have a wall treatment idea in mind, I’m planning on a redo for that floor length mirror and I hope to recover the bench at the end of our bed. Lots to do but I’m happy with how it’s coming together.

Do you love roman shades or are you a blinds girl? Do you hang your drapes high or like them low?

Wednesday, August 28, 2013

How to line drapes (with what you have)

Hello to you all! I have a fun little project for you today – the afters aren’t anything earth-shattering, but it’s one of those to-do items I’ve had on the list (in my head) forever. And I did it without spending any money!

I mentioned earlier this week that I’m going room by room in the house decluttering (and cleaning). It’s taking me a long time. Eons. I don’t see an end in sight. Help. me. I have our bedroom and bathroom (and I’m ignoring our closet like usual) and then I’ll move on to the other floors. Working my way down sounded like a good idea when I was all gung ho about this idea weeks ago.

Anyway, part of the reason it’s taking so long is because I’m taking care of little (and huge) projects along the way. I try to ignore them but then I start twitching and I can’t concentrate and the annoying voice in my head goes “Oh it won’t take long, just do it!”

So I do. This is one of those. Our drapes in the loft/playroom/craft room have been hanging for a couple years, but they’ve really been pieces of fabric hanging, not drapes:

P. Kaufmann blue green fabric

It’s what I do. ;) It’s not the first time I’ve done this. If you don’t mess with the drapes you can’t tell too much. It depends on how much light pours in the window. These are a linen-like fabric so very light and sheer and they were looking kind of awful not being lined. Did anyone ever notice it? I doubt it. But it’s something that was bugging me.

So I went to my fabric stash for some lining. I went through all of it a few weeks ago and knew I had some bigger pieces. Well…I had two that were about a foot too short and nothing else that worked. And at this point I’m ready to do this thing so I’m racking my brain trying to think of what I could use.

I was about to just save it for another day (a non no-spend month day) when a light bulb idea hit me. (LIGHT. BULB. Name that movie.) I knew we had an extra set of cream sheets for our king-sized bed that we haven’t used in a long time. We have two sets we rotate and this was a cheap extra set we never use.

So I threw the flat sheet on the floor and realized if I cut it down the middle it would totally work. SCORE! I’ve seen this done a million times so it’s certainly nothing new, but it worked for me since I’m not spending on decor/DIY this month.

I figured I’d give you a quick how-to-line-drapes tutorial – but keep in mind I’m not a GREAT sewer. (Seamstress?) I just do things they way they work for me and they’re not perfect.

The big thing here – you need to lay your fabric with the print side down. If you’re doing a pillow, both printed sides need to face each other. When you’re done you’ll pull it back inside out so the good sides are out. This hides your seam:

how to line drapeshow to line drapes

I don’t pin the whole thing to start – just the top. I get that where I want it and pin it, then sew that part first:

how-to-line-drapes4

Speaking of sewing. Do not be afraid. This is your friend:

brother sewing machine

I promise, if I can sew, you can sew. I’m not good at sewing. Not a great sewer-of-straight-lines. But the thing is, no one will notice your lines aren’t straight. YOU won’t notice. (Unless you’re sewing something with vertical stripes and in that case good luck to you my friend.)

Half the battle is learning how to get the machine threaded and it’s not hard. It shows you how to do it right on the machine and takes about a minute.

Then you sew. Like a boss:

how to sew

I love hemming tape, and for years I used just that. But we have animals and I found I needed to throw stuff in the washer occasionally. The hemming tape will actually hold up for a wash or two, but after that not so much. And honestly? Sewing may even be faster than hemming with tape and an iron. Once you get going it’s super fast.

You really want your lining to be slightly smaller than your fabric, so at the end you can iron the edges over so you can’t see the lining. Does that makes sense? You want the printed fabric to be seen from the side, not the lining. (I kind of help that along with the way I hang them too.)

The ironing afterwards took longer than sewing each panel, no lie:

how to line drapes

Here’s an idea of the different the lining makes. It makes them less see through, yes (you can get black out lining from the fabric store) but it also makes them fuller and they hang prettier:

difference between lined and non-lined drapes

Wimpy on the right, lined on the left.

Since I was at it, I took care of another quick little project. You can see in the pic above that the bamboo shades were hanging inside the window. I’m obsessed with getting as much natural light in this house as I can so I moved them up.

They now hang on the wall above the window:

hanging roman shades above window

It’s a little thing but it all looks so much better to me!:

lining drapes with sheets

I use the little clips to hang my drapes but hate seeing them, so I use this trick to hide them from view. It gives your drapes the look of pleated ones (that are way over my head).

This room is way in between decor-wise, but at least for now it’s decrapified and clean. And the window looks nice. :)

line drapes with sheets

The “create” is coming down next. I think I need a break from words on my walls. ;)

So do you know how to sew? Have you ever used sheets to line drapes? I use sheets from Goodwill for my spray paint “tarps” occasionally – but I may need to start looking for more to use as lining. After a good wash of course. :)        

**You can see more about my DIY craft table here.

**The fabric is called Spring Vine Opal from P. Kaufmann.