Showing posts with label lighting. Show all posts

Wednesday, June 4, 2014

Barn light love

Hey hey all! I’m back today with a little progress in the mud room. I am SO excited – I love when things come together the way they look in my head. :)

Because this space used to be a laundry/mud room combo, and it drove me absolutely mad, and was always a disaster:  pit of despair

We had outlets in that little nook where the washer and dryer were. I kept them when I added the DIY bench and the beadboard. I’m not sure what we’ll ever use them for, but I’m not one to ever cover up an outlet: DIY mud room bench

You never know when you might want them!

So because the two outlets were perfectly spaced on the wall I got an idea a few months back, and it finally came to fruition:

barn lights

Sconces baby! Yeah!

Our electrician friend has been crazy busy so I figured I would do it when he was available. He was free a few days ago so for $150 I had these installed in a couple hours!

Did you know if you have an outlet, you can add a sconce above it? You just need to tie into the electrical and add a switch – no biggie. ;) Actually, it doesn’t seem that hard, so I’m determined to figure out how to do this on my own. I have so many spots in the house I’d like to add some wall lighting.

I am so thrilled with how they look! Ack, I just love them:

mud room beadboard

I was so happy I celebrated by painting the door trim in the room! Everything still needs one more coat of glossy white, but I’m just happy to not have the bare wood staring at me every day.

The galvanized barn lights were from Lowe’s:

galvanized barn lights

They don’t match the hardware in there exactly, but I’m not worried about it. It’s the same lighter tone. It is SO nice to have added light in here: The main light in the room is a fluorescent light, and while it is very bright, it’s so dang ugly. :) I’m thinking of replacing it so it will be nice to have another light source.

I just think they are adorable:

bench made of kitchen cabinets

That little mark on the wall above the pillows needs to be touched up – that was where he was going to put the light switch but our old dryer vent was there, so it’s on the right instead.

It’s coming together! This room has undergone a HUGE transition and it’s functioning so well for us. I’m so grateful we were able to move the washer and dryer to the basement.

Our cats LOVE that bench cushion, by the way. One of them is laying on it every time we walk in the door:

DIY mud room bench

Even our elusive Maine Coon came out for photos. ;) He doesn’t show up here on the blog often.

I’m getting closer to the end of the DIY list for this room…a little more painting, touch ups, the storage on the wall above the bench, crown molding…and then some fun final touches like art and a few accessories. Can’t wait!!

Have you added sconces anywhere in your home? I’ve used plug in versions a few times in our house – in our master, the basement and two in the Bub’s room. Love the look of them!

Tuesday, April 8, 2014

Updated 80’s light fixture

Hey hey! I’m back with a project that I let sit around for nearly two years. It’s been moved around the house – the garage for a while, then it’s future home (the dining room/library) for the past year or so. Just sitting there. For a year.

It was time. I found this light fixture at the Habitat Restore almost two years ago, even before I finished up the bookcases in the dining room:

painting brass light

It was $20 and I loved the shape so I snagged it up!

I think the main reason I let it sit so long was the work that I knew would go into transforming it. Meaning taping all that off to paint it. Bleh. Not fun.

I pulled out my rub n buff first, thinking I may be able to get away with no taping off and spray paint. But the dark color I had was dried as hard as a rock, I couldn’t get any out of the tube. Wah wahh. So I knew I’d have to spray paint it. I did consider just leaving it – the brass didn’t horrify me. :) But I wanted it to stand out more and I knew a darker color would make that happen. And the brass looked fine in some areas and horrible in others, so it needed to be covered.

It came apart into two pieces and I cleaned it well:

painting brass light fixture

This one helped:

Then it was time to tape all that off. I came up with an idea that helped though! I just laid the painter’s tape down over the glass and then used my razor to “cut out” each one:

taping off glass on light fixture taping off glass on light fixture

It worked GREAT. I timed myself and it took one hour and 15 minutes to tape off the whole thing:

taping off glass on light fixture

That’s 64 sections in one hour and fifteen minutes, so not too shabby! And when you’re sitting in front of the TV watching Flipping Out the whole time it’s really not too bad. :)

About half way through I realized the inside would still be brass, but you pick your battles. No way was I going to try to do the inside. So it’s still brass, but you can’t even tell.

I took it and the smaller pieces outside (YAY for spray paint weather!!) and primed them with black primer, then sprayed them in oil rubbed bronze spray paint (I’ve tried them all and all look great). Then I hung the light part in the garage and sprayed it the same way:

spray paiting a light fixture

Those white sleeves were brittle and falling apart so I just kept them on to protect the electrical stuff while I painted.

By the way, I don’t always prime my metal light fixtures – it’s not something that’s going to get wear and tear. But I was almost out of my ORB spray paint so I wanted to make sure it had a dark base.

When the parts were dry to the touch (about an hour later), I installed it inside:

painted 80's brass light fixture

The chandelier we’ve had in here has looked odd to me since we started the transition to a library instead of a dining room. (Read more about that here.) Our old kitchen table still sits in here, only because we haven’t made the new furniture a priority. (Four matching chairs isn’t going to be cheap!)

Anyway, the old light was too detailed for this space and I wanted something a bit simpler. I think the darker paint makes this light look a million times better!:

DIY bookcases

Eventually I may get something else (I’ve had my eye on another light for a long time now) but for now the $20 one that’s been laying around for years works GREAT. :) I won’t do anything until we get the furniture for this space anyway.

Part of the reason I finally got this done is because I’ve been wanting to move the chandelier that was in dining room to the bedroom:

pottery barn light from home depot

I’ve had another Habitat light up there for years but I wasn’t loving it anymore – and it was just a place holder till I could get a chandelier in there. :) This worked out perfectly!

The chandelier was from Home Depot and I got it because it was so similar to the Pottery Barn version, for about $200 less:

img73c 5450f114-4a75-4e08-a540-aa5969a5cf1b_300

(PB: source, HD: source)

I LOVE this light! It is gorgeous in the master bedroom:

chandelier in bedroom I’ve been planning to use this one in there since I finished up the bookcases in the library, so it’s nice to finally get it installed!

So there you go – a $20 light, spray paint season is BACK and a little light switcharoo! I feel like I got two lights for less than $25 – I had to get new white sleeves for the dining room light so that added a few bucks. And when you buy the light two years ago, does that even count? :)

Have you spray painted a light fixture lately? It’s amazing what paint will do to help update them!

Tuesday, January 21, 2014

The right distance

Hey heyyy! So I’ve been planning this post forever because I get these questions a LOT. They are serious, important, life-changing questions like…how high should I hang my light fixture?

See, this is DEEP people.

So I compiled a bunch of frequently asked size/distance questions and my advice. These aren’t rules cause I don’t believe there should be any rules when it comes to decorating your own house. But they are guidelines to help you make things look and feel “right.”

First up, the headboard. I’m asked a lot about the size of our DIY headboard:
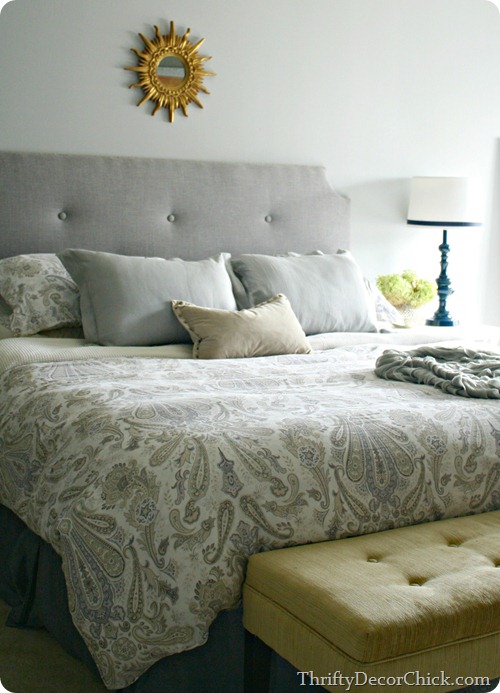
DIY tufted headboardI wanted the width to be just ever so slightly bigger than the bed. So I went with about 77 inches wide. For the height, I hung it so the headboard was about 57 inches high off the floor. I’ve read that 48 inches is a standard height for a headboard but that’s too low for me. I wanted to be able to sit in bed and have my head rest comfortably. Our old headboard was shorter and that drove me batty.

The height depends on your room, the ceiling height and the look you’re going for too. Some want an exaggerated, high headboard for the drama of it, which can totally work.

Now, let’s talk lights. First up – the size of the light. The general rule is adding up the dimensions of your room and that will determine the width of your light. So if your room is 15 by 15 feet, you’ll want your light fixture to be at least 30 inches in diameter.

Of course there are exceptions to that too – we have an open kitchen/family room so I went larger in there, even though the nook isn’t big at all:

How high to hang light fixture

I err on bigger instead of smaller for my lights, at least now. I’ve had smaller lights in that spot and they never felt right to me. This one feels right, but it’s also a fairly “light” fixture – not heavy feeling so that helps it from looking massive.

Also, if you have super high ceilings you can throw those dimensions out the window and go pretty big.

Where you hang you light matters too. The general advice is 30 to 36 inches above your table. I’ve also read a standard 66 inches from the floor to the bottom of the light, but I like to base it off of the table, not the floor.

Here’s the thing – I hung our dining room fixture (this room looks completely different now) at 36 inches above the table:

Chocolate brown dining room

And I find that WAY too high. It has always looked awkward to me. I prefer a lower light. The light above our kitchen table is only about 25 inches above the table and I love it so much more at that height.

Again, on this one I say err on too low instead of too high. Not too low that you can’t see each other across the table of course, but low enough that it kind of grounds the space.

And when you hang a light or have someone do it for you, make sure to leave enough wiring up inside the ceiling so you can adjust it later. I’ve cut so many too short and can’t change the length or move them around. (You can add wiring but I prefer not to do that.)

The experts -- I read it in a Pottery Barn catalog ;) – say bathroom sconces should be at about 66 inches off the floor, but again, I kind of buck that advice. In our powder room I wanted to clear the wall treatment so I went higher, about 77 inches:

Wood planked walls in white

Because here’s the thing – at 66 inches off the ground you’re lighting the sink and the floor, not you. I wanted the lights to shine down on our faces, so I went higher and I really like it:

Sconces in bathroom

I did the same in the basement bathroom – you want to work off where the mirror will comfortably go:

Sconces in bathroom

Those are about 75 inches from the floor. This is one that you’d have to play around with to see what works for your family.

Hanging art is such a personal preference too. Overall the advice is to hang the middle of the art at eye level:
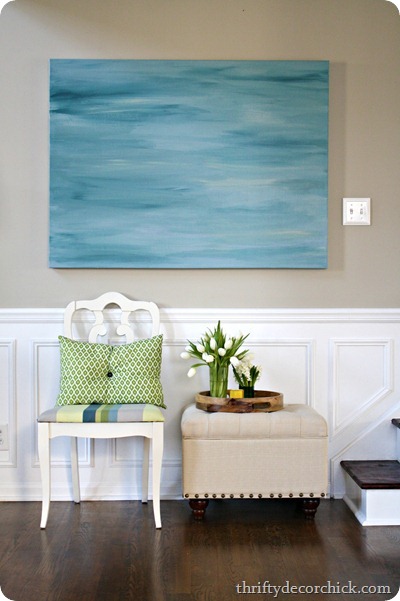
How high to hang art

The thing is, I’m 5’9” so my eye level is a few inches taller than most of my friends. ;) So again, it’s a personal thing. We have nine foot ceilings in most of the house so I feel like I can go a bit higher with the art. Otherwise there’s an awkward amount of space above it that I don’t care for.

Of course gallery walls throw all that out the window. :) On our basement wall I went all the way to the ceiling and filled the whole wall:

gallery wall wood planked wall

Again – it’s your house. Do what you want. :)

Finally, the rugs. OH, the RUGS. They are hard, right? I think so. At a dining table the advice is to make sure the chairs can be pulled out and stay on the rug. So the rug should be big enough that the chairs don’t fall off when someone is sitting at it.

For other rooms, there should be a good foot, preferably more, around the room where you can see the floor. Otherwise it looks like wall-to-wall carpeting, you know? Unless that’s what you’re going for!

But at least in our family room, I’ve learned over the years that a bigger rug is better:

graphic rug family room

I thought it would make the space feel cramped and it did the exact opposite. I don’t know what it is about a smaller rug, but at least in here it made the room feel much smaller than it was.

The general “rule” is that at least the front parts of the furniture should sit on the rug, but I’ve heard many say all of the furniture should comfortably sit on it. I tend to go for the former. As long as some of the furniture is on it I’m good.

Ugh, so many rules. This is why I say take this all with a grain of salt. Most of the professional advice has not worked for me in this house. It’s been ten years of trial and error to figure out what works and I’m always tweaking as you know.

Do you ever wonder about these? Any I didn’t cover?

P.S. I’m making progress on the mud room – and patiently waiting on one big part of the room to come together. I hope to show you this week!

Tuesday, January 14, 2014

Making an outlet or switch flush

Hello and how are ya? Today I’m sharing a quick solution to a problem I run into quite a bit – only because I’m constantly putting planks/board/trim on my walls. :)

I had to do it on our beadboard backsplash:

beadboard backsplash

And on the board and batten/beadboard island:

beadboard island

And in the planked walls powder room as well: wood planked walls

Any time you put anything on the wall that adds to the thickness you’ll have an issue with the outlets and switches – the outlet itself won’t be flush with the wall anymore, like this:

making outlet flush with wall

Of course to avoid this you can just cut the wood around the switch plate so it stays against the wall, but I like the cleaner look of having it go behind the switch or outlet plate. I had the same issue in the mud room near the bench I am building:

DIY bench with kitchen cabinets

I had to just tape the covers back on for the time being since the screw wasn’t long enough to even hold them on. The beadboard isn’t that thick but you need to make adjustments to make it work.

It’s actually very easy to do and very cheap. You’ll need these plastic spacers from the electrical aisle:

electrical spacers

First thing you need to do is make SURE the power is off to the outlets or switches your working with. Turn them off at the breaker, then double check with a voltage tester like this:

voltage tester

No light or a short light and/or beep means the power is off.

But you’re not done -- plug something into it to triple check that it doesn’t work. And THEN check it one more time by using the detector on the screws next to the outlet:

making sure power is OFF

The light went on and it beeped continuously, which meant there was still power coming from somewhere. This one must be wired to the light in the room -- I turned off the breaker to that light and then all was good.

I know electrical work can be scary but once you are sure it is OFF, you are good to go!

You’ll want to take the two screws out of the outlet so it comes loose a little bit:

adding spacers to outlet

And then you just need to figure out how much space you need to make it flush. So for this one I tried a few different numbers and ended up with five spacers – you just fold them accordion style and they snap together:

adding spacers to outlet

Each spacer is 1/8th of an inch, so you can measure to see how far out you’ll need – so 5/8’s of an inch would be five spacers. I just do the trial and error method because the measuring doesn’t always work perfectly for me.

Then you just put the screw back in and slide the spacers on it behind the outlet:

adding spacers to outletDo this for both the top and bottom screw and then tighten them like usual. You may need a longer screw if you need to add this much behind the outlet or switch – I had to get longer screws because the ones that were there were too short with the spacers added.

When you’re done put the plate back on and you're good to go!:

Adding spacers to outlet to make it flush with wall

Of course this works when installing tile too. If you tile your backsplash you’ll want to use these to make the outlets flush against the tile instead of inset.

Here’s the before and after to show you the difference again:

How to make an outlet flush with wall

By the way you’ll need these if you use the pretty switch covers I told you about here:

light switch covers They are pretty thick and will need a spacer or two to make the switches flush again. (On that outlet we have dimmers installed, that’s why the switches are different.)

Hopefully this will help if you ever run into this problem! It’s really a very easy, fast fix and the package of spacers are pretty cheap. (And they last forever.) Have you ever used these little plastic doodads?

Monday, September 16, 2013

Glossy navy blue LOVE

Hello my friends! How was you weekend? We picked about 15 pounds of apples and one day this week I’m going to try making applesauce for the first time. It should be interesting. Wish me luck.

I got one big DIY project and a small one done this weekend and I’m equally excited about both of them. We’ll start with the smaller one today since it’s prettier. ;)

As some of you know, our master bedroom is going through a (sloooooow) metamorphosis. It started with new bedding I picked up months ago and then a DIY headboard and some paint. I still haven’t finished painting because I’m still deciding on the color. It may change. We’ll see.

I’m not one to knock my old decor, because at each point I loved where I was. Does that make sense? Deep. Anyway, I’m changing up our bedroom because I was just wanting a different look. We had the same paint up for eight years and I was itchin’. I sold our bed on Craigslist and I’m trying to use the cash from that to makeover the whole room.

At first I was hoping to reuse the sconces we used for light before:

sconces above bed

I did love having the light right above my head for reading. But the only reason those worked was because the bed was so tall – regular lamps wouldn’t work for us (the light was too low). And now that the bed is back near the ground again those sconces looked too teeny. SO. I ended up bringing some brass lamps up from the basement:

painting a nightstand

To see that nightstand redo go here. Your 80’s nightstand will thank you. ;)

I know many of you dug the brass as it was and I totally get it. I think in a different setting I may almost kinda maybe leave it as is. I’m not quite there with the shiny brass yet (I love an antiqued version, still not sold on this coming back). And they weren’t in the best condition either – they both had some areas that were corroded/worn/not sure what to call it. And both had stickers on them (for YEARS?) that I just couldn’t get off all the way (I had to just spray over them). 

So they needed some paint. I just couldn’t decide on a color. I didn’t want to go with a silver because I thought that would be too cold feeling – I wanted to warm up the space a little. The bedding has a blue/grey color in it, and I actually have a color that matches that pretty well – but I wanted more contrast than that.

And then one of you (LilClementine) suggested navy blue and the heavens opened up – THAT was the one. I picked up some glossy navy blue paint the other day and gave it a go. I started with primer – on a shiny metal like this it’s never a bad idea. All I had was a black primer so I just used that:

spray painting a lamp

I knew immediately I was going to like them more painted. I think the pretty lines of the lamp were lost with the shiny metallic. When painted a deeper color you can really appreciate them. I think so anyway.

And then I pulled out the blue. I was so hoping it would turn out like it was looking in my head:

navy blue spray paint

It did. :) I absolutely, totally LOVED it. Brilliant!!

I had some navy blue ribbon in my stash so I just wrapped it around the bottom of the lamp shade to tie it in a bit:

ribbon on lamp shade

So here’s the thing – the navy blue isn’t in the bedding or anything else in the room really:

how to spray paint

But there will be more of it now. ;) The older I get the more I realize things don’t have to match exactly. I think if I had used a color that was a match it wouldn’t have made the same impact. I love how it brings a bit of contrast and drama to the room:

navy blue lamp

Right? I LOVE them. Now I want to pull some navy into some pillows maybe, or in the drapes? I don’t know, like I said, this room is slow going so I’ve got time to decide. ;)

Yet again…if you haven’t used spray paint to transform something, do it. Today. OK, fine -- maybe later this week if you’re busy. Short, small burst of paint, not long ones. Move it quickly across the surface, don’t concentrate on one spot too much. Numerous quick coats are better than one heavy one.

Next up I need to finish the painting. Figure out what to put above the bed (the mirror just went up there to fill the space for now). Drapes. Recover the bench at the end of the bed. New floors?? We’ll see.

It’s coming along though and I’m really pleased with it (and my navy blue lamps) so far:

tufted headboard

What’s the last thing you spray painted that you loved? The best part about it – if you don’t like it it takes just a few minutes to change it again. Seriously the easiest way to change up your decor that I know of.