Tuesday, July 17, 2012

Knockoff sunburst mirror

Well hello! I’m so excited to share this little DIY project with you all (y’all? Can I be southern for a moment?) because it turned out JUST how I envisioned.

I told you back in this post how I tend to buck trends (decor and otherwise) – either I just don’t add them to our home or I do it reeeeeally late, well after they are cool. That is just how. I. roll.

Same goes for this project. I actually came up with an idea to create this gorgeous Ballard Designs sunburst mirror months and months ago:

ballard knock off mirror

I even bought the pieces to make it, figured out how I was going to make it, and almost started…but then it seemed like I was seeing them everywhere in blogland. Sunburst mirrors are fantastic, so I am not surprised they were all over the place.

But I’m annoying, so I waited. :)

When we had our big tall walls and stair case repainted a few weeks ago, I knew I wanted to change up the decor on the huge wall at the back of our stairs.

Soooo…I figured these would be perfect. I gathered all my materials (again) and started figuring out how I wanted to put it together (again). I began with cedar shims from my local True Value:

shims

I was psyched cause they carry the longest shims I’ve ever seen (about 14 inches I think?) so my plan was going to work out even better than I thought! Buwahahahaha.

I wanted to make the same shape the Ballard mirror had, so I laid two shims together, touching at the bottom, wider apart on top. Then I laid one more on top and glued it on to hide the open area:

how to make a DIY sunburst mirror

I used hot glue for the entire thing and it held great – wood glue works too, but you’d have to wait for it to dry and I have zero patience. :) I used a TON of hot glue, just to make sure everything was secure. (And that’s the reason the lovely kitchen towel is under every pic.)

The bottom of each trio of shims is hidden eventually, so you can use up those that are beat up a bit:

how to make a DIY sunburst mirror

Oh, and I made that one that goes on top stick up a little bit over the tops of the two, just like in the Ballard version.

Then I took a scrap board (you can find something similar in the wooden area at the craft store – for my second mirror I used a round wooden piece) and started gluing the sets of shims on. I started with four, then added four more on top, then an additional four on top of that.

It was all about filling in the open space:

how to make a DIY sunburst mirror

Then it was time to flip it! If  you use long shims like I did you need to finesse the flip a little. ;) When it’s turned over, just add single shims to fill in some of the empty space and glue them to the back of the entire thing:

make a DIY sunburst mirror

I could have kept going, but I liked having a bit of space between some of the wood.

I flipped it back over again, then glued another piece of scrap wood on top of everything:

how to make a DIY sunburst mirror

Then it was time to paint! This actually took more time than all the gluing, just because I tried to get in the little crevices. If you were smart you’d do this first, but I’m a stickler for the hard way obviously. :)

I mixed some of my sample of Annie Sloan chalk paint in Paris Grey with water and brushed it on. I didn’t want it to cover perfectly, since I wanted more of a rustic look. The mixing with water helped to give it a bit of a wash instead of opaque coverage. I picked the grey for a more neutral look, but any color would look amazing!

After the paint, I used a mirror glue (make sure to use the mirror version -- regular adhesives may eat away the back of your mirror) and gooped it up:

how to make a DIY sunburst mirror

I found 12 inch mirrors in the candle area at Hob Lob (half off!), centered them right on top and then let it dry for hours. A little hanger added to the back and they were ready to go!

I LOVE love LOVE how they turned out!!:

DIY sunburst mirror Ballard knock off

They hang in the two large squares I installed in our staircase eons ago:

DIY sunburst mirror

I was actually considering taking those down because they are NOT my best work. ;) They were one of my very first DIY projects in this house and up close they aren’t as good I as would like.

But for now they are staying! ;) I LOVE how well the mirrors work inside of them:

DIY sunburst mirror

I personally love the rustic look, and that you can see the varying textures in the wood:

DIY sunburst mirror

The make a HUGE statement for very little money. It is so hard to find huge art to fill a big space (that isn’t crazy expensive)!

You’ll notice my little quote on the gallery wall is gone – it had to go when we had everything painted:

DIY sunburst mirror

I left it open for now because I’m debating if I’ll put up something different or just rearrange the photos.

I seriously ogle them every time I go up or down the stairs:

So here’s the comparison side by side – the Ballard version that is 48 wide and $350, and mine that’s 34 inches and cost $10 each:

Ballard designs knock off mirror knock off sunburst mirror 

Hellooooo, that is AWESOME! The cost was $4 for two packages of shims from True Value, the $5 mirror from Hobby Lobby and the scrap wood for the base. I had everything else.

Sooo, I’m about a year late on the sunburst mirror trend, right? And I’m sure I’m not the first one to figure out how to make it this way – but I LOVE how they turned out! And I love figuring out how to save $340 on something I love. :) Best part, yes?


I was one of the bloggers selected by True Value to work on the DIY Squad. I have been compensated for my time commitment to the program as well as my writing about my experience. I have also been compensated for the materials needed for my DIY project. However, my opinions are entirely my own and I have not been paid to publish positive comments.

Monday, July 16, 2012

Show Us Your Bathrooms!

Hello there! How was your weekend? Ours was HOT. We did get about five minutes of pouring rain, thank goodness. It wasn’t enough to help much (we are experiencing a severe drought here in Indy) but it was something!

It’s time to kick off the week with another Show Us Your House party!:

show us your house

This month it’s bathrooms! I realized while preparing for this post that I haven’t shared much of our bathrooms. The powder room has had a story all it’s own, and that I’ll share later this week, but otherwise I don’t concentrate much on them. They aren’t anything super fancy, but they get the job done, ya know?

I made some changes to our master bath years ago but haven’t touched it since. It’s like time stands still in there, I swear. :)

Long ago I painted the 16 foot walls a gray green color called Tornado Watch (from Lowe’s) and we’ve liked it just fine since:

gray green bathroom

It is starting to get a little dark for me though, so someday when I feel like climbing a ladder a meeeellion times again, I’m pretty sure I’ll go lighter.

I spruced up the tub area years ago with some trim work, paint and stencils:

beadboard bathroom

I keep hoping those round faucet handles will come back in style. ;) A few years ago I got a wild hair and took the tub surround off the wall and tiled instead. I LOVE how it updated that space.

You can see more about of the trim here and more on the textured stencils here.

I glued the beadboard right over the tub siding about five years ago I think? And it’s held up great! (No post on that, sorry!)

Told you I haven’t touched this room in years! ;) I realized the other day that I’ve spent the least money and effort (compared to the rest of the house) in the rooms that are supposed to bring the most return – kitchen and bathrooms. Whoops. :) I just feel like a redo in the bathrooms will cost lots of moolah and we’d rather focus on other spaces for now.

Someday I would like to make some changes though – one being our vanity:

maple bathroom cabinets

It’s very nice, and I picked a honed marble for the counter which I really love. It’s the height of the vanity that drives me BATTY. It’s SO low. The hubs and I aren’t exactly short so I’d love to make it taller some day.

Our tiny shower works fine, but the DIY shower curtain hides our reeeeeally short shower doors:

DIY shower curtain

We have to bend down to get in the shower or we’ll knock our heads. :) So eventually I’d like to tile that entire space.

It’s a long room, and that back part with the shower only has one light bulb (in the fan) so it’s incredibly dark. I’d looooove to install one of those solar tube skylights above the shower area some day soon. I’ve seen them done on TV and they seem to add an incredible amount of natural light!

So anyway, there’s one of our bathrooms – now I can’t wait to see yours! Give me some inspiration! ;) Share your master baths, powder rooms, kid’s baths – anything goes!

I’d love a link back, especially if you’d like to be considered in a highlight post:

Show Us Your House
<div align="center"><a href="http://simplehomeinteriordesign.com/" title="Show Us Your House" target="_blank"><img src="http://www.homestoriesatoz.com/wp-content/uploads/2012/03/image34.png" alt="Thrifty Decor Chick" style="border:none;" /></a></div>


And here’s the schedule for the rest of the year!:


August (family rooms), September (basements/rec rooms), October (bedrooms, guest or master), November (foyers), December (mud/laundry rooms)


Now let’s see your spaces! Get to it!


Friday, July 13, 2012

Summer in the house

Happy Friday the 13th! Hope it was a good one for you and the bad luck stayed away! :)

Today I’m sharing a few of the summery touches I’ve added around the house over the past few weeks. Most everything I’ve had for a while – there’s only one recent purchase that I couldn’t pass up!

Not many words needed, so enjoy the pics:

DIY wooden trough

wooden trough under tv 

I get asked about this wooden trough under our TV a bunch – you can go here to see how I made it. It’s super easy and cheap to make – and I did it for free. :)

summer vignette decorating

A little vignette with a glass used as a vase.

summer pillows

Pillows are handmade (striped) and from Target (fuzzy I picked up last year, blue was from earlier this summer). Cute kitten with the precious crossed paws was free. ;)

summer decorating

Rocks and seashells I’ve gathered over the years.

summer decoratingseashells cloche

This “cloche” was a from an 80’s light fixture I picked up from Goodwill. I painted the metal gold to brighten it up.

lemons in bowl summer decorating

Love the pop of yellow against the green vintage pedestal!

summer sand coral display coral decor 

This beautiful coral is my only recent purchase – I found it at an antique store of all places!

green glass bottle

I’ve already gotten five tomatoes from my plants – are yours ready yet? There is nothing like a home-grown tomato! YUMMO!

Hope you have a lovely summer weekend! Talk to you next week! :)

Wednesday, July 11, 2012

Coral summer tablescape

coral summer tablescape

**This giveaway and comments are now closed! Winners have been contacted via email.

Hello there! How are ya?

Well, it’s July, and I gotta be honest, usually July means I start thinking of the f.a.l.l. word. But the older I get, the more I try to embrace summer. I’m starting to dig it. When it’s not 105 degrees. ;)

We do have at least a few more weeks of summer, and I’m determined to bear hug it and make the most of it! (And then I can think about fall.)

The lovely folks at Target are helping me (and a few of you) to keep celebrating summer with their FUN coral stripe outdoor dinnerware. They sent me a set so I could create a summer-inspired vignette, and I gotta tell you…it was FUN.

I don’t often create tablescapes and it was a treat to take these bright colors and do something pretty and summery with them!

I set up a little coral shindig on our outdoor DIY table I showed you last summer. It sits under the pergola on our deck and we often find ourselves sitting on the carpet out there at the table.

I tried to use what I already had to create this vignette (other than flowers!) and I luuuuurve how it turned out! I started with my rattan chargers and added the plates, bowls and cups from Target:

coral striped dishes target

The idea of sitting down to tea has always sounded so lovely to me, but I don’t like tea, darn it. Same goes with coffee by the way – a morning cup of Joe sounds so nice and relaxing, but I don’t like that either. ;)

So I created our own little (pink) lemonade party. I found a yummy recipe in one of the Bub’s Mickey Mouse books of all places! It called for maraschino cherries and juice and it. is. yummy!

It doesn’t hurt that the colors worked pretty darn perfectly with the dishes. I used the dip bowls for sugar, lemon slices and extra cherries:

pink lemonade cherriesstriped beverage dispenser 

I’ve been looking ALL summer for a beverage dispenser with a handle – and there. you. go. I love this one – beyond the handy handle (har), it’s sturdy and the spout actually works.

I dressed up the table with one of my favorite flowers, gerbera daises, and simple babies breath in my mason jars:

summer tablescape

Babies breath all by itself is SO beautiful!

Altogether it made for a lovely, intimate little table setting that I LOVE!:

striped target dinnerware

Isn’t that so perfect for summer? I had so much fun doing this!

It is so totally girly and bright and pretty!:

     summer outdoor tablescape 

In celebration of Target’s Big Honkin’ Summer campaign, they are offering THREE of you the coral themed items for your own summer party! Three lucky chicks (or dudes?) will receive all of these outdoor items in a coral theme:

- Beverage dispenser with coral stripes
- Coral stripe dinner plate (4) 
- Coral stripe cereal bowl (4) 
- Coral Stripe tumblers (4) 
- Coral dip bowls with bamboo serving tray

WHOO! How cool is that?

All you have to do is leave a comment here. Easy peasy. :) What’s your favorite part of summer?

*Remember if you comment anonymously or you have a private blog, please include your email address, and spell it out with “at” and “dot” to avoid any spammy emails coming your way.

This giveaway is open to US residents only and will be open for a week – till Friday July 13 (oooooohh!) at noon EST.

Monday, July 9, 2012

Pink walls, begone!

Heyyyyyya! I’m back to show you a HUGE change we made to the house a few weeks ago, and it was a very long time coming.

When we built more than eight years ago, we found out during the process that the builder would paint the interior walls for us if we wanted. Since our dining room, living room, loft and staircase are all connected, and all but the dining room have soaring ceilings (about 25 feet up at the tallest point), we jumped on that option big time. (For those spaces.) And the fact that they were going to paint it all for $600 (that we rolled into the mortgage) made it so we couldn’t pass it up.

We chose a color called Beechwood Grey by Porter and they were able to spray it on before floors or trim were installed (hence the cheap price).

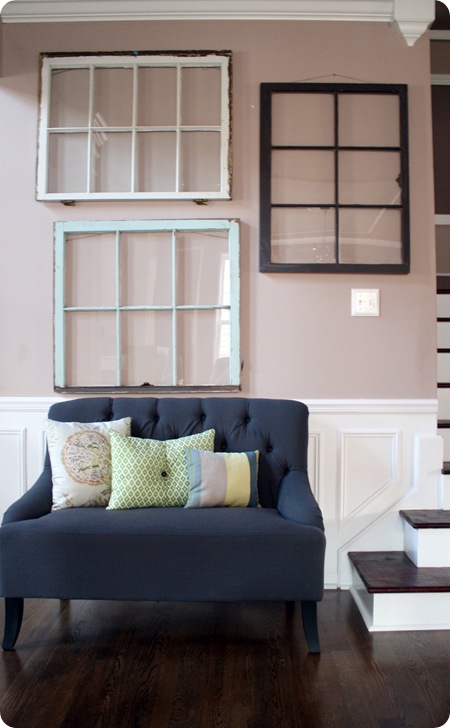
Thing is, it wasn’t too long before I regretted our color choice. Sometimes it had more of a gray tone and I didn’t mind it. But other times it had a pinky hue that kind of drove me crazy. Eventually I no longer saw any grey, just PINK.

Pink as pink could be, pink.

And the kicker, beyond the color, was that they painted in flat paint. Flat paint has it’s place (ceilings!) and on big walls it can be a good idea, because it definitely hides imperfections in the wall.

But for all that is good, it is NOT a good idea on high traffic areas, like say…a staircase? A staircase wall that a little boy touched ever. single. time. he walked up the stairs as he was learning to climb them?

A staircase that showed every little smudge from every piece of furniture we’ve ever carried up the stairs:

grossyuck 

Grody to the MAX.

Thing is, at least with the old flat paints (the newer ones are coming out with wipeable versions), you just can’t clean them. You could scrub all you want and it it won’t come clean. And then if it does come clean, you wipe off so much of the finish that it leaves a mark where you cleaned.

There’s no winning with it.

But we couldn’t just repaint those stair walls because a.) there’s no way the color would match perfectly b.) the walls are about 25 feet tall.

Uh, this girl? Not going up there. :)

So they sat there, all grody, and honestly I didn’t know that we’d ever be able to do anything about them. I just thought it would be too much to have them painted. But man, that staircase was looking AWFUL.

One day the guys that have been working on the basement took me to a house to show me how they had done something. While we were there they pointed out all the stuff they had done in the house, including painting a two story family room.

DING DING DING!!!

I had no idea they could do it, and it planted the seed.

So months later, we saved up the money (which turns out wasn’t even much more than we paid the builder!) and had it done and I AM SO HAPPY!!!!

The color is Analytical Gray by Sherwin Williams and I am head over heels in love with this color. Here it is in the dining room soon-to-be library:

Sherwin Williams analytical gray

(The top isn’t cut in because I will reinstall the crown up there eventually. The dining room transformation is coming along, more on that soon!)

Here’s that room with everything crammed in there as they painted – I had painted the dining room myself, but you can see where it stopped on the wall going to the front room:

yikes

I used to have a piece of trim up there so I could paint each room a different color. You can see that’s gone and I’ve since installed the wainscoting around into the dining room (above). Doesn’t it look so much better?? (And my money plant is growing like a weed!)

This is a LOVELY neutral color, beige mixed with just the right amount of gray. I think they call it “greige?” I call it perfect. :)

I took some before and after shots of the spaces to show you the difference this color has made. Here’s the living room window wall, before on the left, after on the right:

pottery barn jute rugdecorating bookcase

Oh my goodness, I can’t believe how pink those walls look now that I look at them in pictures!

Here’s the desk area in our living room, before on the left, after on the right:

cream desk homegoodsSherwin Williams paint

The foyer/staircase area looks soooo different:

old windows on wallold windows on wall

Wow. Pink.

Not sad to see ya go.

Here’s my favorite before and after:

baseboard trim on stairs

Ah yessssss…the joys of an eggshell finish. I use eggshell pretty much everywhere in our house – it’s not too shiny, and it wipes up well. (Sometimes eggshell is called satin.)

And I like that it bounces the light around a little bit – I swear it makes the spaces brighter because it has a teensy bit of reflection to it. The flat just absorbed all the light and sucked it up into it’s dark, pink, flat chasm.

OK, drama. But for REAL my Squeezies. This is huge. I think this is one of the BEST changes we’ve made to our house – LOVE IT!!

I’ve already made a few other changes because of this one, so I’ll show you those over the next few weeks. WHOOO!

So do you have a go-to neutral paint color? It can be SO hard to find one that works for so many different spaces, like this one had to. If you’ve got one you love, please share!

P.S. Did I mention…WHOO?

P.P.S. You can see more on the rug in the dining room here!