Sunday, April 17, 2011

Prettying up the ceiling fan

Helloooooo all! Hope you had a great weekend!

A couple weeks ago I did a little project that only took about five minutes and buck to complete. So of course I had to show you. :)

It all started last month when I finally addressed the massive pile of magazines I’ve been avoiding for months (years?) now.

I saw an idea in one of my old BHG mags and then did a little researching online to see if I could figure out how to do it myself. I didn’t find the how-to, but I did find another inspiration picture:

We have a ceiling fan in our family room and even though I’d prefer something prettier, it’s staying. It’s necessary for the times the oven starts smoking in the kitchen, the smoke alarm is going off, and opening the windows and flapping the kitchen towel just isn’t cutting it. :)

The person that creates the smoke may or may not be me.

I will never tell.  :)

The fan is darker brown, which I do like. It has three lights as you can see here:

It’s not bad. Nothing awful. I was just inspired by the photos I found and wanted to try something different.

I decided I was going to do my best to use what I had on hand to change it up.

I started by taking off the glass covers – you just squeeze the metal pieces inside and pull the glass off:

Next up – to figure out how to get my lamp shade to stay on the fan. I had large Goodwill drum shade I planned to use and it was the type with the wire circle at the top of the shade – the kind you have to use with harp. (More on that in a bit!)

So I stood under the fan for about ten minutes, thinkin’ and a thinkin’. I noticed there was a little jobby on the bottom where the pull chain came out. It matched the one on the side:

Because I’ve changed out a meeellion lights in this house, I have plenty of electrical parts laying around. I dug through my stash and found this threaded connector:

The real name of this piece will create some major spam and unwelcome searches if I use it, so for now it’s called a “threaded connector.” ;)

Anyhoo, I knew if I could get it connected to the fan, I could figure this out:

I looked and looked and LOOKED and tried every little trinket I had in my tool box, and nothing worked. Drats.

I was so determined at this point, I was off to the hardware store. :) I looked around for awhile, but couldn’t find the exact piece I needed.  Lowe’s Guy and I both spent a good ten minutes looking through the drawers of nuts and connectors, and still couldn’t find anything that worked. And then Lowe’s Guy No. 2 came up to help and suggested I look in…wait for it…the ceiling fan area.

Now, who would have thunk it? :) Bahhhrilliant.

There I found exactly what I was looking for:

Two of these little connectors came in a package for about $1.50. Not bad.

I threaded the connector to the fan, put the longer connector into that one, and then put the hole of the lamp shade over the long piece:

I secured the shade up there with a small nut (picture on the right). It worked perfectly!

The original lamp shade I tried was way too big though, so I took another off a lamp and used that instead (a lovely from Pottery Barn I got with a gift card last year):

Love, love, LOVE.

There’s a few things to consider if you want to try this out – first of which is your ceiling height. The shade hangs lower than the glass shades did, by about five inches I'm guessing? Our ceilings are nine feet, so we still have plenty of clearance. (I’m 5’9”, hubby is 5’11”.)

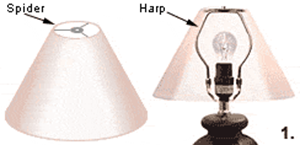
Something else to consider is your lamp shade. My shade was the type that fits on the lamp with a harp – it’s called a spider fitting:
image

If you have an uno style shade, or the type that fits right over the lamp socket, you’ll have to use a different method:

image

I’m sure there’s a way to wire that type of shade up there. But if you are thinking about trying this out, I’d suggest using one with the spider fitting, just because it’s SO easy.

If the bare bulbs showing from underneath the fan are going to bother you, this isn’t for you. That doesn’t bug me one bit, since you only see the light bulbs if you’re right under it:

DIY drum shade ceiling fan

Honestly, you see less of the bulbs this way than with the original glass shades.

One more thing to consider is the size of your shade. The light bulbs need to be two to three inches from the shade, for safety reasons:

drum shade on ceiling fan

But that also depends on the wattage of your bulbs – ours are 60 watt and we have a dimmer on this light. (And even though our shade is large enough, I had the light on full force for hours the first day, feeling to see how warm the shade was every ten minutes or so.)

It was fine. But I’m a freak like that.  :)

It’s odd – it’s makes more of a statement than the glass shades, but I find I notice it less. Maybe it’s because those covers were never my cup of tea. Or it could be because I’m obsessed with drum shades (especially those trimmed out with lovely jute trim).

I don’t know what it is, but I love how it turned out. Especially because it only cost $1.50:

ceiling fan with drum shade

If you don’t have a drum shade, check out Lowe’s! They have a great selection. I always find great options at HomeGoods too, usually for less than $15.

Oh, and it holds up great when the fan is running too. Our fan doesn’t shake much anyway, but it’s totally secure.

So have you doctored up a ceiling fan? With spray paint? New shades? Some bling? :) Have you tried this project? Do share!

Oh, and by the way -- this version:

Is $540. :) Rock. on!!

Thursday, April 14, 2011

The gallery wall-to-be

Helloooo! How’s your week going?

We were on Spring Break around here last week and I was an absolute slug. Really – when hubby is home all day I’m just completely worthless. All I want to do is sit around, eat A LOT and watch ridiculous amounts of reality TV.

It’s AWESOMENESS.

But by about Saturday at 5 p.m. last weekend, I my slothdom had run it’s course and I had to do something. And do something I did – I started one or fifty projects in the playroom turned game room. But this week has been so crazy,  none of it has been touched in five days.

The first little project I tackled is going to be a big one and I can’t WAIT to show you:

It involves a closet, an electrician, paint and me learning how to build stuff – we’ll see how that last part goes. Could get interesting.

But if it all comes together = AWESOME! Ack, I’m so excited about this one.

Next up is the pile of mdf sitting in the garage, waiting to be installed in the room:

I really hope to get that project done this weekend – it’s going to make a huge difference in there!

But the most dramatic change involves taking all of these off the wall:

No, not ladders. :)

The shelves that have been up for about five years:

I love them, I do! I’m just ready for a change – a change that came to mind as I was going through our boxes and boxes (and. boxes.) of photos recently.

We have so many special family photos and I must display them. They are fantastic – I just had to show you a few of my favorites.

I adore pictures of my husband as a child. ADORE. I wish I could travel back in time when I see these:

IMG_3926

And it absolutely kills me how much he looks like our son. I need to get a similar shirt for the Bub and take a picture just like this. They could be twins.

Here’s hubs with my late brother-in-law:

Oh my, couldn’t you just squish them? :)

I love this one of my in-laws:

I love imagining the setting, who was there, what they were celebrating – all of it.

The older pictures of my grandparents are some of my favorites – just look how beautiful my Grandmother is in this picture:

Do you see her wedding gown? Stunning. And my Grandpa looks so handsome! I miss them both so.

Looks like my other Grandpa was an aspiring actor at a young age:

This photo is actually quite large – at least 30 people were in this Ladies Aid Society play. :) I love everything about it – the costumes, the fake beards and mustaches, the mischievous glint in my Grandpa’s eyes:

And he got his beautiful eyes from his Dad (the groom):

I don’t remember my Great-Grandfather, but his lovely wife (to the right) is my namesake. She was a really fantastic, strong Hungarian woman. And she made some mean kifli. Ohh, I must learn how to make them.

One of my absolute favorite pics isn’t one of the oldest. It’s from my childhood, so probably only 20 25 30 years ago:

OK, it’s pretty old. ;)

We went camping all the time when I was young, and that picture was taken at Brown County State Park (Indiana) in the fall. That’s my Dad pushing me, and my favorite part of this picture is the absolute JOY on my face.

This is the reason photos fill the walls in our home.  :)

I’ve started building up my stash of frames again – and my go to spot is always Goodwill. I found these large, chunky frames today:

I can’t wait to start framing everything and filling up this wall:

It’s gonna be fantastic. I hope. Crossing fingers. It’s pretty awesome in my head.

There’s lots of stuff going on under that TV too, and I’ll show you that SOON.  :)

So that’s the madness going on in my noggin and in our playroom this week. I need to focus and get at least one part of this totally last minute, by-accident mini redo DONE.

So, is there an old family photo you treasure? How far do yours go back? I’m guessing some of mine are last 100 years old, and they’re all originals. Anyone know the best way to store old photos? I plan on scanning them all, but I’d like to keep the originals stored safely away.

Wednesday, April 13, 2011

In between

Hello all! Whew…it’s been an insane couple of days. Lots going on (good and not so good) including news yesterday that we need a brand new (read: not cheap) air conditioning unit and $1000 in car repairs. Niiice.

I’ve started an impromptu redo on a room in our home and I LOVE how it’s turning out…but for now it’s a mess. I’m in full “in between” mode around here -- doors off the hinges, wire shelving everywhere, pictures and frames laying all over the place. I kind of got ahead of myself. :)

Add to that a (long time coming) night out with my hubby and our friends tonight, and I’ve just plain ran out of time in the day! I hope to make some progress tomorrow – you know, while they’re installing the new air conditioning unit. Fabulous. :) I’ll share the start of the redo tomorrow.

I finally added the name of the beautiful fabric I used on our kitchen window to my post from Monday – I also found the living room fabric name too! Check it out here (at the bottom of that post) for all the info.

I’ll leave you tonight with one of the funniest things I’ve seen in a long time. This is my how my brain operates lately:

comic“Whoa…he’s a freak.” My favorite line. And I love how his eyes glaze over when he gets an email.  :)

(If you know the name of this comic, let me know so I can credit it!)  :)

Good night! See you tomorrow!

Monday, April 11, 2011

Covering the (nekked) windows

Remember those nekked kitchen windows? I loved how much light they let into our formerly dark space. I have lived, quite happily, with nothing on those windows for at least six months now.

I decided I was going to keep them that way until I found just the right covering, at just the right price, that I loved. If I didn’t find all of the above, they were staying nekked…FOREVA!!!

OK, that was a little intense. But I wasn’t going to force anything. I wanted it to be natural. To flow. Be cool.

And over the past few weeks…it all aligned perfectly. :)

It started when I found this purdy fabric a while back at Calico Corners:

I got it for another room, and LOVE it there. Love. (I’ll show you that soon!) But for some reason, I had a ton extra – I think I had planned on making pillows, but I had enough left for some mongo pillows.

So…the idea hit me. The colors would be so freakin’ pretty in our kitchen! I held it up to a kitchen window and was hooked. It took about 45 minutes with my hemming tape and iron and I had some cute cafe curtains:

IMG_3850

I didn’t even line them. I might later, might not. I didn’t make a rod pocket either – I just hung them with the clips using this technique.

I live on the edge people.

Remember the pendant light I installed over the kitchen sink? I had taken that shade off to use in the living room and put another drum shade up. It’s not in the best condition, but it was a $1.99 Goodwill find last year, so I’m making it work!

It had black trim on the top and bottom of the shade, so I just took that off:

I found some double fold bias tape in a pretty green color (for less than $2!) and because the shade was still sticky from the black tape, I just stuck the green one on:

IMG_3876

You can see how beat up the shade is in this pic, but from the ground it’s not nearly as noticeable. It may not be staying up anyway…but more on that later. :)

Finally, my little window makeover was complete! It’s so fun and fresh and springy!:

I played around with the height, and ended up with something a little longer than half the window. I used a dark tension rod to match the drapery rings, but I may try a white one too. Although I do dig the contrast of the dark rod.

I love the flowers in simple glass bottles on the windowsill:IMG_3848

Best part – the new curtains still let the light in, but if I ever go into freak out mode at night, I can pull easily pull them closed. :)

Awhile back I found a Target rug that pulled in the blues from the family room, and now I couldn’t be happier with how the rug, chairs and drapes are working together:

colors in the kitchen

Because they aren’t right next to each other, (I think) they totally work. They all have the same shades of green and the fabric and rug have the same smoky blue color. All have a supa fun design too. :)

And my covered windows didn’t stop there! A couple weeks ago I came across some clearanced bamboo shades that were the perfect size for the bay windows:

Only $11 each baby!

The shades aren’t the exact tone of those in the family room, so I’ll have to see how they work on a sunny day. Hopefully it won’t drive me nutty.

You wouldn’t think it from this picture, but it was cloudy and rainy today:

bay window in kitchen

Yay!! I still have my light and bright, but with some texture (and privacy if we need it). Can I get a hollaaaa?

I have some ideas in mind to add some color with accessories to the nook too. :)

Only a few more projects to go and our kitchen redo is complete! You know, the one I started almost a YEAR ago? :) Something about that year deadline is getting my booty in gear.

But so far, so good. Me likey:

:)

The cafe curtains are another P. Kaufmann fabric – I wrote down the name and now I can’t find it! I know, hate me. I do know it had the word “citrine” in it, but I can’t find this fabric online. I’ll call tomorrow and get the name to update this post.

So do you have any nekked windows? Like them? Hate them? Waiting for the just-right-treatments to come along? Do tell.

**I found the name! It’s called Spring Vine Opal from P. Kaufmann. And my lovely living room drapery fabric is called Retreat Blue Citrine, also from P. Kaufmann. (I got the names of the fabrics mixed up.)

Wednesday, April 6, 2011

The sofa search (an update)

Well hello there! I think it’s high time I fill you in on our search for a sofa in our family room. I wrote about the impending purchase a couple of months ago, and I so appreciated all of your feedback on that post.

As I mentioned one or 15 trillion times, our family room is an odd configuration of open layout, a wall of windows, a corner fireplace and a walk way into the rest of the house:

It makes for a very frustrating furniture set up. I may have mentioned one or eleventy billion times that we’ve tried every way possible when it comes to arranging the furniture. Except one , which I’ll tell you more about in a minute. :)

There’s a number of things we’re looking for in our new sofa – it has to be easily cleaned (I mean, with water and soap), comfortable, and oh yeah…EASILY CLEANED. :) That’s the biggie. It’s my biggest complaint with our current sofa.

At first we were looking into a Pottery Barn sofa with a chaise. My sis helped me out and did a quick count of the comments on the previous post, and 31 or so people LOVED their PB sofa. About nine did not. Funny how the negative comments make such an impact, eh?

If I remember right, the biggest complaint was that the back cushions get smooshed over time and end up…well…smooshed. I believe the PB folks suggest a fluffing ritual, but I know me and me would NEVER keep up with that. I know what I’m made of peeps. :)

I mentioned IKEA sofas as well, and about 24 of you loved your Ektorp sofas, and five weren’t thrilled. This time the negative reviews were more about general quality – some said they just plain didn’t hold up.

On a recent trip out to IKEA, I tested out the floor model, and crossed it off the list for comfort reasons only. If I didn’t sink into the model that thousands of people sit on a week, I’m guessing my tush isn’t going to sink into ours at home. :)

I would totally consider it for a less used space like our playroom though – the price, size and washable slipcovers can’t be beat!

So from there I did some more research – I went oh so many places and sat my booty on OH so many sofas. And then I found…the one:

baldwin sofa arhaus

It’s the Baldwin sofa from Arhaus. A few of you mentioned it and I had to check it out. We’ve had an Arhaus in Indy for at least five years now – probably many more than that. I’ve never stepped foot in the store before now, but as I mentioned before, this is not going to be a thrifty purchase by any means.

For the first time in seven years, we’re going to purchase furniture with cash, and it’s going to be a purchase we plan on keeping for (at least) the next ten years. Our other sofas have lasted about two years, at best, and we’re done with that.

And I gotta say…if you haven’t visited an Arhaus, you must visit just for the eye candy. Lordy, it’s gawgeous. SO many pretty things to look at, great decorating ideas, and plenty of knock-off projects as well. ;)

Anyhoo, the Baldwin had me at “washable slipcover” and I was a goner after I melted right into it – it’s that comfy. Oh my.

One little detail I’m looking for this time is a lower profile arm, and it’s got it:

You can see from the picture of our family room above that the current sofa’s arms take up about ten extra inches of valuable space in the room.

There’s also another option called the Lansbury:

It’s a bit more modern, a little more contemporary. But it doesn’t come slipcovered. I mentioned before that I really didn’t want to go with a microfiber, and I had two reasons for that – years ago when we tried them out we were nearly shocked out of pants. They were literally…shocking. :)

I’m also not in love with the way microfiber leaves imprints if you swipe your hand across it – you know what I mean? But I did find out that those two issues have be greatly improved on over the years, so I don’t think either would be an issue for me anymore – especially because they are so easy to clean!

So now there’s a few things to figure out – the first is how the heck to pay for it. ;) No really, it’s going to take months of saving, obviously. And we also need to make a decision on another big change in the room.

Last year I finally figured out a solution for the furniture placement. This is our current layout:

I used Homestyler to create this floor plan and I highly recommend it – it was SO easy, fun (and free!) to use.

It’s not perfect (I messed up the placement of the windows on this one), but it gives you an idea. Right now we have the sofa facing the corner fireplace, with the TV to the left of it.

My idea is to move the TV above the lovely Henredon (Craigslist!) dresser:

I was planning this before, but kept hesitating because the dresser that was there before (which is now in the Bub’s room) was just slightly too small – and moving the TV over there meant I’d have to lose my lamps. I LOVE those lamps. :)

The new dresser is super long, and the absolute perfect size for our TV and my lovely lady lamps. I have no idea how the TV will look flanked by lamps, but I’m hoping I’ll like it. Cause I LURVE.

Anyway, because our basement is unfinished, we can have all of our cable and surround sound stuff moved over to the other wall, which will free up the wall near the fireplace.

Initially we were thinking of a sofa with a chaise, and if there’s room, we’d add a chair next to the fireplace:

Moving the TV completely changes the orientation of the room. It makes it longer and wider, because in the past that area in front of the dresser didn’t really feel like part of the room.

Hubby’s only concern is that people may walk in front of the TV, but usually it’s just the three of us, so we figured it’s not a huge issue.

And yes, to watch TV, we’d have to sit turned a bit, but after some of my own private research over the past few months, I’ve realized we sit angled anyway. We gravitate towards the window end of our sofa and angle our bodies that direction.

So now I’m trying to decide if we should do the chaise, or go full-on sectional:

My only hesitation is putting a sofa in front of the window – I’m not avidly against it, but I’d rather not do it if I have the option. After seven years trying to figure out this room – I’ve realized there is no other option. :)

The pros: the sectional gives us so much more usable seating! (And no, the sectional can’t go the other way, longest part against the windows. Not enough room.) It still keeps the focus on the fireplace, but also allow for easy TV watching. It makes usuable space so much bigger – and with a slightly bigger rug (some day), it would be fantastic.

The cons: the sofa in front of the windows (which I think I could get over) and it may crowd the fireplace a bit. (It would be about three feet from the corner of the fireplace.) BUT, with the TV and stand gone to the left, it would open up the other side of the fireplace.

I’d love to be able to add a smaller chair and ottoman to the spot where the entertainment center is now – something thinner like this:

Or this (it rocks – literally!):

The chair would wait though – I’d need to live with the space to see how it worked out first.

So…two things I’m wondering about from you all – those of you with slipcovers, give me the pros and cons would ya? Love them or hate them? Do they always look messy? How often do you wash yours?

And I’ve heard conflicting reports on whether or not the Arhaus sofa is the same as the Ballard Designs Baldwin sofa. Arhaus and Ballard tell me no – but they have the exact same specificiations – construction, measurements, etc. Any insight?

Whew, you still with me? :) That’s where we stand now – no new sofa, yet. Lots of ideas swimming around in my head though. Honestly, at this point I’m hoping we’ll have a new sofa sitting in our family room by fall. Between saving and the time it takes to have it made, it will be (at least) that long.

Have I mentioned patience is not my strongest virtue? :)


P.S. I did a ton of research about what to look for in a quality sofa, and found this Good Housekeeping article to be the most helpful. The Arhaus option has won out for us because they incorporate so many of these recommendations.

P.P.S. And yes…we’ve tried arranging it that way. And that one. And…THAT one. :) We’ve tried it all.