Wednesday, May 19, 2010

Organization bliss

**Edited to add: I got the organizer from Target, in the electronics section. LURVE.

While I work on the kitchen redo, I’m still working on things here and there in our office as well . I was reeeeally hoping to share my desk redo tonight, but it’s taking foreva and a day to paint. More on that soon!

Add in a trillion trips to Home Depot for the kitchen, and it’s taking even longer.  ;) But I’m not complaining!!

Tonight I had to share a quick organization dilemma that was solved for me today. Can you hear the GIDDY in my voice??

Most of you know we have a three-year-old. This sweet three-year-old loves movies. I also have a sweet hubby who likes to buy movies for our boy. I may be a little lot guilty of this as well, but because I can, I’m going to blame him.  :)

Anyhoo, lots of DVDs means our family room looks like this every time the Bub wants to watch a movie:

OK, I exaggerate. Just a tad. But it’s annoying. You know how toddler’s roll – finding a movie is usually an act of “fling every single DVD out like your life depends on it.” So the family room floor is covered with these plastic cases daily – whether we watch something that day or not. (How does that happen?)

We have a great kiddo who loves to help pick them up, but it still gets old after a while, you know what I’m saying? If I step on one more open DVD case…

Enter this glorious $20 contraption:

DVD organizer

I know 90 percent of you have one of these are are all, UH…DUH. But I’ve never used one until today.

And all is right with the world.

My Peanut even helped me put them all in there – he was so excited. It was a bit thrilling for me to see the organization nut coming out of him. It would be a bit freaky for anyone else, but for this Momma…PROUD.

Isn’t it beautiful?? Stunning really. This baby hold something like 150 movies. I thought we’d be set with this for quite a while, until I started filling it up and realized it’s almost half full. And that doesn’t even count all the movies still hidden under the sofas and the TV stand!

Imagine 70 something little plastic cases piled on the floor every. single. day. Ack! Drives me to drink chocolate milk.

Because I am me, and me is a fruit loop, I even cut out the cover of each DVD to put behind the disc:

(Is anyone else SO excited for the new Toy Story to come out?!)

I figure it will be a game of matching for the Bub. It has nothing to do with my weird organizing obsession. Nothing at all. Zero.

Now, I have to take all of these to be recycled:

002

And find something else to put in these baskets in the entertainment center:

014

Gloriously EMPTY!

I thought for a minute I would use them for something other than toys, but then I heard myself laughing…at myself...

Like that would ever happen.

So tell me, have you found any great organization goodies lately?

Tuesday, May 18, 2010

What to do with the STUFF?

Well THANK YOU for all of your sweet comments and thoughts on my last post! I’m so excited about the kitchen redo! I’m pretty sure I’ve been to Home Depot nine times in the last three days, so they should know me by name soon.  ;)

I hope to get our sink and faucet installed this week, but it’s not an easy job I know, so we’ll see. I’m being patient. Being patient. Being patient. (If I keep saying that, it will be true, right?)

So I wanted to talk about a topic I get emails about ALL the time – and I figured it’s about time I do a post on it! The question is – when you do all that decrapifying that I KNOW you all are doing, (ahem), what do you do with all of the stuff you want to get rid of? 

There are many options available -- some will make you some money, some will make you a tax deduction. ;)

The first option is probably the most obvious:

The majority of my stuff goes to Goodwill – like new, nice or just OK condition. I find it’s the most convenient option for me, but that’s mostly because I’m insanely impatient. And I can’t stand crap. So when the crap sits around, it drives me mad. Even if it’s something nice, I’d rather just drop it off to Goodwill, get it out of our house, and move on.

That being said, I’ve had a Goodwill pile in our foyer for three weeks now. The good thing about that is friends stop over and take most of the stuff in the pile, so I have less to lug to the drop off.  ;) (Thanks K!)

There are other options as far as donation goes – Dress for Success is a program for women who are trying to find jobs and need professional clothing. I know there are other similar programs out there as well.

When I did the major decluttering of our basement earlier this year (I still need to finish up a few things and show you!), I took a TON – and I. mean. a. TON. – of stuff to a local women’s shelter. (Two SUV’s full!) It was a lot of baby gadgets and clothing, and I just felt like the shelter was the best place for them. The battered women who stay there often leave home with very little for their kids or themselves and need to start over – so it felt good to donate so many things I knew they could use.

And of course there’s ways to make money while getting rid of crapola, which is a total win-win. A biggie this time of year is the garage sale, of course!:

I have to tell you, I’ve never been a huge fan of hosting garage sales. It may or may not have to do with the fact that I have to be up at 7 a.m. on a weekend to get it accomplished – which is just absurd. I mean, really. I sleep.

Secondly, I hate the haggling. I mean, you should see me in NYC’s Chinatown – I’ll go after a price with the best of them. But something about going back and forth about $2 just rubs me the wrong way.

And it’s usually hot.

And early.

Oh, I mentioned that. :)

Instead of hosting my own, I prefer to take a carload of my crap to a friend’s house for their garage sale, and let them get up at the crack o dawn and sit in the sun all morning. Works for me!!

When it comes to home decor items, I’ve had GREAT success with consignment shops:

They are shops filled with great stuff people don’t want anymore that you see and you totally didn’t know you wanted (but you do). You’ll find furniture, dishware, art, light fixtures, accessories – it’s a treasure trove!

The shop I use goes through my items when I bring them in (this depends on the shop – you have to make an appointment at some places), picks out what they want, then keeps a record of my items. When they sell, I get a percentage of each item, and then I get a fun little check in the mail every month.

Or…I may or may not go in and check my balance and then spend said balance in the shop. Maybe.

I always make more than I would at a garage sale. And I have to do very little make that cash. Awesome. Some shops will give you money when you drop off items – they’ll determine what they would sell it for and give you your percentage up front.

There are also consignment shops for men’s, women’s and children’s clothing and baby gear. I find these are much better to shop at than to sell at – I just don’t get the same return that I do at the home decor shop. But that could be because I spend $4 on Wal-Mart t-shirt and call it done.  :)

The Web is another option for making money off your items – eBay is one site of course. I used to sell junk great stuff on there all the time and made good money. The fees seemed to get higher though, and all of the buying shipping supplies, finding boxes and packaging items just became too much.

There’s another option I know many folks use – craigslist:

Something about craigslist has always given me the heebies. I just have never felt comfortable having complete strangers come to my house. The few times I have sold items on it I have been a nervous wreck the whole time – and I don’t use my name, a email with my name in it, I don’t give out my cell number – and it still makes me queasy.

I have only had two buyers come to our house – one picked up the items from the front porch and left the cash under the mat. The other came in because I had called her and talked to her for days and felt comfortable with her coming in. And even then I still regretted it when she left. Every other time I have met folks at a public location to give them their item.

It’s a personal thing – I’m a freak, as you know, so take my thoughts with a grain of salt. ;) I know many who have made great money and found some fantastic items through craigslist!

I tried out one final option a couple months ago and absolutely, positively loved it. I hosted a swap for a few friends – everyone brought their goodies and we piled them up:

002

Obviously, we ran out of room. ;) Next time, I’m borrowing a bunch of tables!

I prepared a few snacks, some drinks, and we had fun just hanging out. Because there weren’t many of us, we just kind of had at it and grabbed what caught our eye:

007

There was very little hair pulling and just a bit of pushing.  :) Nahhhh…we all behaved. But I expect the number of attendees will grow next time I host this, so we may have to draw numbers in the future. I’m considering a “holiday” swap as well – just for Christmas decor. Wouldn’t that be festive?

I highly recommend the swap – I can’t tell you how fun it was! I got a fab find from my friend Beckie – I’m still trying to figure out what to do with it though. I have to sit on things for a while. And leave them in my foyer. Yes…it’s still there, two months later.

So did I forget anything? Any other options for donating or selling that stuff you don’t need anymore? You know I’ll keep harassing you to decrap your place, so you might as well get to it. Seriously. I can be very irritating persuasive.

Sunday, May 16, 2010

A not-so-mini kitchen redo!

Helloooo there! Hope you had a great weekend!

I am SO EXCITED to share some fun news with you – I’m talking giddy, I am not worthy, glorious news.

I mentioned a few weeks ago that I have been planning a mini redo of our  kitchen:

It’s usually a bit more dressed up than in this picture, but I had just decluttered, so the extra stuff was outta there that day. :)

I think I totally freaked some of you out when I said I might paint the cabinets. I kid! I kid! I’m not going to paint (most of) them! Really, I love our gorgeous cherry/maple cabs and I am not planning on touching (most of) them!

I am so annoying. I know.

My mini redo plan was to do a new backsplash and replace the sink and faucet. The faucet I told you about a long time ago in this post:

It is the most fantastically annoying faucet ever made. It’s SO low, so basically anything I wash/fill/rinse smacks into it when I am trying to wash/fill/rinse it.

And since we moved in six years ago, the sink has bothered me because it was installed crooked. I showed my husband once and he just shook his head at me, but it’s true. A whole half inch. That’s like, two feet in Sarah-length. It drives me mad.

Plus, I realized ohhhhh, about two months ago, that the wrong sink was installed. It’s not what we picked out. Six years ago. So I notice a half inch of crookedness within days, but the wrong sink I don’t notice till last month.

Fantastically awesome, I am.

Anyhoo – my mini redo was going to be enough to lighten up the space and make me happy.

And then I heard birds singing. Actually I didn’t hear anything – it was an email from American Express. My dear friend Jessica (she’s a dear friend now anyway) asked if I would like to participate in their spring home makeover initiative to promote their Membership Rewards program.

Um. Yes. Yes I would.

Jessica, my BFF, explained that they are trying to show how card members can use their Membership Rewards points to pay for home improvement and decor items. I know many of us use them to pay for travel, but I was completely shocked at what you are able to get for your home with points as well. I’m talking gift cards to Pottery Barn, Crate and Barrel, Restoration Hardware…swoon.

Because I am the crazy nut that I am, the one that got me the most excited was a big orange gift card that said “Home Depot.” You’ve got to be kidding me.

Sooo…Amex has given me reward points to transform a room in our house! I am completely beside myself and feeling quite blessed that I was chosen to be a part of this opportunity. I was asked to pick a redo of our master bedroom, family room or kitchen. And since the kitchen was in the works anyway…it was a pretty easy decision.

I am pinching myself! Gleeeee!!

It's hard for me to pay to have anything installed, so I hope to show you the how-to on a lot of the projects I have planned. Your dollar goes so much further when you tackle it yourself.

So here’s the rough plan for the kitchen over the next few weeks:

butcher

Pretty self explanatory with those nifty arrows, but I hope to master the art of coping with crown molding – and I’ll show you how it goes. We had the ceiling painted (same color as the walls) in our great room space years ago, I’ve been positively itchin’ to get white crown up there against the wall and ceiling since then.

I have a grand plan to drive two hours to our nearest Ikea to purchase butcher block to replace the island counter. I’ve never been to Ikea. Never used butcher block. Never replaced a countertop. We’ll see how that goes.  ;) It will have to be cut to the size I need, and I’m still working on that as well.

From what Nice Ikea Guy told me on the phone, they don’t have the dark wood tone I want, so I am doing a little research – I think I can stain it and then finish it off to protect it. (We will not be prepping food directly on the counter.)

I’d like to look into some new accessories for above the cabinets. It’s been years since I changed much of it out, so I’m really excited about that. (And I may be able to buy some items directly from Pottery Barn?! What the what? Without making my own knock off?!)

I’m also getting rid of the black, shiny backsplash and I have an idea to give the refrigerator area a more custom look:

backsplashI also hope to put glass fronts in a few of the cabinets to break them up a bit. You know how it goes – I see it in my head…but we’ll see how that vision turns out.  ;)

I have this dream of a gorgeous chandelier over the island, but I think it would be too much with the light over the table, the sink light, the recessed lights, yes?:

pot rack

So instead I’ve already removed the pot rack to see how it looks without, and I cannot tell you what a difference it has made in here!! It really seems twice as big. Hubby and I both stood back and were in awe. Crazy what a difference the simplest changes make. (I’ll show you soon!)

I hope to darken the stain on the top of the kitchen table, and perhaps paint the base – maybe cream, maybe black. I’m not sure yet.

The bay window area will get some changes as well, including a lighter coat of paint on that wall. (It’s quite dark there in real life.)

By the way, bear with me on these pictures – I copied them from different posts over the years.  ;)

I have MANY more projects in mind – and they won’t all get accomplished over the next few weeks of course. But I’ll share my plan, the process, and the purchases along the way.

Starting with this week – I was asked to use 50,000 Amex points to start, and with that I was able to buy a $500 Home Depot gift card. (Hate me, I know. I’ve been there. Seriously.)

So this weekend I bought the black granite kitchen sink I’ve been ogling for two years now:Pegasus AL20MB Granite Double Bowl Kitchen Sink in Black

And because I thought an oil-rubbed bronze faucet may disappear against the black sink, I got a stainless set (to match the appliances) similar to this one:

Moen 7730SL Monticello Single Handle Kitchen Faucet - Stainless Steel

And this is where I’d love your thoughts – does anyone have a single bowl sink and love it? Hate it? I love them but don’t know if they are practical for us. I am constantly rinsing paint brushes and sanding blocks and all that good stuff, and that all ends up in the right bowl in our sink for weeks days. So I feel like I need a spot to put clutter. Isn’t that great? :) But I would love your thoughts if you have a large, single bowl sink.

Also, I was thisclose to purchasing the faucet that you pull out, with the sprayer on the end of the nozzle -- I wasn’t sure how well it would hold up though. Anyone have one? Can you adjust the spray pressure? Has it held up well?

Basically – is there anything concerning a new sink or faucet I need to know? We’re having a friend (or my Dad? Wanna come over?? Smiles sweetly.) help us with the installation, but we are just a teensy bit clueless on what to pick out. I’ve never done this before peeps. I would love your thoughts!

And because I am so excited about this redo, I already started this:

photo

Aren’t you SO GLAD you don’t live with me?  :)

I’m thrilled that there’s a little somethin’ somethin’ from Amex coming for one of you too!  Stay tuned for a great giveaway in the next few weeks!


TDC is one of five blogs picked to promote the Amex Membership Rewards program.
I have received reward points to use as I wish to redo a room in our home.

Thursday, May 13, 2010

Bloggy Butt

First off – the winner of the Dimples and Dandelions giveaway is Kellie DeMille! Kellie, please email me and I’ll get you in touch with the D&D folks! Congrats!

OK, so I’m not one to obsess about my weight. Most of the time I’m too busy with life to think about it much.

I don’t diet – never have. I just know myself and know what I’m willing to do to keep my weight in check and eating very little is not one of them. 

I like to chow.  :)

I gained VERY little weight during my pregnancy – I actually lost weight the first 20 weeks and then finally gained only 20 pounds by 37 weeks when I had the Bub. And pregnancy did something fantastically awesome to my metabolism – within just a few months, I was well under my prepregnancy weight. And within a year I weighed less than I had been in years.

And then I really started blogging. (Enter the “dun dun duunnnnnnn” here.) And within a few months it had all gone to you know where.

To my butt.

I seriously don’t get it – at first, I was like, yeah, I’m on the computer a lot. But then when I thought about it more, I was perplexed. In my old life, I sat at a computer pretty much seven hours a day. And the other hour we were eating lunch.  ;)

Factor in another one and a half hours of commute time every day, and I was sitting on my booty a whole heck of a lot more than I do now.

So what in the heck?

Let me clarify here – I’m only about 15 pounds overweight. It’s not bad, I know. But lately I’ve realized I just need to take better care of myself – eat a bit better, work out more often, all that good stuff.

So even though we have work out equipment in our basement, there was something about the gym that was calling me back. We joined a nearby gym last week and I’ve been totally gung ho about going.

I went Monday and Tuesday and got my butt whooped by the elliptical machine. I used to be one of those annoying women you see who go at a 7.2 speed, not holding on to the railings. And not sweating a drop.

Ummm…no more. I’ve barely made it out alive this week at 15 minutes each time, drenched.  But at least I’m doing it, right? RIGHT?

So this week I decided to take advantage of the free hour with a trainer that came with our membership.

Big mistake. HUGE.

I was already feeling the affects of working out harder than I had in months – and I hesitated to go but thought I just needed to do it. I was motivated! I was going to get BUFF!! I was hallucinating!

I met my trainer and he was such a nice guy, so friendly! We sat and chatted about my goals, timeline, all that good stuff. I was feeling good!

I totally had this image in my head:
personal-trainer1_243214116See how happy they are? She’s working out but she’s happy and feeling a little burn – just enough to know it’s working. He’s so funny and nice and you see that smile? All nice and supportive?

Mr. Trainer and I talked about the areas I wanted to target. Then I told him I had great success losing weight in the past by using the weight machines consistently.

He smiled and told me how right I was – it was so important to work your muscles. All nice and friendly like.

He told me to warm up on the treadmill for about ten minutes and we’d get started afterwards. “We’ll take it easy on you today, no worries!”

The man lies like a rug. A big, muscular, smiling, rug.

It was some of the worst pain I’ve ever felt in my life. I was begging for mercy. Not out loud, but in my head. Out loud I was smiling through my gritted teeth, trying so hard not to punch him in the nose with every “PUSH THROUGH!”

Mr. Smiley Trainer now looked like this to me:
I am not a wus peeps. I have a very high pain threshold. And by the end I was cussing like a sailor in my head. And then I realized I was saying it out loud.

At the end Mr. Evil Trainer-Annoying-Smiley-Face was trying to get me to use these:
Amazing Sliders Furniture Sliders Set of 8
Furniture sliders – under my hands and toes and do these contortions on the floor. I’m serious. Are you freaking kidding me? 

He wasn’t. And I was done. And I was blinded by the sweat that was pouring into my eyes. And there he was smiling.

I looked like this:
sweating

He still looked like this:
personal-trainer1_243214116
And I wanted to poke him in the eye. And the best part – we didn’t use ONE weight machine (which I really wanted to do). It was all lunge, squat, contortions-on-the-floor crap.

I don’t know if it was some kind of I’m-insane-adrenaline-rush or what, but I told him I’d sign up for more sessions. Then I went to cool down on the treadmill and when I tried to walk back down the stairs to go pay the Mr. Insane-Smiley-Trainer-Man, I realized I couldn’t.

My legs wouldn’t function to walk down the stairs. I wasn’t sure what to do. So I gripped the handrail and took baby steps down the steps, like either a 90-year-old or a 2-year-old. You pick. It was amazingly awesome.

I decided to see how I felt today to decide if I’d go ahead and pay for more sessions. And I’ve decided to politely decline.  ;)

Today I am in pain like I’ve never known. He said he’d take it easier on me next time. I don’t believe him.

I’m going to stick to the boring stuff – treadmill, elliptical, anything other than him. Please God, anything other than him. Mr. Smiley-Face whatever. Maybe someday I'll forget about the pain and go back to him. Maybe. Maybe not.

So tell me – have you used a trainer? Loved it? Hated it? Did you stick with it? Do you send your trainer Christmas cards or do you have nightmares about them? Do tell!

**I am sure my trainer is perfectly awesome and I am quite sure there are plenty of amazing trainers out there. He was not for me, but if you are amazing and nice and won't try to kill me with squats, I would love to work with you. ;)

For a giggle – check out a funny story one of my reader’s shared with me here.  :)

Thank you to my latest advertiser!:
Thrify_Decor_Button

Tuesday, May 11, 2010

DIY drum shade chandelier

Well, if you follow me on Twitter, you know this project has been a doozy. It started with my need for more light in our office/den. I mentioned last week that part of my issue with this space is it’s so dark.

I talked to our electrician a while back about installing an overhead light in this room. Because of the way the beams run in the ceiling, it would be a major project I’m not willing to mess with right now – AND it would be costly.

Thrifty is my name. Not costly.

So I considered a couple options for a ceiling light in the room and nothing had panned out. Then an idea hit a couple weeks ago, and while shopping at HomeGoods over the weekend, I found a perfect, huge, beautiful drum shade:

drum shade

I’m pretty much obsessed with drum shades lately. They’re all over our house now. This one was exactly what I needed for my DIY light fixture…and it was only $13! Booyahhhh!

I’ve seen this project in numerous magazines and every time they give directions, they say to find a light kit – I’ve seen them on TV so I knew what I was looking for. But when I got to Lowe’s there was no “light kit” to be found. There were smaller versions for chandelier-type bulbs, but I needed something I could run through the top of my drum shade. (More on that later.)

Luck was on my side that day at Lowe’s because very knowledgeable Lowe’s Guy was there to help me out…and he didn’t look at me like I had two heads when I described what I wanted to do.

We clicked, yo.

Guy helped me pick out the parts I needed, and when I got home to put them together I was VERY pleasantly surprised at how fast and easy it was to put them together! There’s a large BUT coming, so stay with me here…

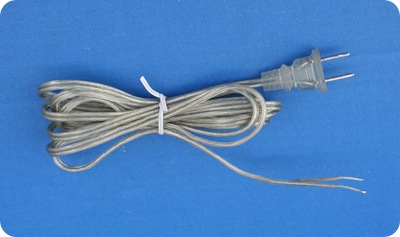
Most of what I needed was in the lamp part section at Lowe’s. The first thing you need is a cord with a plug at the end. I forgot to take a picture of the package, but it looks exactly like this:
The second piece to the puzzle is the socket:

And the third was a loop:


You need to believe me when I say this is EASY to do. I’m pretty experienced with electrical work and I’m not just saying it. If you have all the parts in front of you, it will quite literally take you ten minutes to put this together. I do not lie!

First step is to take the top off the socket, and screw the piece above into the top of the socket, then put it through the middle of the lamp shade bracket, then screw the loop onto it on top:

023Are you with me? It’s easy! Promise.

Then take your cord, with the open ends, and put it down through the pieces I just mentioned:


Next, you’ll want to separate the two wires a bit. Sometimes you can just pull them apart, sometimes you’ll need a wire cutter to cut down the middle:

The directions for the cord will show you how to tie it into a “knot” – I can’t remember what it’s called, but it’s very clear how to do it, and it takes a minute. You can see it here, but on the directions it’s much easier to follow:

034Then follow the directions – one wire is smooth. Wrap that around the screw it says to, then tighten the screw. One wire is ribbed – wrap that around the screw it says to and tighten that one.

If you’ve ever installed a light fixture it’s just like that. If you haven’t, don’t be sceered. I SWEAR TO YOU IT’S EASY!!  ;)

When you are done, slide the parts of the socket back together, put in your light bulb, and plug it in!

And…

Hear a pop and see sparks!

Ummm…I’ve totally lost all of you who were going to try this, haven’t I?  :)

I was so annoyed. I know how to do this stuff peeps, and I did it right. But I don’t mess around with electrical stuff, so I took it all apart, and took the socket back to Lowe’s.

Can you say “GAH?!”

I was praying Nice Lowe’s Guy was still there, and I actually trolled the aisles for a few minutes, hoping I would find him…and then I almost smacked the cart right into him! Yippee!

He looked at the socket we picked out and realized the problem – it had too many connections on it. There was a third screw (you only need two) that was supposed to be connected to something. He mentioned it was meant for a lamp that has two light sources or something like that. I have no idea what that means, but I nodded my head like I did.

Soooo…he took me to the electrical aisle, where we found a much simpler socket:
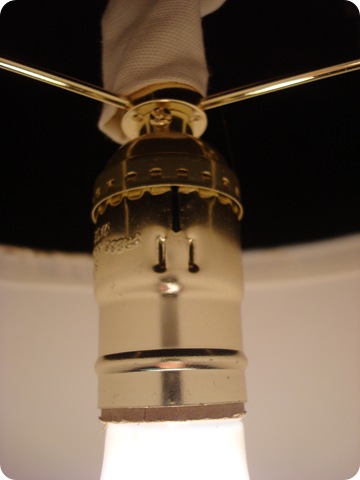
It was much cheaper than the first socket – I think $3? And it only had two screws inside – one for the smooth wire, one for the ribbed wire. You can find it at the end of the electrical aisle – it’s in a set of bins you pull out and it was wrapped in plastic.

It worked!! And all was right with the world again. Thankyouverymuch.

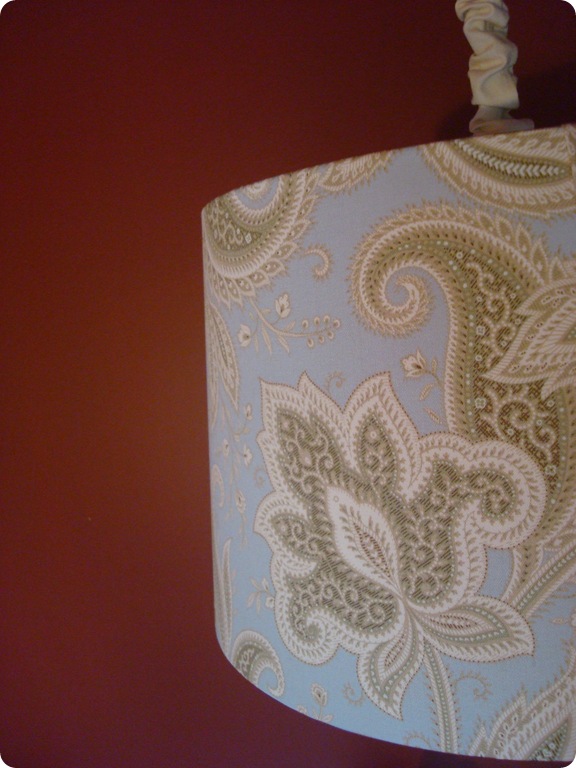
I covered the drum shade with some of my lovely fabric for the new office:
047

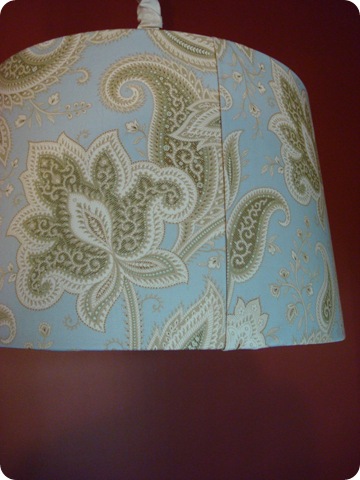
And because this project was doomed to be a total science fair, I cut the fabric wrong TWICE to cover the thing. I had to end up using two pieces to get it covered:
038

I just folded over the raw edges and used hot glue to get them down on both sides of the shade.

I always forget that you can see areas like that when you turn on the light:

026

But I was about over it by then so I say who the heck cares? NOT ME!  :)

Can I tell you how much I adore this fabric?:

040

Please ignore the wall color. It’s not staying for long:

036

Think light, bright and fab.  :)

I always cover the inside edges with ribbon:

034

It finishes it off and covers the ragged edges you’d see with the light on:

DIY drum shade chandelierEven though this is super lightweight, I didn’t want the wires to be the only thing holding it up. So I took some chain from an old fixture and hooked it to the loop I showed you above, then hung it on the hook in the ceiling. (It takes the weight off the electrical cord.)

Because I have to swag this over a bit, I wanted to cover the cord and chain. I took some of the fabric I bought for this room redo and cut a couple of strips. Then I just hot glued it together to make a cord cover:

   DIY cord cover

I put the cord through all of it and scrunched it a bit and it looks fab!

For now I took the cord up behind the drapes, down to a plug:


I bought a switch to add to the cord so I can just leave it plugged in and turn it on easily, but I may just see if our electrician can run a light switch up from the outlet so I can use that instead.

I LOVE IT. It hangs directly over the desk, which is getting a redo as well. It's a perfect source of overhead light -- what I was wanting so badly in this space.

And being purdy sure doesn’t hurt!:

Sigh. Lurve.

Total cost for this DIY light fixture was $35:

- $13 for the shade (HomeGoods)

- $12 for 2/3 yards fabric (I got extra for this project)

- $5 for the cord with plug

- $3 for the socket

- $2 for the loop set (comes with two)

That’s $35 right? I was never good at math. Covering lamp shades I’m OK at. Math, no.

I hope I didn’t make this seem harder than it is – it really will take you a VERY short time to put it together. I can guarantee it will take longer to cover the shade with fabric than it will take to put the fixture together.

Cross my heart, swear on my pretty new drum chandelier.

So, you think you could do this one? I bet you could!  ;) Let me know if you try!

P.S. To see my DIY Ballard Designs inspired pendant light, go here.


Thanks to my latest advertiser!:

Fit_Gal_Club_Link_Picture