Friday, November 9, 2012

Inspired You

**This giveaway is now closed. Winners have been notified. Thanks!

Hello and happy Friday! Any fun plans this weekend? We are heading into the last few days of marching band for the year, which always makes me both sad and happy. I always miss the activity when it’s done, watching the kids…but I’ll be happy to have my husband back, at least for a few days. :)

I’ve got a special post for you today because I get to brag on a friend a bit. :) I found Miss Mustard Seed’s blog years ago and am happy to say she is now a dear friend in real life.

Marian just published her first book this week, a lovely one called Inspired You:

miss mustard seed book

When it came in the mail I was immediately taken with how pretty it was:

miss mustard seed book

I’m a decor girl, what can I say? I mean, am I wrong? :)

As soon as I started reading, it felt like Marian was reading it to me – I love how it’s such a casual read. I have avoided design/decor books all these years just because they’ve felt over my head when reading.

This one feels like you’re talking with a friend. And I nodded my head so often – I can’t agree more with the message in Marian’s book! She proves you don’t need crazy talent or lots of money to make a beautiful home.

One of my favorite quote in the books is this:

“Beautiful homes start with inspiration and a willingness to try.”

Love that!

Marian’s words are inspirational, and the photos are the eye candy:

miss mustard seed book

You know how you study photos of beautiful rooms in magazines for a good long time, looking at every detail and figuring out how you can replicate it in your home? Or is it just me? ;) Well, I think I spent as much time studying the pictures as I did reading.

But it’s not just filled with finished spaces – Marian shares the before pics of many of her rooms and projects. And a bunch of really detailed tutorials as well:

miss mustard seed book

There’s a tufted headboard tutorial I am determined to try!

I’m so incredibly thrilled for Marian! She is an amazing person, decorator and business woman.

I’m also thrilled that I get to give away Marian’s book to two of you! To enter just leave a comment here (make sure to include your email with (at) and (dot) spelled out to avoid spam) this weekend. I’ll email the winners on Monday after noon!

Good luck and have a GREAT weekend!! What are you up to?

Thursday, November 8, 2012

How to accessorize bookcases

Well hello! I’m back today to share how the accessories on the bookcases came together. It was a long process (what about this project wasn’t??) and I gathered some of the items over months and months. Most of the accessories we already had, but it sure was fun to look for a few new pieces throughout this process!

Here are the bookcases again as a reminder:

DIY built in bookcases

First I’ll go through some of the pieces, and then I’ll explain how I pulled it all together!

Of course I wanted the items to have a “library” feel, so that was most important to me throughout the process. Almost all of the “new” (I’ve picked up items since January) accessories were found at local antique/thrift shops.

I loved the colors on this globe – they work with he room perfectly! The background color ties in with the walls in the room and the blue works with the backs of the built ins:

accessorizing bookcases

I had a globe from my childhood that I could have used, but my STINK sister took it. She swears it’s hers and I swear she’s WRONG. :)

This art was a more recent find and I was so thrilled when I found it!:

accessorizing bookcases

It’s an actual oil painting of a skyline and it reminds me of NYC. It was only $20 (which I thought was incredible for a real painting), I think because there was a sticker stuck to part of it. I was able to get it off with tweezers and it looks brand new! The frame was like that too – perfect!

When I shop for ANY accessory, I love finding things that mean something to us as a family, and the NYC painting is certainly one of those.

I brought in more globes with these bookends I found at a thrift shop:

globe bookends

They were going to get a paint job but I didn’t want to do it after all that work. Now they’ll stay as is. :)

I added quite a few metal pieces, the fat quails (?) were from Goodwill, the pretty cranes were from a thrift shop:

 accessorizing bookcases accessorizing bookcases

There were a few small DIY projects, including the little set of drawers that I showed you here:

CeCe Caldwell paint

I filled my little wood pots by just covering Styrofoam balls with moss sheets:

DIY moss topairies

I just cut pieces of the moss off and hot glued it on. I didn’t worry about the backs:

 DIY moss topairies DIY moss topairies 

I don’t mess with the backs or the insides of things. :)

The butterfly art was a poster I cut up and framed years ago. I just painted the frame and mat with the chalk paint I used on the set of drawers above:

accessorizing bookcases

You may remember the butterflies from my old laundry room years ago:

black and yellow laundry room

I added a little tiny bit of sapphire Rub n Buff to the frame to bring out the texture – the sapphire is such a pretty color!

The faux leather box used to sit in the bedroom (I shopped the house!) and the fat topiary (that I adore!!) was one of my only new purchases, like from a real store. ;) I got it at one of my favorite local nurseries:

accessorizing bookcases

Most everything else was ours already. :) I was surprised we had so many books! I did pick up just a few more at Goodwill, but I made sure they were all books we would actually read. It was fun to pick out some new ones. (For a fraction of the price!)

I take the book cover off my books so the pretty covers can be seen. I bought my very first design book to celebrate finishing the bookcases – I’ve never had one! (The Design Sponge book):

oil rubbed bronze cabinet hardware

Oh la la!! ;)

I used our paper back books too – we have too many of them not to!

As I’ve said before, sometimes accessorizing falls right in to place, sometimes it’s agonizing! :) Most of this fell into place nicely, it was only those bottom shelves that gave me fits:

DIY built in bookcases butcher block

As I went through the process, there were things that I repeated to make it more cohesive – first up were the metal pieces:

how to decorate bookshelves

The fan, the cranes, the bookends and the little fat birds were placed throughout.

I tried to space out the green items too:

how to decorate bookshelves

I even thought about which way to go with the books. I tried to switch back and forth – starting on the right, then left, right, etc.:

how to decorate bookshelves

Otherwise parts of the bookcases started to look “heavier” than others.

And I also thought about what to center on the shelves and what not to:

how to decorate bookshelves

The top and bottom items are all centered, and two of the shorter shelves in the middle are as well, on each end.

You know how you see those beautiful photos in magazines? Yeahhh, I can’t even imagine how many people and how long it takes them to get those perfect shots!

I’m just glad I have pictures of these, because I’ll need to refer to these when I need to put everything back after I decorate them for the holidays! The books will stay of course, but I plan to exchange a few accessories out.

So there. you. go. Whew! I hope that helps as you try to conquer your shelves or accessorizing in general. I’m certainly no expert but I do love how they turned out! If there’s something or an item you’re wondering about, please let me know and I’ll answer you in the questions.

Thanks again for all the love on this project! Now, onto that never-ending powder room project. :)

Tuesday, November 6, 2012

The holidays, debt free

Thrifty Decor Chick Dave Ramsey

I don’t know what it is about this time of year, but the last time I blogged about our debt free journey was last November as well. I guess it’s the upcoming holidays coming up that gets me thinking about it.

This year it’s extra special because I was asked to participate in the Dave Ramsey Merry Different Christmas series over at daveramsey.com. It was such an honor to be asked to write about our experience and I so cherish the relationship I have built with the people there.

It’s been almost two years since we finished paying off $125,000 (in credit card, car, student loan and I-have-no-idea-what-we-bought debt) and became debt free, and yes, I can easily say it’s been the best two years of our lives. It has changed us, our marriage and our outlook on life in general for the better.

I get asked all the time how it’s changed our lives. To say there is a peace and a feeling of FREEDOM is an understatement. The only money we owe anyone is for our house, and we’re chipping away at that at a good rate too. After living our entire adult lives in debt, that is an amazing feeling!!

It’s the little things that make a difference to me – I can buy primed wood if I want to now, instead of unprimed. Silly maybe, but it’s still not lost on me. This year I went to the salon to get my hair highlighted for the first time in five years. I don’t shop Goodwill as much as I used to, which I think bothers some people. Thing is, I believe I’ve saved money by not stopping in a couple times a week anymore. I used to buy items just because I’d be afraid to “lose” them for a good price -- and my house filled up with STUFF I wasn’t using. It was a waste.

Some things have not changed though – our two cars combined are 16 years and 300,000 miles old. They are…interesting. ;) But we’ll keep fixing them as long as we can to avoid buying new (used) ones. And although we can now hire help sometimes (no, I didn’t frame and drywall our basement, thankfully we hired out for that), I still find great joy in doing things myself and always will.  :)

A time that I feel the change in our home the most was last Christmas (our first without debt), and that’s what I wrote about over at the Dave Ramsey site here. A few years ago, right about now, I would start to feel the panic of not having enough money to pay for Christmas. Then that panic would be “eased” by our fall back method of using credit cards throughout the season.

But it returned a couple months later…and for months (years?) after, as we continued to pay off the holiday (and everything else from months and years before). It’s just what we did. It’s what so many do! And I’m not mad at you if you do either – but if you are fed up with the debt, I write this to tell you you CAN do it differently.

That day that we asked each other – “Can we REALLY live without credit cards?” -- caused a shift and changed our lives.

This year the folks at Dave Ramsey are encouraging you to be weird too with their "A Merry Different Christmas” series. They want you to avoid going into debt for Christmas gifts, parties, decorations and focus on what really matters. To celebrate, they’ll be doing product and cash giveaways that total around $75,000 ($10,000 per week and a $15,000 grand prize)! There hope is that this will ultimately provide someone the chance to celebrate being debt-free for Christmas. AWESOME!! It gives me chills. And yes, every time I hear a debt free scream on the radio show, I still get tears in my eyes. It is an emotional thing.

My hubby and I would like to pay it forward too. If you are struggling with a little or a lot of debt, we want you to know that is really IS possible to become debt free. So like last year, we are giving away the Financial Peace University classes to five of you. This is the nine week series of classes that got us SUPER excited to kick some debt butt. The end of our debt journey was the hardest for us, and these classes motivated us SO much.

You can just use the CDs in the packet to go through the class on your own, but I highly encourage you to go to the classes if you can. It makes a difference!

You can take a look here to see where there are classes near you. Many start up at the beginning of 2013 – I can’t think of a better way to start the new year!!

The Dave Ramsey folks are throwing in 25 desk calendars as well:

dave ramsey

Believe me, when his words are staring at you every day, it motivates. ;)

To enter to win one of the five Financial Peace classes, just leave your comment here with an email so I can contact you if needed. And of course, if you’d like to enter privately, please just send me an email at simplehomeinteriordesign (at) gmail (dot) com with the subject “Financial Peace.” I’ll leave this open all week, till this Friday, the 9th, at noon. Winners will be contacted via email.

Good luck, and if you have a debt story to share, please feel free to do so in the comments! I love hearing them!

Monday, November 5, 2012

November Before and After Party!

Hello there! Hope you had a great weekend! The early darkness last night threw me, but today’s bright, sunny morning helped a little. :)

Today we’re kicking off November with the Before and After Party, and wow, there were SO many great projects last month I couldn’t wait to share with you!

Check these out and then link up your own today!

I have loved those sweet velvet pumpkins and acorns I see in blogland, and Lisa shared a great, easy tutorial on how to make your own here:

velvet acorns DIY

Aren’t they precious?

Oh my goodness, I LOVE Shannon’s man cave – this is the look I’m going for in the basement:

man cave decor

I loved ever bit -- that dark ceiling too! She shares a ton of the her DIY projects along the way too. Awesome space!

Becky’s organized and cute toy storage just made me happy:

toy storage

I have big plans in mind for the basement toy storage and decided this weekend it needs to happen sooner than later. The toys and games are driving me a little batty down there. ;)

Speaking of the basement – Larissa’s idea was SO fun, I have it on my to do list! See how she turned a cabinet door into a (cauuute) snack tray here:

DIY snack tray

Isn’t that adorable? Love the chalkboard top!!

Shari created a lovely little fall tablescape in her ORCHARD:

Orchard Autumn Tablescape

Oh my goodness, I just want to go sit and have a glass of wine!

Brooke shared a great tutorial on covering a lampshade and how she DIY’d the leopard look here:

recovering a lampshade

Her vignette is lovely too!

You won’t believe the before of Ashley's barstools, and she made them even cuter with some number stencils:

recovering barstools

And last but certainly not least, Amy’s painted globe project was too cute!:

painted globe project

I see globes all the time at thrift stores that are in bad shape – this is a great solution to fix them up. You could do whatever word you wanted – so fun!

Told you these were some fun projects! As always, if you’d like to pin these, please visit their respective sites to do so.

Now it’s time to see what you’ve been up to this month! If you’d like to be considered for next month’s recap, please include this link in your post back to TDC:

<div align="center"><a href="http://www.simplehomeinteriordesign.blogspot.com/" title="TDC Before and After" target="_blank"><img src="http://www.homestoriesatoz.com/wp-content/uploads/2012/03/beforeAndAfterButton_thumb1.gif" alt="TDC Before and After" style="border:none;" /></a></div>


Now link it up! Have fun!


Sunday, November 4, 2012

Come party with us!

Hello! I’m tickled pink that it is (almost) that time of the year again! This is one of our favorites – it’s nearly time to share your holiday home with blogland!:

Holiday_Home_2012_banner

Well, you do have a month…but I admit I’m already thinking about it. ;)

We’ll start with Layla and Kevin and holiday mantels on the 4th, Kate is up next on the 6th with Christmas crafts, Rhoda will host pretty vignettes on the 11th, and I’ll finish off the linkies with my annual Christmas Tree Party on the 13th.

We can’t wait and hope you’ll join in! And don’t forget the November Before and After Party goes up tomorrow morning! Enjoy the rest of your weekend. :)

Friday, November 2, 2012

October in review

Hello all! Hope you’ve had a great week and have an even better weekend planned! It’s the end of the month, so that means another quick recap of the projects I’ve posted here on TDC in October. Two months left in the year…I can hardly believe it.

I started out the month with one a big fail of a project in the basement:

magnetic strip fail

You all had great ideas, and I went out that day and bought some washers to glue to the bottom of the cars. Still haven’t done it, but it will be a good, mindless project. Someday. :) I’ll definitely let you know when I do it!

Next up, I shared some of the beautiful before and after projects from last month, and you all shared 350 more at the October linky:light blue walls dining room

I wanted a spot for the Kleenex (and my hot chocolate) in the family room, so I moved one of my favorite pieces next to the sofa and was surprised at how well it worked:

accessorizing end table

So cozy!

I did a LOT in the family room this month…not sure what that’s about. ;) I shared our coffee table redo here and the DIY wood tray here:

DIY wood tray leather handles

We still have so much to do in the basement, but I had to start decorating…just a little:

blue yellow vintage sewing cabinet

You can see how I put together this little spot here.

The basement laundry room is coming together…slow but sure. I took advantage of that weird space behind the washer and dryer and made a shelf for the stuff we use regularly:

laundry room storage

It’s not pretty yet, but functional, and that’s all I care about right now. Have I mentioned how much I love having a laundry ROOM? It’s delightful!

You shared more than 200 beautiful bedrooms at the Show Us Your House party here.

I was THRILLED to finally find affordable lighting for the library bookcases. It only took forever:

outdoor lights turned bookcase lights

Speaking of bookcases! Can you even believe I finally finished them??:

DIY built in bookcases butcher block

Thanks for all the comments – I really appreciate that you take the time!

I also shared a couple Halloween projects – our mummy door here and paper Halloween decor here.

Don’t forget Monday is the November Before and After Party – get those posts ready!

Have a lovely fall weekend! Got anything fun planned?

Thursday, November 1, 2012

Redo with CeCe Caldwell paint

Well first off, I have to say a big thanks to all of your lovely comments on the library built ins! I’m going to start calling it a library now I guess, since there’s no dining happening in there. Library sounds so posh though. “Would you like a cup of tea…in my library?” Ha!

Anyhoo, I’ll go into more detail about the accessories soon, but one of them gets it’s own post. ;) Last week I got a chance to try out a new-to-me paint and was able to work a little redo on one of the items I used on the bookcases.

I’ve had this little drawer thingy for years – got it as a present probably eight years ago? I think? Anyway, it’s from Pier 1 and I love that it’s a bigger piece, but it’s been a long time since it’s been displayed:

I’m pretty sure it started out green and then got a redo years ago during my let’s-paint-everything-black phase. I mean…everything. It was a little crazy. :)

Because it was a perfect fit for the shelves, it needed a redo. It was a great project for the CeCe Caldwell chalk and clay paint:

CeCe Caldwell chalk and clay paint

The lovely ladies from Bungalow 47 near Lansing Michigan drove down to central Indiana to show a few of us bloggers how to use the paint. You may have heard about chalk paint recently – it’s booming! I told you about the Annie Sloan version here and the CeCe Caldwell paint is very similar…but has some differences.

One of the things I love about chalk paint is that you don’t have to sand before you start painting. You’ll want to clean the item well (just with regular cleaning supplies or wipes), but sanding is not necessary. Here’s the thing though – to get a great, hard finish, you’ll want to use a wax over the piece when you’re done. That’s what protects it. Otherwise I don’t know if the paint would hold up to wear and tear without it.

I wanted to give this one some dimension, so I started with one of the brighter colors the ladies brought us to try out – this one was called Blue Montana Sky:

Trying out CeCe Caldwell chalk and clay paint

I love painting with chalk paint, especially the first coat, because it doesn’t need to be perfect. This coat is just to peek through the second, so it took no time at all to get it on there. It goes on SO fast.

I did notice in comparison that the CeCe paint dries slightly slower than the Annie Sloan paint does – which I found to be a good thing. I could touch up parts without the paint dragging.

OK, so here’s a cool thing about this paint – the CeCe Caldwell brand has clay in it – which makes it so you can see where the paint is drying. You can see in the pic above the dry and wet spots – I thought that was cool! Since I had to get home to get the Bub off the bus, I hurried my drying time along with a hair dryer – super fast!

Then it was time to add the second coat. For this one I used Pittsburgh Gray. After it dried I pulled out some of the blue behind it by giving it a quick sanding:

CeCe Caldwell chalk and clay paint

The drawer on the top had been sanded, the one below had not. You can see how a tinge of the blue is coming through – love it!

If you aren’t doing two colors, you don’t have to sand. And if you are just wanting a slightly distressed look, you’ll just want to pick and choose your spots. I hate sanding with a passion, but this wasn’t bad.

Sanding gives it a great, smooth as silk finish. Next up was the wax – this was the other difference I noticed from the Annie Sloan wax. The CeCe wax is non-petroleum based so it has ZERO odor (and that means it can be shipped!) and it was very, very light when spreading it on.

It was slightly easier to apply because it’s so light, but as far as the result afterwards, the finish was similar as the Annie Sloan version. You just brush it on, then wipe it off and kind of “buff” with the rag as you do.

Many of you have asked about the wax I’ve used lately, and this is why I love it, at least with the chalk paint products:

CeCe Caldwell wax

You can see how it makes the paint color rich and deep and brings out the undertones. This also makes it easy to see where you’ve put it. :)

I’ve used wax on top of regular latex paint as well and love the result there too, it just doesn’t change the color of the paint quite as much.

When it was dry (I waited till the next day), I put the hardware back on:
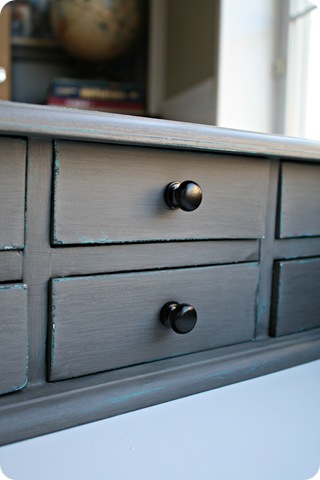
CeCe Caldwell paint

And the little redo was complete!:

Trying out CeCe Caldwell paint

At first I was worried the gray was going to be too dark, but I actually really love how it turned out. It’s got a Restoration Hardware vibe that is perfect for the bookshelves:

Redo with CeCe Caldwell paint

What’s funny is I didn’t think I’d like the chalk paint products before I tried them, but I like these paints more and more each time I use them. They are perfect if you love a distressed finish, but you can see by my piece that it also works for more streamlined stuff too.

I love that with the wax, the finish is SO smooth, like something from the furniture store. It’s crazy!

The downside to the chalk paints is the price – they are more expensive than regular latex paint. (The CC brand is slightly less than AS.) But what they say is true – I find they last MUCH longer than a regular quart of paint. It goes a really long way. (The wax goes an even longer way.) When you factor in the price/time of primer, it may come out as a wash, depending on what you are painting.

The older I get, the more I paint stuff, the more I realize the value of a good paint. This stuff is good and I’ll keep using it for sure. I’m already eyeing some frames that need a makeover. :)

So there you go, my take on another paint product – and if you have any questions about CeCe Caldwell paint, the ladies (Jill and Chantelle) from Bungalow 47 will answer them in in the comments over the next couple of days! (You can also visit the CCC site here.) They will know better than I what works and what doesn’t. Ask away!

**I was not compensated to write this post – I just like sharing my thoughts on new DIY products with you!