Showing posts with label fun stuff. Show all posts

Friday, April 18, 2014

Fun Easter ideas

Hello and Good Friday to you! I hope you have a lovely weekend planned, whether it be activities with your family or just relaxing. :)

I had a cute Easter-themed project planned for this week but I just couldn’t get it done. Wah waaah. I know it’s down to the wire here but I thought these other Easter-themed projects and ideas were too cute not to share!

I am totally in love with the pretty colors of these naturally dyed eggs:

naturally dyed eggs

(source)

I love ours as bright and as obnoxious as possible but these colors are so lovely! (And who knew red onion would make a green egg?)

We’re big Despicable Me fans in this house, so of course anything minion makes us smile:

minion eggs

(source)

How CUTE are those? And totally easy to pull off too.

I pinned this the other day and didn’t end up digging the plastic eggs out in time…fail! My son will get this lunch next year for sure:

lunch with Easter eggs

(source)

One of my all time favorite tables settings I ever put together was this spring/Easter-themed one from a few years back:

twine wrapped eggs

I wrapped some plastic eggs in twine and yarn and nestled them in burlap – so easy.

The rest was just flowers stuck inside my Goodwill glass centerpiece:

Easter table setting This idea is absolutely gorgeous – I wonder if you could use fake eggs or if they would float too much:

Easter centerpiece

Those are two of my favorite flowers – ranunculus and gerbera daisies! Isn’t that so pretty?

What do you make for Easter dinner? Our standard is Pioneer Woman’s prime rib:

pioneer woman prime rib

(source)

GOODness. It is delicious. I’m not a big cook by any stretch and I now make this for both Easter and Christmas (and sometimes Thanksgiving!) and it’s SO easy to do.

I thought this snack idea was so adorable!:

Easter snacks

(source)

I mean, come on. Dying. That is the cutest!

Do you have Easter plans? We’re going low key this year – just enjoying a weekend without a lot going on. We are planning to see Heaven is for Real and I’m bringing my tissues because I bawl at the trailer alone. :)

Hope you have a lovely, blessed weekend!


P.S. I have the pin it button installed on my photos but I ask you visit the sources and pin from there. :)

Friday, March 21, 2014

House happy

Hey hey and welcome to this beautiful Friday! (At least here…hope you’re having a nice one too!)

I call these posts house happy and I’m not sure why because it’s not really stuff from my house. It’s mostly fun stuff from my Pinterest, Instagram, etc. that I like to share occasionally. I need to change it. Social media happy perhaps? Doesn’t have quite the same ring.

Anyway, it’s just fun stuff to end the week. :)

I shared this one on Facebook and it couldn’t be more true:

email/letters cartoon

For real. Good mail is the BEST!

I learned that Siri has a sense of humor and she’s up with the latest:

siri

Ask her who took let the dogs out too. :)

There are only 37 spots left for the upcoming Haven Conference this summer!:

Haven Conference

Did you see that Chip Wade is our keynote? I LOVE HIM HIS SHOW. We are planning on having the sessions and speakers up online by April 1st – it’s going to be another great event!

Every year Target comes out with cute new gardening tools and every year I feel I must get new ones:

target gardening

My dream has always been to have built in seating around a kitchen table. This is dreamy:

built in banquet

I pinned this one from Houzz but it’s originally from Southern Living. Gorgeous.

This mud room (it actually just looks like a little mud room “nook”) is just beautiful:

mud room with mirror

(BHG)

I wouldn’t change one bit!

I’m sharing ten awesome spring cleaning tips over at the Home Depot blog – there are some really good ones in there people! I use all of them and they all work great. :)

And finally, I haven’t meant to hold on out on this so long, but I wanted to share a picture of my BEAUTIFUL grandson:

cheeks

I don’t share many photos of my son here so I won’t be sharing many of sweet cheeks either, but my stepdaughter said this was fine. He is seriously precious and cuddley and smooshy and such a good baby. We are SO blessed to have him in our lives and family.

There you go – some good, pretty, fun, precious stuff to kick off your weekend. :)Hope it’s a great one!


P.S. The pin it button is now on all of my photos but I ask you visit the original source to pin from there.

Monday, July 1, 2013

Building a Lego house

Hey all! Can you believe it’s July? This is one of my favorite weeks of the year! It’s even better than years past because our temps are unseasonably cool and we’ve had tons of rain – two things I like very much. Last year we had drought conditions and couldn’t set off fireworks, so we’ve already made up for that this year. ;)

Oh by the way, I wrote this whole post and then realized it’s the first Monday of the month so I should be doing the Before and After Party today. I totally forgot. We’ll do it next Monday, hope that works!

This weekend I finished up a DIY in the basement that I’ve been planning for a while. Since we had the built in cubbies installed I’ve been hoping to get this done, just to take advantage of some odd wall space down there.

I have never built true floating shelves – I have built shelves (here in the dining room built ins, here in the pantry, here in the basement bathroom) but all of those had supports on the sides for me to attach supports to.

True floating shelves with no side support are another thing – but I think I did pretty OK at it for a first try!

I didn’t follow any specific tutorial, just used what I’ve seen here and there and winged it myself. This is a relatively simple project if you work with tools. And sometimes I make relatively easy projects total pains in the butt, so yeah. This was one of those. :)

I started out with some 1x2’s from the hardware store – I cut them down to the length I wanted the shelves to be and then cut supports (same exact length) and glued them on with wood glue:
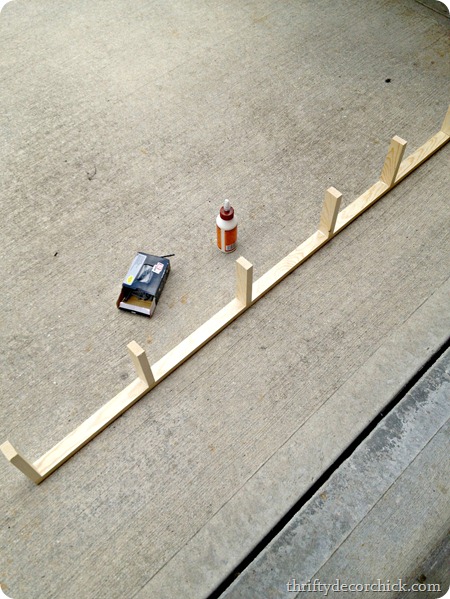
building floating shelves

Then when I thought I had let them dry well enough, I flipped them over to secure them even more with screws. That’s when I realized I didn’t let them dry enough and every. single. support. fell off.

Sometimes I look like I know what I’m doing. This was not one of those times. I’m sure my neighbors were all, awww, look at her, trying to DIY! So cute!

ANYWAY…I always go way overkill with nails/screws/glue and this was no different – I used two (long) screws in each support:

building floating shelves

Before I put the front of this support on, I installed them on the wall. This way I could get the screws into the wall straight on (if the front support was on I’d have to work around it, make sense)?:

building floating shelves

After both supports were up I went to grab the wood I had bought to make the actual shelves I was going to build to slip over them. And I realized I had totally made the supports the wrong size. DOH!

So…back to the store I went. I ended up getting a big sheet of stain grade particle board cut down instead, which in the long run ended up being better anyway (a lot more light weight and less bulky):

building floating shelves

That photo is why I have an SUV. That photo is also why I don’t have a nice SUV. ;)

So instead of making a shelf that slips on over the support, I ended up just securing all the wood to it instead. Which is fine, I just won’t be able to take these down…like, ever. Good thing I like them.

Here’s the process as I started covering the supports with the wood:

building floating shelves how to

I hope that makes sense! The trim on the right is just the start of what I wrapped around the whole shelf to make it look finished off.

Here they are all done – I taped off the walls with FrogTape so I could get them stained with little mess:

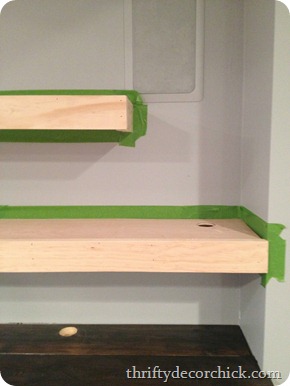
DIY floating shelves DIY floating shelves

So sometimes I recommend you paint before you do a project because I think sometimes it would make the project easier. I NEVER do this and many of you ask why. It’s mostly because of projects like this – they are rarely perfection. So I fudge with stuff, have to recut many times, sometimes make additional trips to the store – and if I had painted the wood I originally wanted to use for this I wouldn’t have been able to return it.

So…sometimes it’s easier to paint/stain before – I just work better doing it all after all is done. That usually ends up being quicker for me.

I used the beautiful Kona (Rustoleum) stain I’ve used elsewhere in the basement – love it!! When that was dry I did a coat of semi gloss polyurethane and called it done. Then I loaded them up with the little Lego sets that have been all over the countertop for months:

DIY display shelf

I’ve been planning these shelves forever now – their purpose is two-fold. Obviously as a place to display all the little Lego sets our boy makes, but to keep them up off the countertop as well. I just want to use the storage space as best we can.

The basement is such a fun space for us and my goal all along has been to make the art down there be very personal to our family. So the Lego sets, although not styled to perfection, are just us. :)

Here you can see how the trim looks and how the bottom piece of particle board hides the supports inside:

DIY display shelf

I just started grabbing the Lego sets and putting them on the shelves – there’s not much hope that this is ever going to look “perfect” but I kind of LOVE it:

DIY floating shelf dark stain

Although the Bub did say later that it’s a “little messy” so he’s going to rearrange it. Gah. (He did NOT get this from me.)

Of course these are all sets he plays with, so he needs help getting them from the top shelf, but he can reach the bottom shelf easily. They are both fairly low because of the bulkhead in that spot.

I had to include a pic of us on a roller coaster in Legoland -- we had it made into a Lego set:

lego storage

It’s hard to see but it makes me laugh out loud every time I look at it. You can’t even see the Bub because he’s ducking down, totally freaking out. My husband has his eyes tightly shut, probably praying for his life. And I’m in the front laughing my butt off – it’s pretty obvious who loves roller coasters in this family.

Now this little spot is dedicated to what the kiddo loves – I’ve mentioned a few times that he’s a Lego freak and we encourage it (within reason). I like that this part of the room really speaks to what he loves:

DIY floating shelves as Lego storage

Like I mentioned, this was my first try at the true floating shelves – and I think they turned out pretty well! Just don’t look too close. :) The bottom one is secured to the wall on one side so it’s super secure. The top one is definitely staying put but I wouldn’t do any pull ups on it. Good thing I can’t do a pull up.

Have you tried this DIY project? Did you do them any differently? Do you have a Lego house that you try to organize too?

Monday, March 11, 2013

DIY (hideaway) Lego tray

Hey all! Whooee, that was a jam-packed weekend! I shopped (at the vintage mart, twice!) and met up some awesome readers and fellow bloggers, went to a party, attended a school event for the kiddo, had a girl’s night with one of the BFFS, went to a Lego event at the fairgrounds and hung with my stepdaughter and her boyfriend who were home on spring break. It was a whirlwind but fun!!

We surprised the Bub with a trip to the Lego event yesterday – to say he’s a a fan would be a huge understatement. He got started on Legos when he was only four (he could never be bothered with the bigger, toddler ones – he only wanted the smaller, big boy sets), and from that very young age was putting together sets with 600+ pieces by himself. It blew our minds but he’s been hooked ever since.

Which for use means a LOT of Legos. I mean…people. They are everywhere. I’m working on getting them corralled to the basement and succeeding…it’s slow but sure. And I think I finally found a storage method that works for us – I’ll show you soon. (It’s not what you think either.) ;)

Anyhoo, a couple years ago I got this Pottery Barn table off of Craigslist for the playroom:

red table

My goal for two years now was to paint it and then cover the top with Lego sheets so it would be a big huge table for him to play on. Well, it moved downstairs about a year ago, into the almost-finished basement, and I swear to you I haven’t seen the top of it since.

We (he and I) were always throwing stuff on it and even when it was kinda cleared off he rarely sat at it and used it. He’d much rather be on the floor doing Legos (or games/toys), or at a higher table, like in the kitchen.

What’s funny is we gained all this additional square footage with the basement, but all I’ve done is get rid of stuff that was down there. I want the basement family room to be open and non-cluttered but when that’s the goal there’s less room down there than we thought there would be.

So a few weeks ago I came up with a plan. First part was to get rid of the table – it was a clutter-catcher and a beast. Huge. To set things up the way we wanted there was just not a spot for it so thankfully a friend took it off my hands.

The second part of the plan is this tray I came up with. I’ve made wood trays before – you just start with a base:

DIY wood tray

I got a piece of wood from the hardware store and had them cut it down to 30 inches – I wanted it that size for a number of reasons. First, I wanted it HUGE so the Bub had a ton of room to play on it. I also needed the Lego tiles to fit just right and they were ten inches wide.

I didn’t take pics of putting it together, but you can see how I made the tray in our family room here:

DIY wood tray

It was the same exact process for this one.

Initially I was just going to stain the sides of this one because I knew the bottom would be covered with Lego sheets. But at the last second I had an idea and stained the whole thing. I used the dark Kona stain I used for the top of the basement cubbies and then added hardware:

DIY wood tray hardware

I got these from Lowe’s – they were inexpensive and simple but I wanted the handle to be really easy to grab.

We laid out the Lego mats and immediately the kiddo was playing:

lego tray for floor

He loved it! When this idea came to me I planned on gluing the tiles down, but later decided not to (more on that in second). They stay in there just fine. And at one point the width was just slightly under 30 inches so I had to cut down a couple of the Lego mats just a tad – but I just did it with regular scissors, so easy!

My boy was in heaven – the first set up was a basketball game because he’s absolutely obsessed with it right now (thanks to Daddy and the Big Ten Champs IU! Whoot!):

lego tray floor

Legos are not cheap but we are happy to encourage his love for them (well, I’m not happy when I step on pointy ones in the dark, but whatever) – I love how his creativity comes out – he found pieces to make basketball “hoops”:

lego tray floor lego tray floor 

Did you know Harry Potter was a basketball player? Me neither.

So here’s the thing – I made this tray so it did something extra special:

 lego tray floorlego tray floor under sofa storage

Awww yeah bay-bee! It hides perfectly away under the sectional. Ours is really low to the ground and it still clears it just fine (I was prepared to raise up the sectional ever so slightly if I needed to). That is why I wanted the handles to be easy to grab.

It’s accessible from both sides of the sofa but he likes to pull it out in the open space behind. WE LOVE IT.

Another reason I made this so big was so we could use it for other reasons too – we can easily carry it over to the top of the ottoman down there so he can put sets together up higher. But we also use it to play games:

DIY wood tray game tray

At first I thought we would remove the mats but there’s no need at all. They are a great surface for the game boards:

DIY wood tray game tray

And I’m so glad at the last second I decided to stain the bottom too – because now we use it for movie nights, pizza dinners, snacks:

DIY wood tray entertaining

Again, we could just leave the mats on (it takes 30 seconds to take them off or put them back on) and most of the time we probably will. (With them removable that means I can wash them too!)

I love how big it is because it fits over the ottoman perfectly – it’s like it was made for it. ;) And it’s sturdy enough we can put our feet up on it and it’s not going anywhere.

So I was able to get rid of a big table that was taking up tons of space and not being used and replace it with a multi-functional one that we can hide away when we’re done:

hideaway Lego tray for floor

Love!!

The cost to make the tray itself wasn’t too bad – I think about $20 for the base and $4 for the handles (I had the trim pieces for the sides), which I didn’t think was too bad for that size. The Lego mats were the cost here – but we will use this and the mats for years to come so it was a worthwhile investment for me.

I love figuring out a way to make things work better for everyone in the family, but I’m most thrilled that the Bub loves it so much. He uses it every day.

So do you have a Lego-obsessed kiddo (or adult??) in your house? I gotta admit, even though they drive me bonkers some days they are fun to do – almost cathartic in a way. And I love seeing what my son comes up with!

Linking up at Traci’s Best of March party!

Friday, March 8, 2013

House Happy

Heya! Happy weekend, whoooo! I’m ready for some rest, hanging with the family, a little shopping and some DIY, of course!

I’ve decided to do a “House Happy” post maybe a couple times a month – just sharing pictures from around the house or from out and about that make me smile. Some will be from Instagram or Facebook, some just from stuff I snap with my phone.

I found these CAUUUTE mason jar soaps at Bath and Body Works earlier this week:

BBW

They are plastic and I may have gasped when I saw them, too darn cute. They come in a few different scents.

I passed up the first fiddle leaf tree I’ve seen ANYWHERE around here because I can’t find a definitive answer on if they are toxic to cats:

fiddle leaf tree

I’ve read they are toxic on some sites but I’ve also found numerous people online saying their cats don’t even try to nibble (the leaves are really thick) or they do and are fine. Anyone with cats have one?

Speaking of cats, we got our latest kitty almost a year ago now and she is a HANDFUL. I’ve had a cat pretty much every day of my life and she is by far the feistiest one ever. But she makes us laugh pretty much every day, and she loves her Bub:

Nya kitty

They fell asleep like that the other night. :)

I found this quote on FB and shared it this week:

passion

I consider it one of the greatest blessings of my life that this has happened to me. :)

If you are looking for fun books to read with the kiddos we highly recommend the pigeon books:

pigeon kids books

They are SO funny. We all end up cracking up by the end, they are a joy to read!

I’ve been working on some storage for the laundry room – I had to come up with a way to make the cabinet taller so this is it:

project

It looks horrible there but I swear it will make more sense soon. ;)

I was browsing one of my favorite antique spots last weekend and laughed out loud at this:

This is so not me by the way, but it’s dang funny.

My kid is pretty much the most awesome kid ever, for so many reasons -- but one is that he likes going through model homes with me. He will see one while in the car and ask if we can walk through it – love him. And then when we drive by a regular house and I say how pretty it is, he’s like, “Can we go inside??” I wish my boy, I wish.

Anyway, I saw this in one of the model homes and thought it was cute – the faceless ballerina kind of weirds me out, but I LOVE the tulle tutu idea for a girls room:

tutu on wall

Precious!

I saw this one on Facebook the other day too and could not stop giggling about it:

spring

We had a sunny day here today for the first time in all of March!! It is melting away the snow and I can just taste spring!

And finally, best news in a long time for NKOTB fans – they’re baaaaack!! I’ve already got my concert tickets for this summer, aww yeah! The video for their newest song was released yesterday and I know I’m a little biased but it is the most entertaining video I’ve seen in a really long time. (OK, it’s been a really long time since I’ve seen any videos, but for real.)

I love how it’s shot, I love the idea behind it, the music, the guys (HELLO) – so fun. Check it out here Blockheads:


Have a GREAT weekend! Chat with ya Monday!!