Friday, September 20, 2013

EASY crockpot applesauce

What is up? Happy Friday to ya! So fall officially starts Sunday! It’s been “official” for me since the temps hit the 70’s around here, but whatev. Details.

Last weekend we went apple picking, it’s a long-standing tradition for us. Most of the apple varieties weren’t ready (I thought it was pretty early to go picking!), but that just means we’ll have to go back. Darn. We just picked mostly Jonathan’s that day and ended up with 15 pounds of apples. I always go a little overboard. :)

This year I wanted to try something I’ve always wanted to make. Of course I thought it would be a long laborious process involving smashing 25 apples by hand or something like that, but I was OH so wrong.

When I mentioned that I was going to make applesauce earlier this week, my friend Cristina mentioned she was making some. I asked for her recipe and she was all, oh I just throw the apples in a pot with some cinnamon and it’s totally easy and MIND BLOWN.

I had no idea! So I did a little research and found she was totally right. (Not that I didn’t believe her of course.) Here’s the recipe I used and of course I used my crockpot – I threw it all in and came home to applesauce. You can’t beat that.

You only need three ingredients – ten to 12 apples (I grabbed 12 because some of mine were small, but ended up using 11), sugar and cinnamon:

crockpot applesauce

The first step is the only one that takes time – you need to peel, core and cut up the apples. Thankfully I’ve had an apple peeler/corer/slicer for years:

apple peeler slicer corer

I honestly think I’ve had this for about 12 years and I rarely use it. (It’s called Peelota. Har.) But it’s one of those things you don’t get rid of because when you need it, you really need it. This is one of those times.

This doodad ROCKS:

apple slicer corer

It made quick work of getting them all ready to go. They looked like this when I was done:

easy crockpot applesauce

I just cut the apples in half from the top. If you don’t have one of these you’ll want to slice them up or just cut them into chunks.

I dumped them all in the crockpot and then added 1/2 cup of sugar and didn’t even measure the cinnamon, I just sprinkled (a lot):

simple crockpot applesauce

I added a dash of nutmeg too – because I’m wild and crazy like that.

I didn’t even stir – just left it as it was, put the lid on and set it to cook on high for four hours. We left the house for the evening, came home and could smell it…wow!

I stirred it up a bit and was freaking (in a good way), because it looked SO GOOD:

easy applesauce recipe

Here’s the thing – I’ve never heated up applesauce at home. Have you? Uhh…it’s amazing!

It was incredibly yummy. Like a dessert really – I like it chunky (name that movie) so I left it as is. Hubby and I both stood over our bowls in the kitchen and stuffed our faces with it. And then did it again later, and I’m doing it again right. now.

SO GOOD, so stupid easy:

Simple crockpot applesauce @ simplehomeinteriordesign.com

And not too horrible for you either!

This batch is almost gone already but I’ll be making more for sure and want to can it when I do. What a lovely little gift for the holidays, right?

Next time I’m going to try it with just a 1/4 cup of sugar though – I really don’t think it needs half a cup. I’ll let you know how it turns out.

Here’s the recipe for you again:

10-12 apples -- peeled, sliced, cored
1/2 cup sugar (less would be fine)
sprinkle cinnamon on top – at least a teaspoon
dash of nutmeg (not needed)

There you go – have I blown your mind? Or all you all, duh Sarah…it’s totally easy. I really had no idea. Now go get some apples and cook it up! You will thank me. :) Have a GREAT weekend!

Thursday, September 19, 2013

Insulatin’ and drywallin’

Yo. I’m back with another DIY project I finished up this weekend. This was a big one and although it’s not necessarily pretty…it’s pretty fantastic. ;) At least I think so. It’s awesome.

For years now I’ve wanted to finish insulating and drywalling our garage. Most of it already is, but the exterior walls (those not touching the house) aren’t. We could have paid for the builder to do it but it was one of those, “OH we can SO do that ourselves”…and nine years later here we are.

The thing is we have a bedroom above the garage and although it’s not too bad, it does get warm in there in the summer. The cold in the winter really isn't too bad, but in the warmer months it is definitely the hottest room in the house.

Yes, the warmer months are about done, but the thing is – this job isn’t the most fun to do when it’s hot out. More on that later. :) But either way, it’s something I’ve wanted to start for a while.

Have I mentioned I’ve never insulated or drywalled before? Yeah. Well, I’ve taken bits of insulation and filled in spots in our basement so there’s that. But the big roll and massive pieces of drywall? Nope.

But I’m a DIYer and I’ve watched a lot of DIY shows so those two things together made me feel like I could totally do this. (Insert tool man grunt.) I figured it couldn’t be that hard…and for once that thought went through my head and I was actually right! Usually when I dare to think that it turns into a horrible day when doors fall and I have a hole in my house.

Let’s start at the beginning. First things first – our garage is a DISASTER right now. I’m almost done decluttering the house and a lot of stuff has gone to live out there till I can figure out where to put it…out there. So really, it’s a mess. We can still park our cars in there so yay for us, that’s something!

I decided to try out my insulating and drywalling skills on this wall:

What wall you ask? Oh let me just move all the STUFF and I’ll show you:

There we go. For real, half the time I spend on projects is just moving stuff out of the way.

Next, I geared UP. Insulation can make you itchy if you touch it, although I hear it depends on the person. If you have more sensitive skin it’s more likely to bother you. I don’t but the thought of getting itchy freaks me out so I wore long sleeves and gloves.

And the mask and safety glasses are a must:

DIY safety gear

So pretty right? I know.

THIS is why I waited till the hot weather broke. It was a beautiful, cool day and I still ended up sweating. And every time I breathed into the mask it fogged up my glasses and couldn’t see so those were fun times.

Anyway, I went to my local True Value (check out locations near you here) for the goodies for this project – they were SUPER helpful. I mean, I knew from my shows how to install it, but I was clueless on what kind to pick out. I found out you need to decide on a few things – faced or nonfaced (I went with faced which means it has a paper barrier), you need to know if your studs are 2x4’s or 2x6’s (the 6’s are usually only for a wall with plumbing) and what R-value you want.

I’m not trying to heat and cool the garage or anything, I just want to keep it a little more protected from temps, so I went with the R-13, which is pretty standard:

picking out insulation Of course the section I wanted to do only had two areas that were the standard 15 inch width for the insulation to fit right into. Those were SUPER easy and fast to do. You just cut it down and then stuff it in. More on that in a bit.

For the areas between studs that were a bit (or a lot less) than the standard opening, I had to cut them down. I measured:
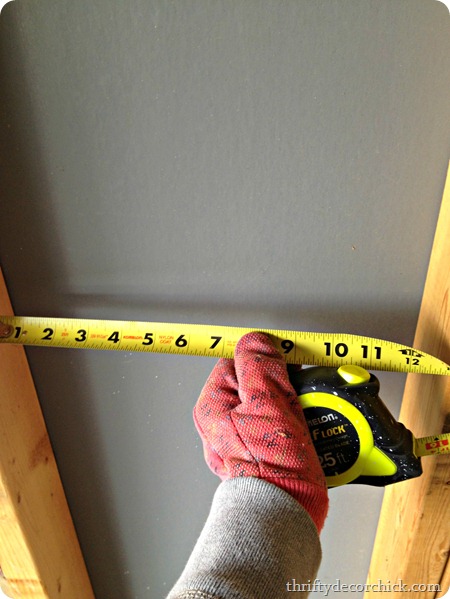
how-to-install-insulation

And this is how I cut the insulation – I just laid down a straight edge (anything would work) and used a razor to slice next it:
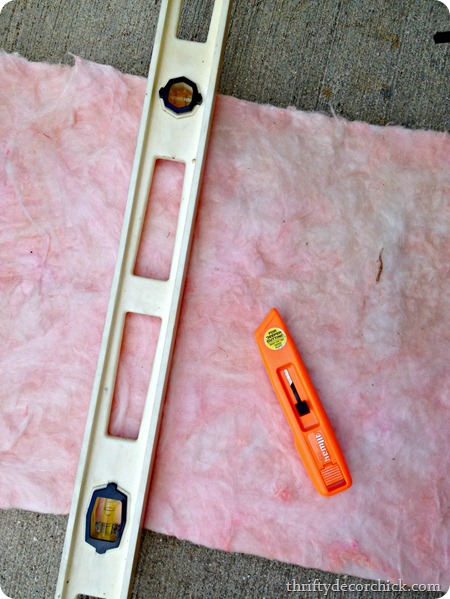
how to cut insulation

I did that right on the cement so I went through a couple razors, but it worked great. When I had to cut the whole piece long ways I did the same thing – but didn’t worry about it being perfect. The beauty of this is that you’re able to kind of push it where it needs to be.

I used the scraps from cutting them down in little spots like this:

how to insulate a wall

And this area along the bottom:

how to insulate a wall

Two things to note real quick -- you don’t want to smoosh insulation too much. I read that it reduces it’s insulating qualities if you flatten it. Also, I didn’t have to worry about light switches or electrical lines on this wall (but I will on others):
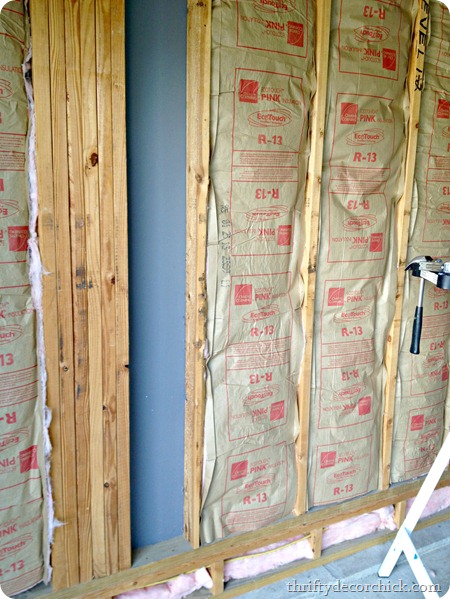
installing insulation

I did look up what to do with those and for light switches you’ll want to cut out around the switch so the insulation fits snug in there. And if you have a cord running through the middle of the wall I read you can “split” the insulation right up the middle. So take the front and back and pull them apart – put the back part behind the wiring and front in front of it (near the area that will be drywalled).

I did read it doesn’t matter too much when it comes to wiring but this seemed like a good idea to me.

So you need to secure the stuff to the studs – I always thought you just stick it in there (and it does stay on it’s own) but over time I can see that it would droop. I just used the stapler I use for upholstery projects for this:

how to install insulation

I didn’t do a ton of staples – maybe five or six on each side?

I was pretty darn pleased with myself when this was done:

insulated wall

I have to say this project was strangely satisfying – I really quite enjoyed it. I don’t know what’s wrong with me either.

NOW it was time for the drywall. I was nervous about this part, not gonna lie. I’ve patched holes in the wall with drywall but never hung it. And man, it is HEAVY. My husband helped me and we started by installing one up high first. We set it on a ladder and then he held it up so I could get a few screws in. No pics of that part, but you get the gist. I knew where the studs where from the little bit of drywall that was installed up higher on that wall (not sure why the builder did that but not the lower parts?).

The lower piece was too big by less than a half an inch, argh! It was all going SO well. :) So I did what they do on the DIY shows – held up my level, scored it with a razor and then knocked off the edge:
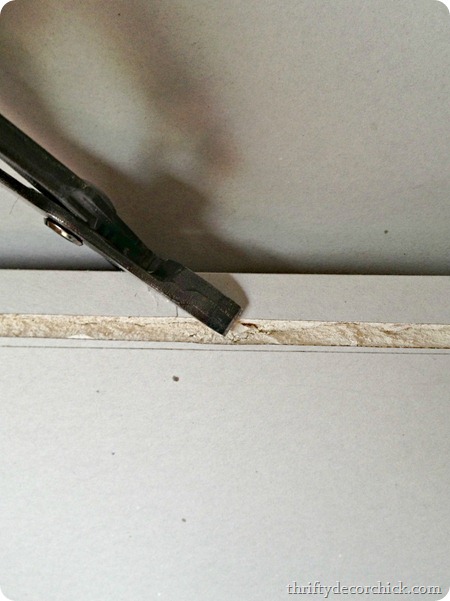
cutting drywall

On the shows they do this and it comes off clean, but this was such a small part. I had to use a wrench and just grab it and pop it off, piece by piece. I think that took longer than hanging the two sheets of drywall.

I turned that drywall over so that rough edge was on the bottom and you wouldn’t see it. :)

I did it! One wall done!:

how to insulate and drywall

SO much better right? I mean, obviously all the junk is gone. The only items I put back were our folding chairs – I like having them right there so I can throw them in the back of my car when we need them. I put everything else away and I’ll decide after the rest of the garage is done if anything will go back.

All along I wasn’t planning on even taping or mudding the new drywall in the garage, but now that I see it I think it will look even a million times better if I did. I already have both from a patching job, so I’ll get to that part soon. I’d love to paint our garage someday too – but for now it’s staying bare. I call it “drywall gray.” So hip.

Here’s a another shot with a before and after to truly appreciate the GREATNESS:

drywalled garage 

It makes me want to wallpaper it or something. It’s hard for me to look at a large empty wall and not do something to it. I’m holding back though -- there is beauty in empty, at least in the garage.

And the bonus is it forced me to clean out that spot so I now can successfully get in and out of my car!

Have you ever tried insulating or drywalling? Overall it was way easier than I thought it would be, but we didn’t have to lift up much drywall either. Now to declutter, organize and drywall the rest of the garage. (I’m kind of excited.)

For more tips on insulating and drywalling, check out more info here.

I was one of the bloggers selected by True Value to work on the DIY Squad. I have been compensated for my time commitment to the program as well as writing about my experience. I have also been compensated for the materials needed for my DIY project. However, my opinions are entirely my own and I have not been paid to publish positive comments.

Tuesday, September 17, 2013

DIY roll out drawer

Hey hey! Thanks for all the comments on my navy blue lamps. ;) Love them!

Today I’m sharing a DIY I did a loooong time ago, but I added a little finishing touch yesterday and realized that I never shared it with you all. I didn’t take pics as I did it all that time ago because I honestly wasn’t sure it would work. ;)

I think I’ll still be able to explain well enough how I put this together. My idea came from my desire to have these all over my kitchen:

container store roll out drawer

(source)

Ah yes…making those deep dark cabinets easier to use. ‘Tis a dream.

But that dream is expensive. Those up there are $45 each (for only 11 inches wide!), yowza. The organization in our kitchen island cabinets was nonexistent so I needed help -- but I didn’t want to spend that much to make them work. So I figured out my own way!

I’ve since seen some different ways to make this by making a shallow box for the stuff to sit in. I’m going to attempt something similar for the other cabinets later. But my version (using mostly what I had in the garage) works great!

I started with a set of drawer slides – you can find them at most hardware stores and they come in various lengths:

drawer slide

You’re supposed to install them on the sides of the cabinet and to the sides of a drawer, but instead I installed them on the bottom of the cabinet:

DIY roll out drawer slides

You’ll see I had to nail down some scrap mdf first because I realized right off the bat that my DIY “drawer” wouldn’t clear the lip of the cabinet unless I raised this up a bit.

I just secured the slides into the mdf using four screws – two at the front and two at the back:

diy slide out drawer

Since the drawer is pulled out now you’re seeing the bottom part of the slide here. That part is covered when the slides are pushed back.

I had a scrap piece of mdf I was planning on installing on top of the slides as my “drawer,” but I couldn’t figure out how to secure the two together. I couldn’t use screws because I couldn’t get to the bottom of everything, you know? I finally had an idea to use some heavy duty Velcro – I just stuck it to the top of each slider with the other part of the Velcro on top with the sticky side up. Then laid down my piece of mdf right on top, so the Velcro stuck to the bottom of it. Does that make sense? I hope!

Here’s what I ended up with:

IKEA pot lid holder

The Velcro connects the mdf on top to the drawer slides underneath. It also makes it so I can take it off if needed (which I did have to do once) – but that Velcro is crazy strong. It’s a struggle to get it off!

The reason I had to pull the wood board off was because the sides of it were scraping up against the screws that were used to put the island together on the sides of the cabinet. Just make sure you have plenty of clearance on each side before you install everything. 

The expandable metal rack is really a pot lid holder from IKEA, but I use them for pans here (and plates in the dining room built ins):

DIY roll out drawer organization

I didn’t want it to move around so I used some plastic holder thingamabobs to secure it to the wood.

My last addition to this project was the handle I installed yesterday. I usually just pull it out by grabbing the IKEA organizer, but this will be much easier.

My only purchase when I did this was the drawer slides – I had everything else on hand. So my version was $15 – much better than the $45 version. ;)

Mine slides easily, even with all the weight of the pans on it:

roll out drawer in cabinet

I forgot to mention – it pulls out SO far out of the cabinet: 

do-it-yourself roll out drawer

Awesome!! (Ignore my ugly pans.)

Oh and you’ll want to make sure your taller items are in front if you have that upper shelf inside the cabinet.

Well there you go – my DIY roll out drawer. :) Sometimes when you want something bad enough you figure out how to make it work! Do you have any of these amazing contraptions (bought or DIY’d)? I love them – they make it so much easier to access everything in the cabinet!

Monday, September 16, 2013

Glossy navy blue LOVE

Hello my friends! How was you weekend? We picked about 15 pounds of apples and one day this week I’m going to try making applesauce for the first time. It should be interesting. Wish me luck.

I got one big DIY project and a small one done this weekend and I’m equally excited about both of them. We’ll start with the smaller one today since it’s prettier. ;)

As some of you know, our master bedroom is going through a (sloooooow) metamorphosis. It started with new bedding I picked up months ago and then a DIY headboard and some paint. I still haven’t finished painting because I’m still deciding on the color. It may change. We’ll see.

I’m not one to knock my old decor, because at each point I loved where I was. Does that make sense? Deep. Anyway, I’m changing up our bedroom because I was just wanting a different look. We had the same paint up for eight years and I was itchin’. I sold our bed on Craigslist and I’m trying to use the cash from that to makeover the whole room.

At first I was hoping to reuse the sconces we used for light before:

sconces above bed

I did love having the light right above my head for reading. But the only reason those worked was because the bed was so tall – regular lamps wouldn’t work for us (the light was too low). And now that the bed is back near the ground again those sconces looked too teeny. SO. I ended up bringing some brass lamps up from the basement:

painting a nightstand

To see that nightstand redo go here. Your 80’s nightstand will thank you. ;)

I know many of you dug the brass as it was and I totally get it. I think in a different setting I may almost kinda maybe leave it as is. I’m not quite there with the shiny brass yet (I love an antiqued version, still not sold on this coming back). And they weren’t in the best condition either – they both had some areas that were corroded/worn/not sure what to call it. And both had stickers on them (for YEARS?) that I just couldn’t get off all the way (I had to just spray over them). 

So they needed some paint. I just couldn’t decide on a color. I didn’t want to go with a silver because I thought that would be too cold feeling – I wanted to warm up the space a little. The bedding has a blue/grey color in it, and I actually have a color that matches that pretty well – but I wanted more contrast than that.

And then one of you (LilClementine) suggested navy blue and the heavens opened up – THAT was the one. I picked up some glossy navy blue paint the other day and gave it a go. I started with primer – on a shiny metal like this it’s never a bad idea. All I had was a black primer so I just used that:

spray painting a lamp

I knew immediately I was going to like them more painted. I think the pretty lines of the lamp were lost with the shiny metallic. When painted a deeper color you can really appreciate them. I think so anyway.

And then I pulled out the blue. I was so hoping it would turn out like it was looking in my head:

navy blue spray paint

It did. :) I absolutely, totally LOVED it. Brilliant!!

I had some navy blue ribbon in my stash so I just wrapped it around the bottom of the lamp shade to tie it in a bit:

ribbon on lamp shade

So here’s the thing – the navy blue isn’t in the bedding or anything else in the room really:

how to spray paint

But there will be more of it now. ;) The older I get the more I realize things don’t have to match exactly. I think if I had used a color that was a match it wouldn’t have made the same impact. I love how it brings a bit of contrast and drama to the room:

navy blue lamp

Right? I LOVE them. Now I want to pull some navy into some pillows maybe, or in the drapes? I don’t know, like I said, this room is slow going so I’ve got time to decide. ;)

Yet again…if you haven’t used spray paint to transform something, do it. Today. OK, fine -- maybe later this week if you’re busy. Short, small burst of paint, not long ones. Move it quickly across the surface, don’t concentrate on one spot too much. Numerous quick coats are better than one heavy one.

Next up I need to finish the painting. Figure out what to put above the bed (the mirror just went up there to fill the space for now). Drapes. Recover the bench at the end of the bed. New floors?? We’ll see.

It’s coming along though and I’m really pleased with it (and my navy blue lamps) so far:

tufted headboard

What’s the last thing you spray painted that you loved? The best part about it – if you don’t like it it takes just a few minutes to change it again. Seriously the easiest way to change up your decor that I know of.

Friday, September 13, 2013

Fabric and pillow purge!

Hey hey! How’s your Friday the 13th going so far? Buwhahahaha.

As I’ve mentioned once or 50 times, I’m working my way around our house, decluttering one room at a time. I try to do this once a year but this time I’ve been crazy intense with it. I’m forcing myself to focus on one space at a time, which is really helping me to purge each space really well.

As I’ve made my way around the house I’ve gone through a LOT of my fabrics and pillows and decided what I’m keeping and what I’m not. I was going to take all of it that I’m not keeping to Goodwill, but I figured some of you might be interested? I kind of hate to give it away if one of you would use it.

So, I’m having a fabric sale today/this weekend. ;) I’ve measured every piece and I’ll show you how I’ve used them along the way as well. For the smaller pieces (that are really cute so I figured someone might be able to use them) I’m just asking for $1 for handling and then shipping.

If you see something you’d like just email me at simplehomeinteriordesign (at) gmail (dot) com and give me the exact name of the item and how many if there are multiples. I will only accept payment via PayPal for this little flash sale. :)

First up are a couple cute cotton fabrics I used in my basement craft room:

craft table

These are just smaller pieces leftover:

SOLD

These were going to be used as pillows for the book nook but I never got to it:

aqua and green fabric

SOLD

I loved this cute fabric but never ended up using it (I’m totally spacing on what this design is called):

SOLD

It goes well with this polka dot print that I used to cover the back of the plastic shelves in the basement (prior to finishing it): unfinished basement

I have a few pieces of this left:

polka dot fabric

SOLD

I was going to use this green quilted fabric on the kitchen stools years ago but decided against it:

SOLD

I got this for a craft and didn’t use it – love it though:

SOLD

This green floral is SO pretty – I was going to use it for roman shades but only had them up for a short time:

This is a nice thick cotton fabric. These are VERY roughly lined – like I just laid the lining down on them and used hemming tape so it’s not anything perfect:

SOLD

I got this red tulle to use at Christmas but the red was wrong (it is a true red, doesn’t lean burgundy like our ornaments). I like to use tulle as a DIY tree skirt

SOLD

I used this blue print to make some pillows to go with my Pottery Barn placemat pillows:

diy pottery barn pillows

It’s a thicker fabric, almost like an outdoor fabric, but slicker. It’s hard to describe. It’s VERY durable:

SOLD

I used this stripe fabric to make pillows for the family room years ago:

small sectional

I just have a small piece left, but it’s enough to make a lumbar pillow perhaps?:

red-blue-white-stripe

Stripe is 27x20, $1 plus shipping

And finally, one of my favorites – the P. Kaufmann fabric I used on the living room drapes:

mirror between windows

I have a few pieces of this left:

p. kaufmann fabric

SOLD

I also have a bunch of napkins and pillow covers, like this placemat I used to make pillows:

placemat pillows

I only have one left and it’s rust/brown:

placemat pillows

SOLD

I used these PB napkins to make the pillows I mentioned above:diy pottery barn pillows

I have three of these:

pottery barn ikat napkin

SOLD

And six of these PB napkins I was going to make pillows with too:

pottery barn stripe napkin

SOLD

Everything above has never been used by the way – the last few have but are clean and in good condition. This is a super soft PB pillow cover with zipper:

pottery barn soft pillow

SOLD

It looks like a gray blue when you look at it alone, but with other blues it looks more aqua, just an FYI. :)

These button PB covers were in that pic in the family room above:

rust pottery barn pillow covers

SOLD

I will iron these for you before I ship them. ;)

These are from wayyy back but are in great condition – they are red (they lean burgundy) zipper pillow covers that would be beautiful for Christmas:

red velvet pillows

SOLD

And finally, the rust shams we had on our master bed up till a few months ago: rust brown bedding

These were barely used – and when I say used I mean they laid on the bed a few times. I NEVER make our bed. Ever. They were from Target and are still in great condition:

rust target shams

SOLD

So there you go! If you are interested, just email me and let me know. I will edit this post if an item is gone! We will figure out shipping when you email me. :) These will all be first to email, first dibs. I’ll work down the list as they come in.

I hope some of you will enjoy these as much as I have (or will do something with them if I didn’t). :)

Take care and have a lovely weekend!