Thursday, September 27, 2012

Mini pumpkins three ways (fall linky!)

Well HEY! I’m back to finish up our series of fall linkies – this time we’re sharing easy, inexpensive, quick fall decor ideas here at TDC!:

fall linky parties

I’ve already shared a few of my simple fall decorating projects this year – the pumpkin wreath took less than 30 minutes because I just stuck everything in and called it done:

pumpkin wreath

And even making the new wood trough for fall goodies in the family room was quick:

fall decorating ideas

This time we’re going SUPER easy. And we’re using little bitty pumpkins.

Simple? Check.

Quick? Check.

Cauuute? Check. :)

These ideas are not earth-shattering, but they are not hard to incorporate into your own home. That’s the goal here. :)

I already kind of showed you this idea on the patio last week, but it’s worth showing again. Take any kind of vessel – a bowl, a basket…a pedestal even. And pile in some pumpkins (OK, gourds too):

decorating with pumpkins

You can add some extras like leaves or beady things too, but I’m drawn to the simple look of these as they are. And I LOVE the combo of the wood next to the pumpkins!

Simple idea No. 2 – I took a glass container and a big candle and filled in the sides with the itty bitty pumpkins:

easy fall decor

Of course light the candle at your own discretion. I would not, just because it would stress me out a bit. ;) But it took about two minutes to throw together.

Recently I saw an idea in a magazine where they filled the vessel with water and added flowers to the top, instead of the candle inside. LOVE that idea too.

Speaking of magazines – the inspiration for this one was taken right off the cover of the latest BHG mag:

decorating with pumpkins

I used a former brass clock (Goodwill find) and turned it into a cloche. (I showed you how here.) I just laid some fluffy moss inside and piled a couple pumpkins on top. I love the contrast of the deep green and the orange of the pumpkins!

I loved the simple version, but had to go just a big bigger – my cheese plate dome-turned-cloche was big enough to hold even more of the cutie pumpkins:

decorating with pumpkins

I added some more of the moss around the edge of the cloche and l LOVE this one even more! Too cute!

Now I want to see your ideas!! Like always, I appreciate a link back to this post or my blog and you can use this button and code to do so:
Fall Party
<div align="center"><a href="http://www.simplehomeinteriordesign.com/" title="Fall Party" target="_blank"><img src="http://i916.photobucket.com/albums/ad2/bethcrabtree/Fall_Link_Party_Sarah.jpg" alt="Fall Party" style="border:none;" /></a></div>


Now let’s see your projects! :


Tuesday, September 25, 2012

Decorating the mantel for fall

fall mantel decorating

Hello all! How are you this fine fall day? Sorry this post is later than usual – I was sidetracked by a quick (if two hours there and two back can be considered quick) trip to IKEA. WHOO!

I’m back today with our fall mantel and will be linking up over at Kate’s shindig:

fall linky parties

Since our new, big mantel is still new to me, I wasn’t sure what I was going to do with it this fall. I knew I wanted something tall in an old vase I found antiquing last year and that was about it.

The starting point found me this past weekend when a friend and I visited a fall festival at one of our favorite shops. My local blog friend Angela was there and I found these ahhhhmazing floofy things in her shop:

fall mantel decorating

We don’t know what they are, but they scream fall to me. They are SO. COOL. Fluffy and soft and long and lovely. I put them in the vase at one end of the mantel, then started playing with colors, heights and textures as I went across:

fall mantel decorating

The wood frame was from Target (filled with a pic of the Bub from last Halloween – fitting I thought) and the copper pumpkin was a find in the dollar spot a few weeks ago as well. The deep metallic tone was just the pop I needed!

I loved the pumpkin wreath I made for the patio so much I ended up bringing it in. I have something in mind that’s a tad more neutral for this spot though so this one may go back out soon:

fall mantel decorating

I just hung it from a piece of burlap (that’s hot glued to the top of the frame).

I was at a BFF’s house the other day, lamenting that I have NO driftwood to decorate with. What kind of decor blogger doesn't have driftwood I ask??

Me.

Until she was all, OH, I have a pile of it from our trip to the lake! Huh? Do I even know her anymore? How was I not aware of her plethora of driftwood?

I used some of it in the middle of the mantel because I ask you…what says fall more than driftwood from the beach?:

fall mantel decorating

;)

I’m pretty excited about the next part people. I found some hydrangeas at Trader Joe’s last fall that I fell in LOVE with – and low and behold, the hydrangeas on my pretty Pee Gee trees in the back turn into those exact ones! The colors are fantastic:

fall mantel decorating

I can finally say…I got those beautiful flowers from my yard. Awesome. :)

The candlesticks were Goodwill finds I used in my Christmas centerpiece last year. I just spray painted them a copper color to tie in with the little pumpkin on the other side. And I finished it off with a big rattan pumpkin I’ve had for years, I think I got it from Target?:

fall mantel decorating

I adore all of these colors – I mean. LOVE.

The greens, creams, oranges and touches of metallic – they are what fall is all about around here: fall mantel decorating

I took some of these pics  yesterday on a sunny day, and some today when it was dark and chilly. (My favorite.) Perfect excuse to get a fire going:

fall mantel decorating

I love how everything works with my wood art I showed you last week:

fall mantel decorating

This is not the time of year when less is more for me…that comes in January and February. :) Now I crave warm colors and a cozy feel in our rooms, and our family room feels so cozy to me right now.

Like a fall hug.

Awwww, gosh.

Even the dog likes it:

fall mantel decorating

But he likes pretty much everything. :)

I can’t wait to see all the beautiful fireplaces and vignettes over at Kate’s! And don’t forget to come back and link up on Thursday when I host our last party – it’s all about easy, simple ways to add fall touches to your home. Anything goes! As long as it’s simple and easy. Or fall themed. Whatever.

Monday, September 24, 2012

Show us your basements (fun spaces)

Well hello there! I’m back on this beautiful (chilly!) Monday with another Show Us Your House link up! This time we’re sharing basements, playrooms and rec rooms. (Does anyone call them rec rooms anymore? How old am I?)

show us your house

As many of you know, we finally finished our basement this year. I say finally because we’ve lived her for 8.5 years and every four months or so of the past five we’ve said, “now we’re going to finish it!” And never did. :)

I thought it would be fun to show you some before, before pics of the basement, back when it was truly storage and a DUMP, and then show it now. Just because before and afters are my favorite. :)

I’ll start with the grody stairs:

When we decided to start using the space (years ago), even while it was unfinished, my first goal was to make those steps safe for my boy, who was just a wee one back then. We had cheap carpet installed and a I painted the walls, which helped a ton.

But now it’s even prettier with new (nice) carpet, new paint and light. Oh and a wood wall:

DIY wood planked wall dark stain

Like I said, for years the basement was purely storage. Storage for the insane amount of crap I didn’t need:

I organized that area and made it into my craft room:

messy basement

But you can tell by that pic that it rarely stayed organized. I had a STUFF problem. :)

Now, that spot looks like this:

Mohawk carpet honored tradition

Hallloooo…so. much. better!

Here’s where the real scariness began:

Told you. :)

And here is that same area now:

basement carpet

It actually looks even better now, cause we got furniture! WHOO! It’s made a HUGE difference down there. Can’t wait to show you.

And the amazing amount of stuff continued around the corner:

I have to tell you – I have gotten rid of an INSANE amount of clutter over this process. It has been a true eye-opening experience for me. For years I would purge the basement, and then it would become a pit of despair again…and I would do it all over. It made me aware of just how much stuff I don’t need – I don’t miss much of it. If any.

Now that spot looks like this:

basement blue gray walls

Well, it did a few weeks ago. I’ll show you the new furniture soon. :)

Here’s another before shot looking back into the space:

And here it is when it was finished:

Mohawk carpet honored tradition

(Can you find the little photo bomber?)

I say “finished” lightly – still so many things to do. The bathroom is still only about a third done. I’m getting anxious to get that moving – I’d love to have it done for the winter movie nights we plan to have down here. :)

We LOVE this space and I have so many plans for decorating it! I’m trying to force myself to get the bathroom done before I start on more fun stuff. :)

You can see more of our basement over the years and the finishing process here. And you can see more of our loft, (including the book nook!) which used to be the playroom, here.

Now let’s see yours! I love spaces like this – playrooms and basements are my FAVORITE. I have lots of favorites. :)

I’d appreciate a link back, especially if you’d like to be considered for the highlight post:

Show Us Your House
<div align="center"><a href="http://simplehomeinteriordesign.com/" title="Show Us Your House" target="_blank"><img src="http://www.homestoriesatoz.com/wp-content/uploads/2012/03/image34.png" alt="Thrifty Decor Chick" style="border:none;" /></a></div>


Here you go! Can’t wait to see your spaces! (And meet me back here tomorrow to see my fall mantel!)


Friday, September 21, 2012

Antique Farm House

**This giveaway is now closed. The winners have been contacted via email.


What is UP? Hope you had a lovely week! This week has been just crazy around here – I am SO looking forward to the weekend! It’s supposed to be unseasonably cool here (60 degrees?!) so we may have to get a fire roaring at some point. Bliss.

This weekend I have some goodies for you from one of my favorite online shops, Antique Farm House:

logo (1)

Antique Farm House is sales event kind of store -- they have several “events” going at once (with different themed decor) and about every other day a new event launches at 11a.m. (EST) and an older event expires. Their prices are pretty fantastic too.

If you love the look of antiques but don’t have a shop nearby, or if you just plain don’t want to leave the house, this site is for you. ;) I LOVE this stuff.

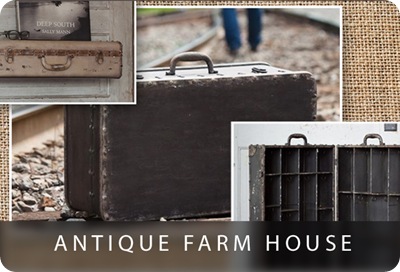
They have some beauties and I wanted to share a few of them with you. One of the newer events is one with a bunch of different repurposed suitcases:

repurposing old suitcases

I just saw a photo online today of an old suitcase repurposed into a dog bed – how cauuute! Love that idea!

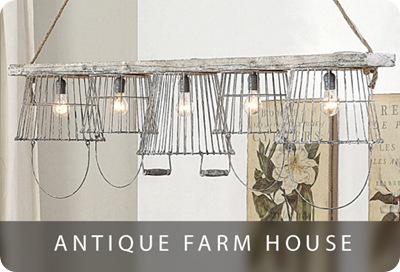
This light fixture is one of my favorite items they’ve carried:

wire basket light fixture

How cool would that look above a long farmhouse table? Swoon!!

I have a serious love of anything industrial lately – I love these pieces mixed in with a traditional look to mix things up a bit:

industrial decor

I adore those stools! The aqua color with the wood seat? LOVE.

These metal number signs are always popular over at AFH too:

I think they would look awesome lined up in a mud room with hooks underneath. :)

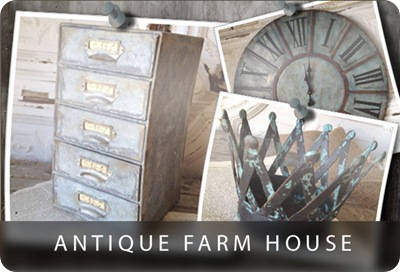
Of course there are a ton of accessories to pick from too – one of my BFFs shops this site and finds the CUTEST stuff. These all look like her:

I love that roman numeral clock…a LOT. I think she needs it. And I could borrow it. ;)

I love that you’ll find piece on AFH that you won’t find in stores. (At least I haven’t seen their items anywhere.) Like this iron mustache hook:  How cute is that! I love funky touches like that. Maybe for hubby’s coat and umbrella? :)

As always, I save the best for last…this weekend they are giving away two $50 credits for two of you to spend as you wish at Antique Farm House!

Here’s how to enter to win one of two $50 credits to AFH:

1. Leave a comment here. What’s up this weekend? Football game here, mixed with a little marching band. And I’m moving some furniture around…can’t wait to show you how it turns out. :)

2. Visit Antique Farmhouse here. Check out the different events (“current sales events” tab at the top) and come back to let us know the item you love the most.

3. Visit their Facebook page and “like” it here. Let us know you did in another comment. (If you already like it, leave a comment telling me.)

4. Subscribe to their email list here (you’ll get notices about the new deals) and if you do (or are already on the list), leave one more comment here.

* You can enter one, two, three or four times – it’s up to you! All options are not mandatory to win – they’re just extra chances. :)

* Remember if you comment anonymously or you have a private blog, please include your email address in each entry, and spell it out with “at” and “dot” to avoid any spammy emails coming your way.

This giveaway is open to the contiguous US only. It will be close this Monday, September 24 at 9 a.m. EST.

Have a WONDERFUL weekend!!

Thursday, September 20, 2012

A pumpkin wreath (on the patio)

fall outdoor decor

Heya! I’m back today for the next par-tay in our fall link up series: fall linky parties

Today we’re linking up fall outdoor decor over at Rhoda’s place (Southern Hospitality).

Last year I shared how I dress up the front of our house this time of year:

This year I wanted to do something for the back of our house – we had an AWESOME patio put in off our deck last summer and we are thoroughly enjoying it. The best part of the whole backyard is the stone fireplace we had installed.

I wanted to create a wreath I could hang on the fireplace – but it had to be able to handle the elements. Cause let’s be honest…I never take the outdoor stuff in. Like…ever.

I use the fake pumpkins from Hob Lob in our window boxes every year, and they hold up year after year. So I figured I’d start there. I had a stick wreath (from Hobby Lobby…of course. You know by now all this stuff comes from there.):

pumpkin wreath

I just started sticking in faux pumpkins. A few bigger ones first:

pumpkin wreath

And then some smaller ones around those:

pumpkin wreath

These all have a wire pic that comes out of the bottom of them, so I just stuck that into the wreath. NO GLUE baby. If the pic stuck out in the back I just bent it back into the wreath. Make sense?

I had most of the pumpkins already, but I did pick up some beady stuff (again, are you surprised??) on sale. They were in big bunches, so I took them apart:

pumpkin wreath

And filled in between the pumpkins:

pumpkin wreath

Three of the beady bunches (say that three times fast) were plenty for this size wreath.

It still needed some FLUFF, so I grabbed some feather jobbies as well (all this stuff is 40 percent off ALL the time at HL):

pumpkin wreath

I had them in gold and brown and used both colors – I just snipped each one off the pic and stuck them in here and there:

pumpkin wreath

And because I could NOT resist them…I added just a couple little butterfly pics too:

pumpkin wreath

They matched too well not to. I tried to resist the butterfly cuteness but they won out. :)

It took about 20 minutes to stick everything in (no glue helps to speed things along), and I was THRILLED with how it came out:

pumpkin wreath

I rigged it up around the top of the fireplace with some jute twine – I tried one of those sticky wall hooks but it didn’t stay up for two seconds on that stone. The addition of the feathering things may make it a little less weatherproof – but I SWEAR I’ll bring it in when it rains. I love it that much. ;)

It is the perfect fall addition to the patio!:

pumpkin wreath firplace

We spend more time out here in the fall than any other time of the year – for two reasons. 1. Summer is too hot for fires. ;) 2. Mosquitoes LOVE ME. I can’t even be outside after sunset or I’m eaten alive. Uck.

I added some mums for some more pops of color, but didn’t have any extra planters. So I hid the cheapy plastic pots with some burlapy fabric I had:

decorating with mums

I just tore off a strip and wrapped some twine around it to keep it on there. I wanted those cute wood planters some of the mums come in, but the stinkin’ mums are more than DOUBLE the cost just for those simple little planters with them. Nah way.

Last year I had big mums in the pots, but the plants I put in there earlier this summer are doing so well I will leave them:

fall planters

I have no idea what they are, but they grow big and full – love them! The petunias survived our drought summer -- the twisty evergreen trees I planted in the spring did not. :)

The placemat pillows have been out constantly for the past year (even some of the winter…told you I don’t take stuff in) and other than being a little faded, they are doing quite well!:

placemat pillows

The patio is ready for plenty of crisp fall evenings – around here they usually consist of a fire, some wine, maybe some marshmallows and a barking (but adorable) dog:

stone patio outdoor fireplace

When are you heading over? Bring an extra blanket and you’ll be set. ;)

Can’t wait to see all the outdoor spaces over at Rhoda’s!

Don’t forget the Show Us Your House shindig will be this Monday, the 24th (I moved it back this month.) This month’s space is basements, rec rooms, playrooms – anywhere you relax and have fun!

We’ll be back with a couple more fall posts to finish up this series next week!